Zesty Homemade Lemon Tart Delight
This lemon tart recipe is wonderfully simple to follow, even if you’ve never baked before. The bright, tangy flavor of lemon shines through in this classic treat, making it perfect for any occasion or just a special homemade indulgence. And the best part? It’s completely halal, allowing everyone to enjoy this sunny slice of happiness. Let’s embark on this baking journey together!
Halal Ingredients You’ll Need
Before starting, gather all the necessary ingredients. Having everything measured and ready will make the baking process smooth and enjoyable. For this delicious lemon tart, you will need:
- 🍪 For the Crust:
- 1 ½ cups all-purpose flour (make sure it is halal certified if needed)
- ½ cup unsalted butter, cold and cut into small cubes (ensure halal certification)
- ¼ cup granulated sugar
- ¼ teaspoon salt
- 3-4 tablespoons ice water
- 🍋 For the Lemon Filling:
- 1 cup granulated sugar
- ¼ cup all-purpose flour
- ¼ teaspoon salt
- 4 large eggs
- ½ cup lemon juice, freshly squeezed
- Zest of 2 lemons (the outer yellow part of the lemon peel)
- ½ cup heavy cream (ensure halal certification)
- ✨ For Decoration (optional):
- Powdered sugar (for dusting)
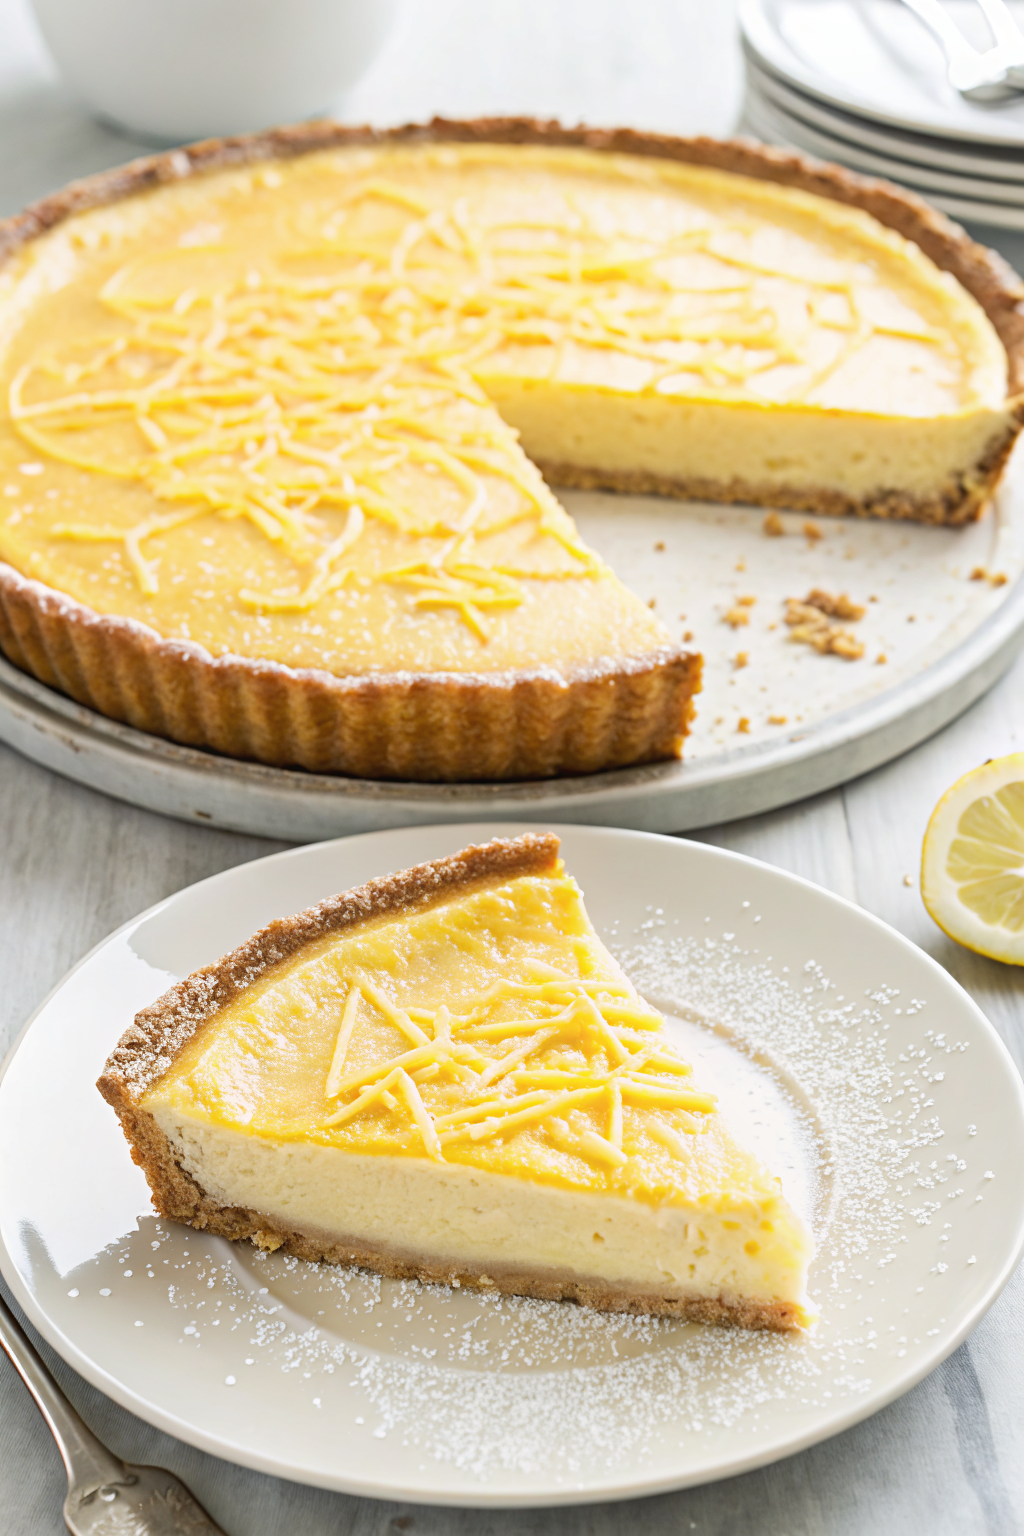
- Lemon zest strips (as seen in the image)
Kitchen Equipment for Making Lemon Tart
To prepare this recipe, you’ll need some basic kitchen tools. Don’t worry if you don’t have fancy equipment; simple tools will work perfectly.
- 🥣 Mixing bowls (one large, one medium)
- 🥄 Measuring cups and spoons
- 🔪 Knife and cutting board (for butter and lemon zest)
- 🍋 Lemon zester or grater (for lemon zest)
- 🥧 9-inch tart pan with removable bottom
- ✋ Pastry blender or fork (for cutting butter into flour)
- 🥄 Whisk
- 🌡️ Oven
- ⏲️ Timer or kitchen clock
- Cooling rack
Let’s Learn Basic Kitchen Techniques
For those who are new to baking, let’s quickly understand a few common terms and techniques that will be helpful in this recipe. Think of this as a mini-kitchen dictionary!
“Preheat the oven” means to turn on the oven to a specific temperature and let it heat up before putting food inside. This ensures the oven is at the right temperature for baking from the start. For this recipe, the oven needs to be preheated to 350°F (175°C). You can usually set the temperature using a dial or buttons on your oven.
“Zest a lemon” means to scrape off the outer, colorful part of the lemon peel. This part contains fragrant oils that add a lot of lemon flavor to the recipe. Avoid grating the white part underneath, as it can be bitter. A lemon zester or a fine grater can be used for this. You can observe in the image that the lemon tart is decorated with thin strips of lemon zest, showing how the zest is used.
“Cut in butter” is a technique used for making pie crusts and tarts. It means mixing cold butter into flour until it resembles coarse crumbs. This can be done using a pastry blender (a tool specifically for this), two knives, or even your fingertips. The cold butter and small pieces are important for making a flaky and tender crust.
“Whisk” means to mix ingredients together quickly using a whisk. A whisk is a kitchen tool made of wire loops, used to incorporate air into mixtures and blend ingredients smoothly. When the recipe says to whisk eggs and sugar, you should use a whisk to blend them together until they are well combined and slightly lighter in color.
Step 1: Making the Crust
Let’s start by preparing the crust for our lemon tart. This crust is called a “shortcrust pastry” and it is what holds the delicious lemon filling.
Step 1: In a large mixing bowl, put the flour, sugar, and salt. These are the dry ingredients for our crust. Mix them together using a spoon until they are combined.
Step 2: Add the cold, cubed butter to the bowl with the dry ingredients. It’s important that the butter is cold because this helps make the crust flaky.
Step 3: Now, “cut in” the butter. If you have a pastry blender, use it to press and cut the butter into the flour mixture. If you don’t have a pastry blender, you can use two knives. Hold a knife in each hand and use them to cut through the butter and mix it with the flour, in a criss-cross motion. Continue until the mixture looks like coarse crumbs, with some pea-sized pieces of butter still visible. Refer to the image to see the finished tart crust – it has a slightly crumbly and golden-brown appearance.
Step 4: Gradually add ice water, one tablespoon at a time, to the flour and butter mixture. After each tablespoon, mix lightly with a spoon. Add just enough water until the dough starts to come together and form a ball. Be careful not to add too much water, as this can make the crust tough. Usually, 3-4 tablespoons of ice water are sufficient.
Step 5: Gently gather the dough into a ball with your hands. Don’t knead it like bread dough; just bring it together. Wrap the dough in plastic wrap and flatten it into a disc. This will make it easier to roll out later. Place the wrapped dough in the refrigerator and chill for at least 30 minutes. Chilling the dough is important as it helps the gluten relax and makes the crust more tender and easier to handle.
Step 2: Preparing the Lemon Filling
While the crust is chilling, let’s prepare the flavorful lemon filling. This filling is what gives the tart its signature tangy and sweet taste.
Step 1: In a medium mixing bowl, whisk together the sugar, flour, and salt. These are the dry ingredients for the filling and whisking them together helps to prevent lumps.
Step 2: In a separate bowl, lightly whisk the eggs. Just whisk them until the yolks and whites are combined, no need to make them foamy.
Step 3: Gradually whisk the whisked eggs into the sugar mixture. Whisk until everything is well combined and smooth.
Step 4: Stir in the lemon juice, lemon zest, and heavy cream. Mix until all the ingredients are well incorporated and the filling is smooth and creamy. The lemon zest will add a wonderful fragrance and flavor to the filling. Notice in the image the vibrant yellow color of the lemon filling, which comes from the lemon juice and eggs.
Step 3: Assembling and Baking the Tart
Now it’s time to put everything together and bake our delicious lemon tart!
Step 1: Preheat your oven to 350°F (175°C). Make sure the oven is properly preheated before you put the tart in.
Step 2: Take the chilled dough out of the refrigerator. On a lightly floured surface, roll out the dough into a circle that is about 12 inches in diameter. It should be large enough to fit into your 9-inch tart pan with some overhang. If the dough is sticking, sprinkle a little more flour underneath.
Step 3: Carefully transfer the rolled-out dough to the tart pan. Gently press the dough into the bottom and up the sides of the pan. Trim off any excess dough hanging over the edges. You can do this by rolling a rolling pin over the top edge of the pan or using a knife. You can also crimp the edges of the crust for a decorative look, as seen in the image.
Step 4: Pour the lemon filling into the prepared tart crust. Spread it evenly to fill the crust.
Step 5: Bake in the preheated oven for 30-40 minutes, or until the filling is set and the crust is golden brown. The filling should be just set in the center, not jiggly but also not completely firm. You can check for doneness by gently shaking the tart – the edges should be set and the very center should have a slight wobble. Observe in the image the golden-brown crust and the set filling of the baked tart.
Step 6: Once baked, remove the tart from the oven and let it cool in the pan on a cooling rack for at least 30 minutes before serving. Cooling allows the filling to set completely and makes the tart easier to slice.
Step 4: Cooling and Decorating
After baking, cooling and decorating are the final steps to complete your beautiful lemon tart.
Step 1: Let the lemon tart cool completely in the tart pan on a wire rack. This usually takes about 2-3 hours at room temperature, or you can speed up the process by refrigerating it for about an hour. Make sure it is fully cooled before attempting to remove it from the pan.
Step 2: Once cooled, carefully remove the tart from the tart pan. If your tart pan has a removable bottom, gently push it up from the bottom to release the tart.
Step 3: Decorate the tart as desired. You can simply dust it with powdered sugar just before serving, which adds a touch of sweetness and elegance. Or, for a more decorative look like in the image, you can add strips of lemon zest on top. To do this, use a vegetable peeler to peel thin strips of zest from a lemon (avoiding the white pith), and arrange them artfully on top of the tart.
Step 4: Slice and serve! This lemon tart is delicious served chilled or at room temperature. It pairs wonderfully with a cup of tea or coffee.
Enjoy Your Homemade Halal Lemon Tart!
Congratulations! You have successfully prepared a beautiful and delicious homemade halal lemon tart. Baking can seem intimidating at first, but with simple steps and a little patience, anyone can make wonderful treats at home. The joy of making something from scratch and sharing it with loved ones is truly special.
Don’t be afraid to try this recipe and make it your own. Perhaps next time, you can experiment with different decorations or add a hint of vanilla to the filling. The possibilities are endless! We encourage you to bake this lemon tart and share your delightful creations with family and friends. Enjoy the satisfaction of knowing you’ve made a delicious and halal dessert from your own kitchen. Happy baking!