Your Stunning Cable Knit Carryall
Greetings, crafty friends! Feast your eyes on this incredible Cable Knit Tote Bag. Notice its solid shape, sophisticated style, and those deep, wonderful cable patterns – pure tactile delight! It’s the kind of bag that turns heads. Now, those cables might look a bit daunting if you’re newer to knitting, but don’t worry! With clear instructions and a bit of cozy crafting time, you’ll be able to construct this exact bag. Let’s round up what we need and begin the wonderful process of building your own beautiful, heirloom-worthy tote.
What You’ll Need
Before we dive into the stitches, let’s get our tools and materials ready. Having everything on hand makes the process smooth and enjoyable.
- 🧶 Yarn: Chunky or Aran weight cotton or a durable blend yarn (approx. 600-800 yards). The bag in the image uses a lovely solid light beige yarn, which really shows off the cable definition.
- 🥢 Knitting Needles: Size appropriate for your yarn (e.g., US 8 or 9 / 5mm or 5.5mm). Check the yarn label recommendation!
- 🧷 Cable Needle: A small, specially shaped needle to hold stitches temporarily when making cables.
- ✂️ Scissors: For trimming yarn ends.
- 🪡 Tapestry Needle: For weaving in ends and seaming.
- 📏 Measuring Tape: To check your progress and gauge.
- 📍 Stitch Markers: Helpful for marking pattern repeats.
- 🔩 Grommets/Eyelets (Optional but Recommended): 4 large (approx. 1/2″ or 12mm inner diameter) silver-tone grommets, just like the ones securing the handles in the picture. You’ll also need the setting tool.
- 🧵 Fabric for Lining (Optional): About 1 yard of sturdy cotton or canvas fabric if you wish to add a lining for extra durability and structure.
- 🪡 Sewing Needle & Thread (Optional): If adding a lining.
First Things First: Gauge and Basic Stitches
Okay, deep breath! Before casting on for the bag itself, let’s talk Gauge. This just means how many stitches and rows fit into a certain measurement (usually 4×4 inches). Matching gauge ensures your finished bag will be the size you expect. Make a small practice square (about 6×6 inches) in the main stitch pattern (stockinette stitch, explained below) using your chosen yarn and needles. Wash and block it as you would the final bag, then measure the central 4 inches. If you have more stitches than the pattern calls for in 4 inches, use larger needles. If you have fewer stitches, use smaller needles. Getting this right now saves headaches later!
Now, let’s define the basic building blocks:
- Knit Stitch (K): This is the most fundamental stitch. Insert your right needle into the front of the first loop on your left needle (from left to right), wrap the yarn around the right needle tip, and pull a new loop through. Slide the original loop off the left needle. That’s one knit stitch! It looks like a little ‘V’.
- Purl Stitch (P): The second fundamental stitch. Bring your yarn to the front of your work. Insert your right needle into the front of the first loop on your left needle from right to left, wrap the yarn around the right needle tip, push the needle back through the loop, pulling the new yarn loop with it. Slide the original loop off the left needle. Purl stitches look like little bumps or dashes.
- Stockinette Stitch: This is formed by knitting all stitches on one row (the “right side” or RS) and purling all stitches on the next row (the “wrong side” or WS). It yields a smooth, ‘V’ patterned fabric on the right side.
- Garter Stitch: Simply knit every single stitch on every single row. This produces a bumpy, ridged fabric that looks the same on both sides and doesn’t curl at the edges. The top edge of the bag has a border made using this stitch.
Building Your Bag: Piece by Piece
This tote is constructed from flat panels: a Front, a Back, a Base, and two Sides. We’ll make these individually and then assemble them. This approach is often easier for managing complex patterns like cables when you’re starting out.
(Note: Specific stitch counts depend heavily on your gauge and desired bag size. We’ll use example numbers for a bag roughly 15 inches wide, 13 inches tall, and 4 inches deep. Adjust as needed based on your gauge swatch!)
1. The Base Panel
- Cast on (get stitches onto your needle) approximately 20 stitches (or enough for a 4-inch width based on your gauge).
- Work in Garter Stitch (knit every row) until the piece measures about 15 inches long (the desired width of your bag).
- Bind off (secure the stitches so they don’t unravel).
2. Front & Back Panels (Make 2 Identical)
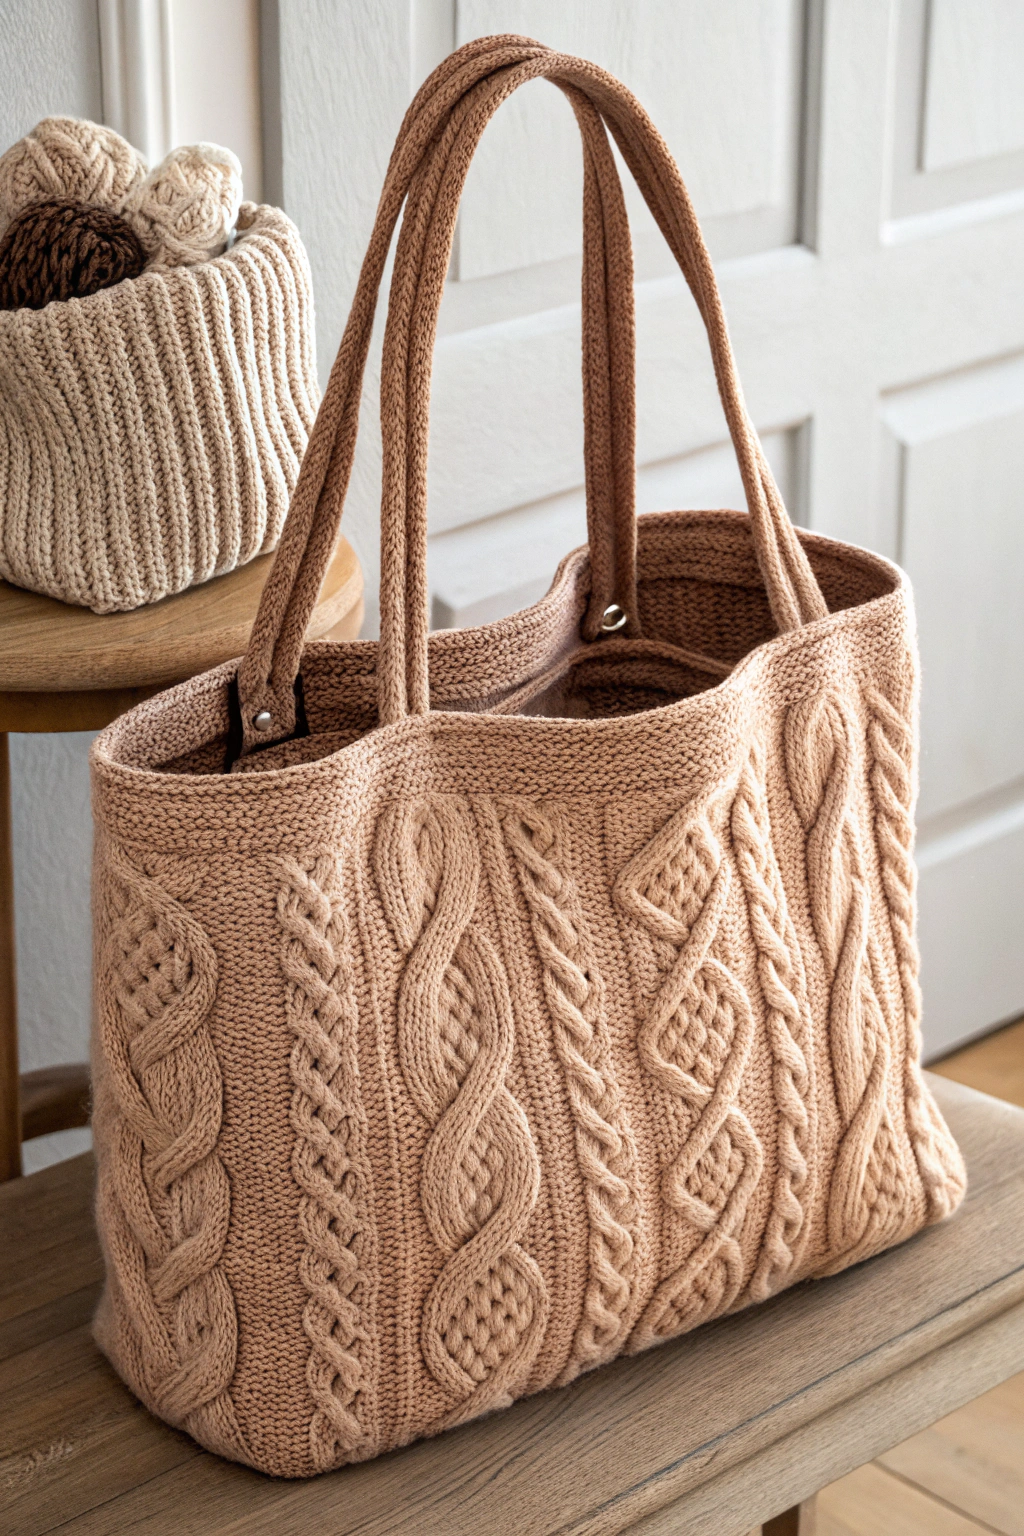
These are the stars of the show! They feature the gorgeous cable patterns visible in the image. Let’s break down the cables seen:
- The Image Details: The bag has multiple vertical cable panels separated by sections of purl stitches or narrow ribs. From left to right on the front (as seen in the image), there is:
- A thick, classic Rope Cable (looks like a twisted rope).
- A narrower, textured Braided Cable.
- A wider central panel featuring Traveling Stitches that form interlocking Diamond Shapes.
- Another narrow Braided Cable.
- Another thick Rope Cable mirroring the first one.
- The background stitch appears to be Reverse Stockinette Stitch (purl side facing out) between the cables, making the cables pop.
- Understanding Cables: Cables are formed by knitting stitches out of order. You temporarily hold some stitches on a Cable Needle either at the front or the back of your work while you knit the next few stitches, then you knit the held stitches. This crossing action forms the twist.
- C4F (Cable 4 Front): Slip the next 2 stitches onto your cable needle and hold it at the front of your work. Knit the next 2 stitches from your left needle. Then, knit the 2 stitches from your cable needle. This makes the cable twist to the left.
- C4B (Cable 4 Back): Slip the next 2 stitches onto your cable needle and hold it at the back of your work. Knit the next 2 stitches from your left needle. Then, knit the 2 stitches from your cable needle. This makes the cable twist to the right.
- Note: The exact number of stitches involved (e.g., C6F, C8B) and the frequency of the crossing rows will define the specific look of each cable (Rope, Braid, Diamond). You’ll need a detailed chart or row-by-row instructions for the exact panel configuration shown. For beginners aiming for this specific bag, finding a pattern with these exact cables charted out is highly recommended. However, the technique is the same.
- Making the Panels:
- Cast on approximately 70-80 stitches (enough for 15 inches width, accounting for the cable pull-in).
- Work a few rows in Garter Stitch for a non-curling bottom edge.
- Begin the main panel pattern: Follow a chart or written instructions for the specific cable arrangement shown. This will involve setting up sections of knit stitches (for the cables) and purl stitches (for the background/separators).
- Example Row Setup (Simplified concept – actual pattern needed for exact look): P4, K6 (Rope Cable section), P2, K4 (Braid section), P2, K12 (Diamond section), P2, K4 (Braid section), P2, K6 (Rope Cable section), P4.
- Work the plain rows (usually the Wrong Side rows) as the stitches appear (knit the knits, purl the purls).
- Work the cable crossing rows (Right Side rows) at regular intervals (e.g., every 4th, 6th, or 8th row) according to your specific pattern, using the CxF/CxB techniques described above to form the Rope, Braid, and Diamond shapes. Tip: Use stitch markers between the different cable sections to help keep track!
- Continue working in the established cable pattern until the panel measures about 13 inches tall.
- Work a few rows in Garter Stitch for the top border, matching the bottom edge.
- Bind off loosely.
- Repeat exactly for the second panel (Back).
3. Side Panels (Make 2 Identical)
- Cast on approximately 20 stitches (for a 4-inch depth).
- Work in your chosen stitch (Garter Stitch is easiest and matches the base/top) until the panel measures 13 inches tall, matching the height of the Front/Back panels.
- Bind off. Repeat for the second side panel.
Assembling Your Masterpiece
Now for the satisfying part – seeing it all come together!
- Seaming: Lay your pieces flat. Using the tapestry needle and matching yarn, carefully sew the side edges of the Front panel to the edges of the two Side panels. Then, sew the Back panel to the other edges of the Side panels, forming the bag’s body. Use a mattress stitch for neat, invisible seams if possible (there are great tutorials online!).
- Attaching the Base: Align the edges of the Base panel with the bottom edges of the assembled body (Front, Back, and Sides). Carefully sew the Base to the body all the way around.
- Weaving Ends: Securely weave in all loose yarn ends on the inside of the bag using the tapestry needle.
Forming the Handles and Finishing Touches
The handles in the image are thick, round cords, likely knitted I-cords or a similar technique, attached through sturdy grommets.
- Make the Handles (Example: I-Cord):
- You’ll need double-pointed needles (DPNs) for traditional I-cord. Cast on 4-5 stitches onto one DPN.
- Knit these stitches. Do not turn your work.
- Slide the stitches to the other end of the same DPN. The working yarn will be at the left end.
- Gently pull the yarn across the back and knit the stitches again.
- Repeat this process – knit, slide, pull yarn across back, knit again. A round cord will start to form.
- Continue until each handle is your desired length (e.g., 20-24 inches). Bind off, leaving a long tail.
- Make a second handle identically.
- Attaching Handles with Grommets:
- Mark the positions for your grommets evenly spaced on the top edge of the Front and Back panels (two per panel).
- Carefully follow the manufacturer’s instructions to install the grommets in the knitted fabric. This usually involves cutting a small hole and using a tool to clamp the two parts of the grommet together. Reinforce the area behind the grommet location with a small piece of sturdy fabric or interfacing on the inside before installing, if possible, to prevent stretching.
- Thread the ends of your knitted handles through the grommets from the outside to the inside. Securely sew the ends of the handles to the inside of the bag, near the top edge, using the yarn tails and tapestry needle.
- Adding a Lining (Optional but Recommended):
- Measure your finished bag’s interior dimensions (width, height, depth).
- Cut fabric pieces (Front, Back, Sides, Base) slightly larger than these measurements to allow for seams.
- Sew the fabric pieces together similarly to how you assembled the knitted bag, forming an inner bag. Hem the top edge.
- Place the fabric lining inside the knitted bag, aligning seams. Fold the hemmed top edge over neatly and hand-sew the lining to the inside of the knitted bag just below the top garter stitch border.
Your Beautiful Bag is Ready!
Take a moment to admire your handiwork! You’ve patiently worked through casting on, knitting, purling, cabling, and assembling to produce this fantastic Cable Knit Tote Bag. Every stitch tells the story of your dedication. Imagine the places you’ll go with this beautiful, sturdy companion by your side.
Don’t be shy – share pictures of your finished tote! Seeing fellow makers’ successes is incredibly inspiring. Happy knitting!