Your First Macrame Plant Hanger
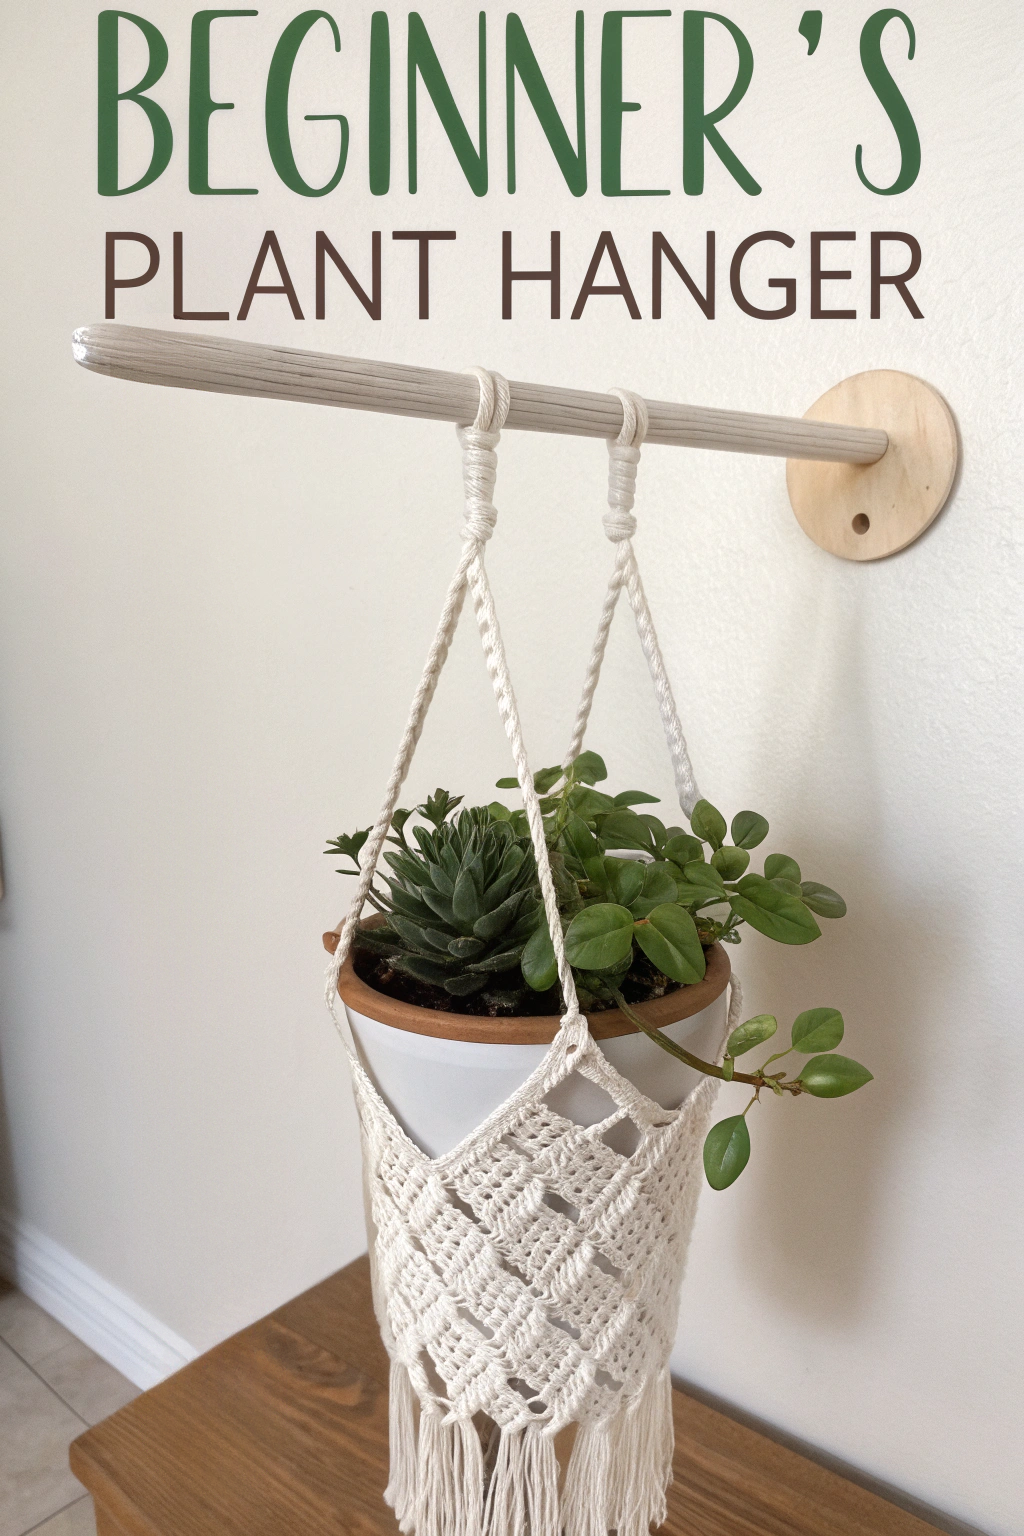
Ready to dip your toes into the wonderful world of macrame? This project is perfect for getting started! We’re going to make the gorgeous plant hanger you see in the picture – a lovely piece to add a touch of handmade charm to your home. Don’t worry if you’ve never knotted before; we’ll go through everything step-by-step. Let’s begin this fun crafting adventure together!
Gather Your Supplies
Before we start knotting, let’s get everything ready. Here’s what you’ll need:
- 🧶 Macrame Cord: About 24 yards of 3mm or 4mm cotton cord (natural/off-white, like the one pictured).
- 🪵 Wooden Dowel: Approximately 12-15 inches long and 1/2 to 3/4 inch thick.
- ✂️ Sharp Scissors: For clean cuts.
- 📏 Measuring Tape or Ruler: To get your cords just right.
- 🪴 A Small Plant Pot: To check the fit as you go (optional, but helpful!).
- ⚓ A Place to Work: A hook, clothes rack, or even tape on a table edge can hold your dowel while you work.
Getting Started: Macrame Basics
Macrame looks intricate, but it’s mostly built from a few simple knots. For this specific hanger, we’ll focus on two main ones:
The Lark’s Head Knot
This is how we’ll attach our cords to the dowel. It’s super simple!
- Take one piece of your cut cord and fold it exactly in half, forming a loop at the top.
- Bring this loop up in front of the dowel, then pass it over the dowel and down behind it.
- Pull the two loose ends of the cord through the loop.
- Tighten the knot gently by pulling down on the two ends. That’s it! Your cord is now securely fastened to the dowel.
The Square Knot
This is the workhorse knot for this hanger’s basket section. It requires four cords. Imagine them numbered 1, 2, 3, 4 from left to right. Cords 1 and 4 are your working cords, and cords 2 and 3 are your filler cords (they just hang straight down in the middle).
- First Half: Take the left working cord (cord 1) and pass it over the two filler cords (2 & 3) and under the right working cord (cord 4). It should look like a number ‘4’.
- Now, take the right working cord (cord 4), pass it under the two filler cords (2 & 3), and bring it up through the loop formed by cord 1 on the left side.
- Pull both working cords (1 & 4) gently but firmly to tighten the first half of the knot up towards the top (or the previous knot). Keep the filler cords straight.
- Second Half: Now we do the mirror image. Take the right working cord (cord 4) and pass it over the two filler cords (2 & 3) and under the left working cord (cord 1). This forms a backwards ‘4’.
- Take the left working cord (cord 1), pass it under the two filler cords (2 & 3), and bring it up through the loop formed by cord 4 on the right side.
- Pull both working cords (1 & 4) again to tighten the second half snugly against the first half. You’ve just completed one full Square Knot! It should lay flat and look symmetrical.
The Spiral Knot (Half Square Knot)
The hanging straps connecting the dowel to the basket possess a distinct spiral twist. This effect is achieved using only the first half of the Square Knot, repeated over and over.
- Using four cords (like for a square knot), only perform the first half: Left cord (1) over fillers (2 & 3) and under right cord (4). Right cord (4) under fillers (2 & 3) and up through the left loop.
- Pull tight.
- Repeat this exact same half-knot step (always starting with the leftmost cord going over) multiple times. You’ll notice the knots naturally start to twist into a spiral!
Building Your Plant Hanger: Step-by-Step
Let’s assemble this beautiful piece!
- Cut Your Cords: Cut 8 pieces of macrame cord, each 3 yards (or 9 feet) long. Precision isn’t vital, a little extra is better than too little.
- Attach Cords to Dowel:
- Take 4 of your cords. Fold each one in half.
- Attach these 4 folded cords to the left side of your dowel using Lark’s Head Knots, placing them close together. You’ll now have 8 strands hanging down from this section.
- Repeat this with the remaining 4 cords, attaching them to the right side of the dowel, leaving a gap of about 4-5 inches between the two groups. You now have two groups of 8 strands each.
- Fashion the Spiral Straps:
- Focus on the leftmost group of 8 strands. Select the first 4 strands.
- Make a Spiral Knot (Half Square Knot) repeatedly, always starting the knot the same way (left cord over). Continue making these knots until the spiral section measures about 10-12 inches long.
- Repeat this process with the next 4 strands in that same left group. You will have two spiral straps hanging from the left attachment point.
- Now move to the right group of 8 strands on the dowel. Repeat the process, forming two identical spiral straps, each 10-12 inches long.
- Start the Basket – First Row of Square Knots:
- Bring the two inner spiral straps (one from the left group, one from the right group) towards the center.
- Take the 4 strands from the end of the leftmost inner strap and the 4 strands from the end of the rightmost inner strap. You now have 8 strands together in the middle.
- Identify the centermost 4 strands. Using these 4 strands, tie one Square Knot about 1.5-2 inches below the end of the spiral sections. This connects the two sides.
- Now, go to the 4 strands hanging from the leftmost outer spiral strap. Tie one Square Knot level with the central knot you just made.
- Repeat with the 4 strands hanging from the rightmost outer spiral strap, tying one Square Knot level with the others. You should now have 3 Square Knots forming the first row of your basket.
- Build the Basket Netting – Alternating Square Knots: This technique produces the diamond pattern visible in the hanger.
- Row 2: To form the next row, you’ll skip the first 2 strands on the far left. Take the next 4 strands (which will be the right 2 strands from the first knot and the left 2 strands from the middle knot). Tie a Square Knot about 1-1.5 inches below the first row. Now, take the next 4 strands (the right 2 from the middle knot and the left 2 from the last knot). Tie another Square Knot at the same level. This row will have 2 knots, offset from the row above.
- Row 3: Go back to using the first 4 strands on the far left. Tie a Square Knot about 1-1.5 inches below Row 2. Take the next 4 strands (center 4). Tie a Square Knot. Take the last 4 strands on the far right. Tie a Square Knot. This row has 3 knots, aligned below the first row.
- Continue: Keep making alternating rows of 2 knots and 3 knots. Remember to always take 2 strands from one knot in the row above and 2 strands from the adjacent knot to form the new knot below and between them. Keep the vertical spacing between rows consistent (around 1-1.5 inches). Execute about 4-5 rows in total (or until the netted section is long enough to comfortably hold your pot). Check the fit with your pot if you have one!
- Finishing the Base:
- Once your netted basket section is the desired length, gather all 16 strands together evenly below the last row of knots.
- Option 1 (Simple Fringe): As shown in the image, there isn’t a large gathering knot. The final row of square knots simply holds the structure, and the cords hang freely below. Ensure your last row of knots is tight.
- Option 2 (Gathering Knot – if you prefer): Cut an extra piece of cord about 2 feet long. Lay it in a ‘U’ shape over the gathered strands, with the loop pointing down. Wrap the long end of the extra cord tightly around all 16 strands (and the short end of the ‘U’) several times, moving downwards. Tuck the wrapping end through the loop at the bottom. Pull the short end at the top upwards until the loop (and the tucked end) disappears under the wraps. Trim both ends of the wrapping cord closely.
- Trim the Fringe: Decide how long you want your fringe to be below the basket. Use sharp scissors to trim all the cords evenly. You can cut them straight across (as pictured) or at an angle for a different look.
Hanging Your Handiwork
Find a nice spot for your new plant hanger! Place your potted plant carefully into the macrame basket. The netting should stretch slightly to securely hold the pot. Hang the dowel on a sturdy wall hook or ceiling hook. Stand back and admire the lovely piece you fashioned with your own hands!
Enjoy Your Macrame Journey!
Well done! You’ve successfully worked through the steps to put together your very own macrame plant hanger. Doesn’t it feel wonderful to make something beautiful and functional? We hope you enjoyed the process and feel inspired to try more macrame projects. Feel free to share pictures of your finished hangers – we love seeing what you produce! Happy Knotting!