Whip Up This Simple Knit Potholder
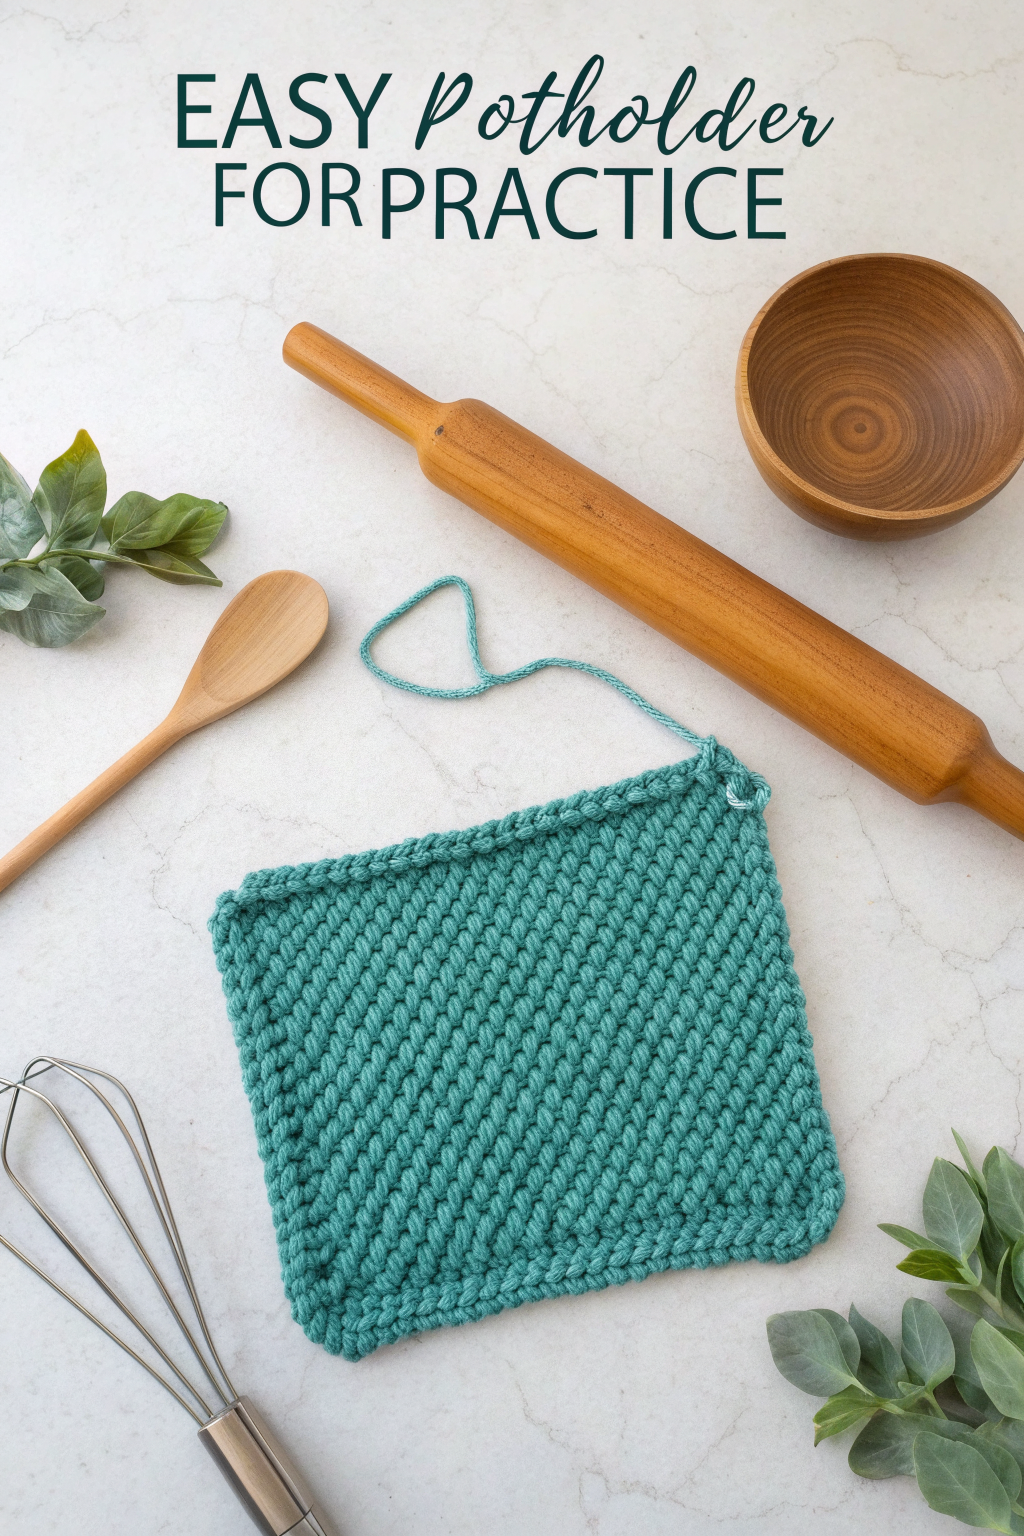
Isn’t there something truly special about making things with our own hands? Take a peek at the lovely teal potholder in the picture – it is so wonderfully textured and sturdy-looking! That diagonal pattern gives it such a neat look. Guess what? Putting together a potholder exactly like this one is totally achievable, even for folks just starting their knitting adventure! This project offers a fantastic way to practice the basics while producing something genuinely useful for the kitchen. It’s a win-win! Ready to dive in and fashion this little gem together?
Gathering Our Goodies
First things first, let’s round up the necessary bits and bobs. Having everything ready makes the process smooth and enjoyable!
- 🧶 Yarn: One ball of Worsted Weight Cotton Yarn is perfect. Sticking to 100% cotton helps with heat resistance, which is key for potholders! The piece in the image boasts a lovely solid teal green shade.
- 🪢 Knitting Needles: US Size 7 (4.5 mm) knitting needles generally work well with this yarn weight.
- 🪝 Crochet Hook: A Size G (4.0 mm) hook comes in handy just for making that little hanging loop.
- ✂️ Scissors: A trusty pair for snipping yarn.
- 🪡 Tapestry Needle: This blunt needle is essential for weaving in those yarn ends neatly at the finish line.
Getting Comfy with the Stitches (Simplified!)
This potholder has a delightful diagonal garter stitch pattern. Let’s quickly demystify the techniques involved, using plain language:
- Casting On: This is our starting point – getting those initial loops (called stitches) onto one of the knitting needles. Think of it as laying the foundation.
- Knit Stitch (k): The absolute cornerstone of knitting! It involves popping the right needle into a loop on the left needle, wrapping the yarn around, and pulling a brand-new loop through. Repeating just this stitch forms garter stitch – that fabric is squishy and shows rows of bumpy ridges, just like in the photo.
- Yarn Over (yo): This clever move adds a stitch to our count. It’s as simple as bringing the working yarn forward between the needles and then over the top of the right-hand needle before the next stitch is worked. This action generates a tiny decorative hole and helps the fabric grow.
- Knit 2 Together (k2tog): Need to make the fabric narrower? This is how! We insert the right needle into two loops on the left needle at once, treating them as one, and knit them together. Easy peasy – one stitch decreased!
- Binding Off: This secures all the active stitches when the knitting part is done, preventing any unraveling. It’s like tying a neat bow on our work.
- Crochet Chain (ch): Using the crochet hook, we’ll assemble the hanging loop with this super simple technique. It’s just pulling loops of yarn through other loops.
- Weaving in Ends: The final tidy-up step, where we use the tapestry needle to hide the starting and ending yarn tails within the fabric itself.
Knitting Our Potholder: Step-by-Step Fun
Alright, needles at the ready? This potholder is constructed on the bias, meaning we start small, grow it diagonally, then shrink it back down to form a square. It’s a pretty neat trick!
Starting Off:
- Let’s get 4 stitches onto one needle. A simple cast-on method works beautifully; many beginners find the long-tail cast-on quite sturdy and easy to learn.
Increase Section (Making it Grow):
The plan here is to add a stitch near the beginning and near the end of every row using those Yarn Overs (yo). This causes the knitting to widen diagonally.
- Row 1 (and all the rows that follow in this section): Knit the first stitch (k1), make a yarn over (yo), knit all the stitches across until just one stitch is left on the left needle, make another yarn over (yo), and finally, knit that last stitch (k1).
See? Two stitches were just added! Repeating this exact row over and over is the process. Our knitting will begin to look like a triangle, growing along that diagonal edge. Those little holes from the yarn overs will appear along the edges, adding a nice detail. Keep working this Row 1 pattern until one of the straight side edges (measure along a side running from the cast-on corner, not the edge with the needles) is about 7 to 8 inches long – or whatever size feels right for your ideal potholder. The piece will be distinctly triangular now.
Decrease Section (Making it Square):
Time to shape the other half! Now, stitches need to be decreased near the beginning and end of each row. This is where our ‘knit 2 together’ (k2tog) skill comes into play.
- Row 2 (and all the rows that follow in this section): Knit the first stitch (k1), knit the next 2 stitches together (k2tog), knit across until only 3 stitches are hanging out on the left needle, knit the next 2 stitches together (k2tog), and knit that final stitch (k1).
Excellent! Two stitches were just removed. Repeating this exact row is how we proceed. The second half of the square starts taking shape, mirroring the first half beautifully. Notice how those lovely diagonal garter ridges continue without interruption. Keep repeating this Row 2 pattern until only 4 stitches are left chilling on the needle.
The Grand Finale:
- Bind off those remaining 4 stitches nice and securely. Snip the yarn, leaving a tail about 6 inches long. Pull this tail through the very last loop on the needle to lock it in place.
- Grab that tapestry needle! Let’s weave in the starting tail (from the cast-on edge). Tuck it discreetly into the stitches on the back side of the potholder. Hold off on weaving in the end tail for just a moment…
Adding That Handy Hanging Loop
A little loop makes this potholder easy to hang up. It’s a lovely finishing touch!
- Pick up the Crochet Hook.
- Poke the hook right into the corner stitch where the final yarn tail is emerging.
- Use the hook to grab that yarn tail and pull a loop through the corner stitch. One loop is now on the hook.
- Time to make a crochet chain: Wrap the yarn around the hook (this is a yarn over in crochet, too!) and pull it through the loop that’s already on the hook. That’s one chain stitch done!
- Keep repeating this chaining action – maybe 10 to 15 times, or until the loop looks like a good hanging size. The length is up to personal preference!
- To close the loop, insert the hook back into that very same corner stitch on the potholder. Yarn over the hook one last time and pull the yarn through everything – the corner stitch and the loop already on the hook. (This joining move is called a slip stitch).
- Snip any excess yarn tail, leaving a few inches. Pull this tail end completely through the last loop on the hook to secure everything tightly.
- Now, with the tapestry needle, carefully weave in this final end, making sure it’s hidden securely within the corner stitches.
Ta-Da! Your Wonderful Handmade Potholder!
And just like that, a beautiful, functional piece of kitchen art has been completed, all thanks to your effort! Feel that lovely, squishy garter stitch texture – it provides great insulation. Isn’t it amazing to have produced something so practical and charming?
Remember, knitting is a journey! Getting the tension (how tightly or loosely the stitches are made) perfectly even happens with practice, so please be kind to yourselves if the first attempt has its own unique character. That diagonal pattern is wonderfully forgiving. Using 100% cotton yarn remains the best choice for safety when handling warm dishes.
Hopefully, making this potholder brought a smile to your face. Go on, give it pride of place in the kitchen! Perhaps assembling a little collection in different colors is next on the agenda? We always love seeing photos of finished projects – sharing the results of happy crafting sessions is such fun! Happy knitting, everyone!