Sweetest Crochet Baby Booties: A Beginner’s Project
Hello fellow crafters! Are you ready to embark on a delightful journey of handmade goodness? Get ready to pick up your crochet hook and make the most adorable little baby booties you’ve ever seen! These charming booties, with their sweet flower detail and delicate trim, are just waiting to be fashioned by your hands. Don’t worry if you’re new to crochet – this guide is designed to gently lead you through each step, making it a fun and rewarding experience. Imagine the joy of gifting these tiny treasures or simply admiring your own handiwork! Let’s dive in…
Materials You’ll Need
Before we begin, let’s gather all the supplies we need to craft these precious booties. Having everything ready will make the process smooth and enjoyable.
- 🧶 Yarn: Soft baby yarn in pink (main color) and white (trim and strap). Choose a yarn weight suitable for baby items, often labeled as “baby yarn” or “fingering weight.”
- 🪡 Crochet Hook: Size 3.5mm (E/4) crochet hook. This is a common size for baby yarn, but always check your yarn label for recommended hook size.
- 🧵 Yarn Needle: For weaving in yarn ends and assembling the flower. This is like a sewing needle but with a larger eye to accommodate yarn.
- 📌 Stitch Markers: Optional, but helpful for marking the beginning of rounds, especially if you are new to crochet. These are small plastic rings or clips that help you keep track of your place.
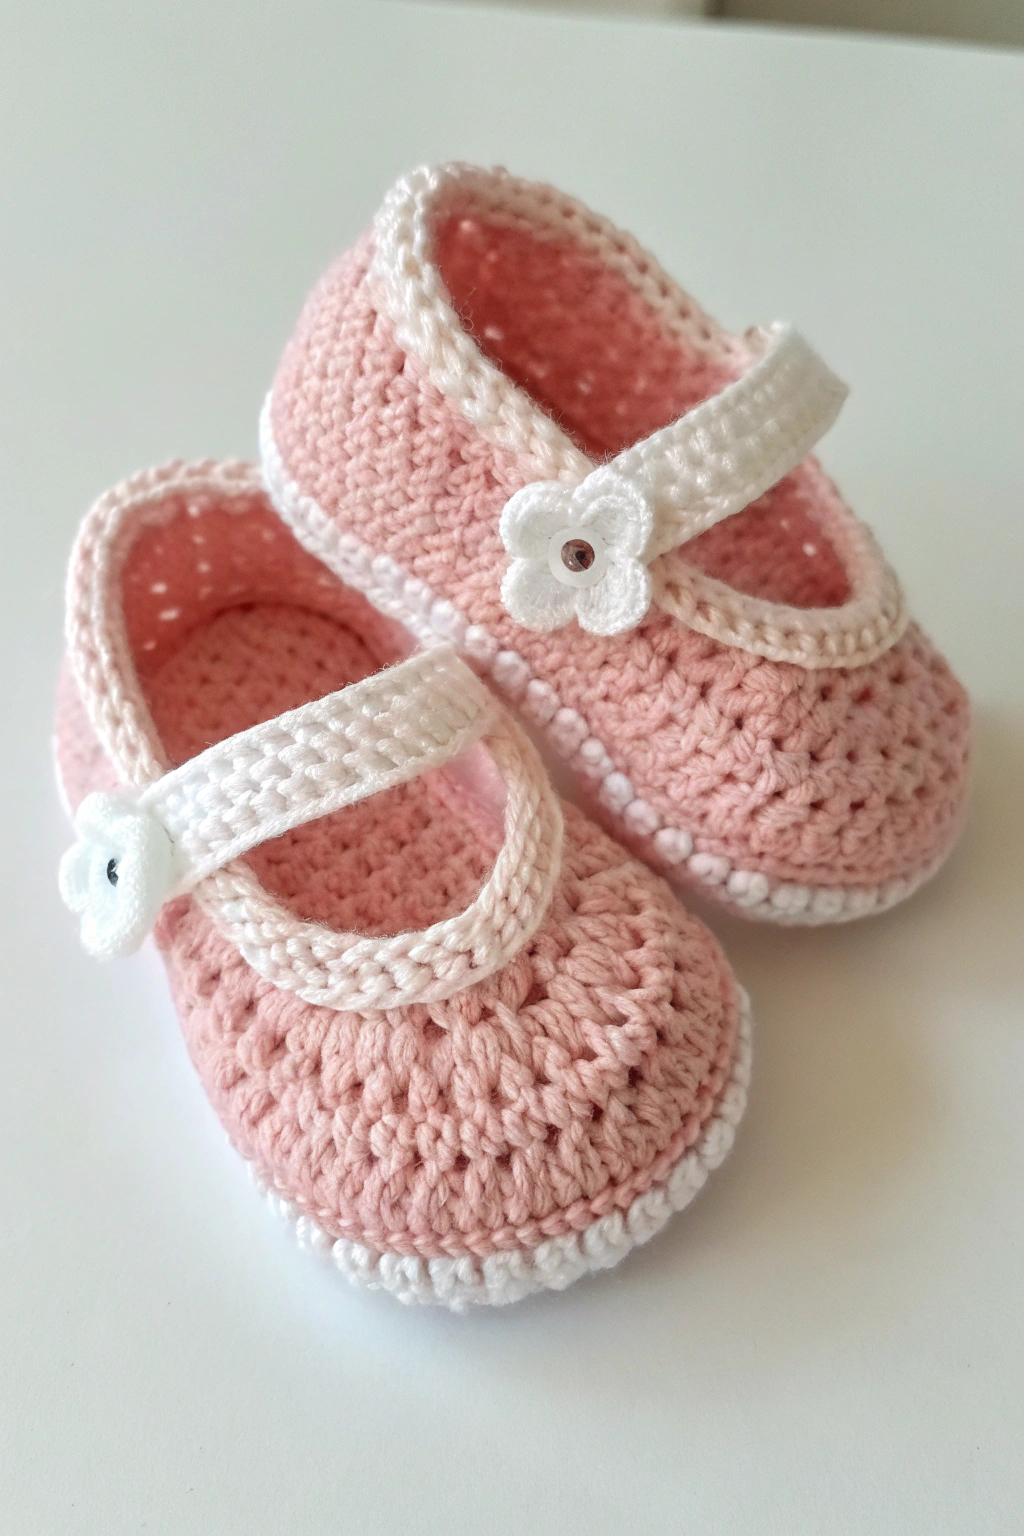
- 🔘 Small Button or Bead: For the center of the flower (as seen in the image, a clear bead is used).
- ✂️ Scissors: To cut the yarn.
Getting Started: Making the Sole
Let’s begin by fashioning the sole of the baby bootie. This forms the foundation of our tiny shoe.
Round 1: The Magic Circle and First Stitches
To start, we’ll develop a magic circle. Think of this as a special way to begin crocheting in the round without leaving a hole in the center. Wrap the yarn around your fingers to form a loop, then insert your hook into the loop, yarn over (wrap the yarn around your hook from back to front), and pull through to form a loop on your hook. Yarn over again and pull through the loop on your hook – this is your first chain stitch and it secures the magic circle. Now we’re ready to work stitches into this circle.
We are going to produce 6 single crochet stitches into this magic circle. Single crochet is a basic stitch – insert your hook into the circle, yarn over, pull up a loop (you’ll have two loops on your hook), yarn over again, and pull through both loops. Do this 6 times into the magic circle. Once you have 6 single crochet stitches, gently pull the tail of your yarn to tighten the magic circle closed.
Round 2: Increasing Stitches
Now we’ll start to build the sole wider. In this round, we will increase in each stitch. An “increase” means you will make two stitches in the same stitch from the previous round. So, in each of the 6 single crochet stitches from Round 1, you will craft 2 single crochet stitches. This means you will have a total of 12 single crochet stitches at the end of Round 2. If you’re using stitch markers, you can place one at the beginning of this round to help you keep track of where the round starts and ends.
Round 3: More Increases
For this round, we will continue to increase, but in a slightly different pattern to shape the sole. We will follow a pattern of “increase, then single crochet in the next stitch,” and repeat this around. So, in the first stitch, form 2 single crochet stitches (increase). In the next stitch, make just 1 single crochet stitch. Repeat this sequence – increase, single crochet – all the way around. You should have a total of 18 single crochet stitches at the end of this round.
Round 4: Shaping the Sole Further
We are continuing to shape the sole to be a bit longer and wider. This time, the pattern is “increase, then single crochet in the next two stitches,” repeated around. So, in the first stitch, fashion 2 single crochet stitches (increase). In the next two stitches, make 1 single crochet stitch in each. Repeat this pattern – increase, single crochet, single crochet – all the way around. You will have 24 single crochet stitches when you finish Round 4.
Round 5: Final Sole Round
For the last round of the sole, we are going to construct a slightly larger circle. The pattern is “increase, then single crochet in the next three stitches,” repeated around. In the first stitch, produce 2 single crochet stitches (increase). In the next three stitches, make 1 single crochet stitch in each. Repeat this pattern – increase, single crochet, single crochet, single crochet – all the way around. You will have 30 single crochet stitches at the end of Round 5. This completes the sole. Fasten off your pink yarn. “Fasten off” means to finish off your crochet work and secure the yarn. To do this, cut the yarn, yarn over, and pull the loop through to form a knot.
Building the Bootie Upper
Now we will switch to the white yarn to develop the edge and then continue with the pink yarn for the main body of the bootie.
Round 6: White Edge and Turning Row
Join the white yarn by making a slip knot on your hook and then pulling up a loop in any stitch of the sole from the previous round. We are going to craft a round of slip stitches in white around the edge of the sole. A slip stitch is a very simple, flat stitch – insert your hook into the next stitch, yarn over, and pull the loop through both the stitch and the loop already on your hook in one smooth motion. Slip stitch in each of the 30 stitches around the sole using white yarn. After completing the round of slip stitches, fasten off the white yarn.
Now, rejoin the pink yarn. We are going to work in rows now instead of rounds to form the upper part of the bootie. Chain 1 (this chain stitch does not count as a stitch, it’s just to bring the yarn up to the right height for the next row) and turn your work. “Turn your work” means to flip the piece over so you are working on the other side.
Row 7: First Row of the Upper
We are going to make a row of double crochet stitches. Double crochet is a slightly taller stitch than single crochet and forms a more open fabric. Yarn over, insert your hook into the first stitch, yarn over, pull up a loop (you will have three loops on your hook), yarn over, pull through the first two loops on your hook (two loops remaining), yarn over again, and pull through the last two loops. This is one double crochet stitch. Double crochet in each of the 30 stitches across the row. Chain 1 and turn your work.
Rows 8-13: Shaping the Bootie Height
Continue working in double crochet rows. For Rows 8 through 13, repeat Row 7 – chain 1, turn, and double crochet in each of the 30 stitches across. You should now have a little cup shape starting to take shape – this is the main body of the bootie! After Row 13, fasten off the pink yarn.
Crafting the White Trim
Let’s add a delicate white trim to the top edge of the bootie.
Round 14: White Trim Round
Join the white yarn again. We will work in rounds again for the trim. Chain 1. We will make a round of single crochet stitches in white around the top edge of the bootie. Single crochet in each of the 30 stitches around. After completing the round of single crochet, join with a slip stitch to the first single crochet stitch of the round to close the round neatly. Fasten off the white yarn.
Round 15: Scalloped Edge (Optional)
For a decorative touch, as seen in the image, we can craft a scalloped edge in white. This is optional, but it adds a lovely detail. Join white yarn again. Chain 1. Now we will form scallops. In the first stitch, single crochet. In the next stitch, skip it (don’t stitch into it). In the stitch after the skipped stitch, make 5 double crochet stitches all into the same stitch – this forms a scallop. Skip the next stitch, and then single crochet in the stitch after the skipped stitch. Repeat this pattern – skip a stitch, 5 double crochet in the next stitch, skip a stitch, single crochet in the next stitch – all the way around. When you reach the end, join with a slip stitch to the first single crochet stitch. Fasten off the white yarn.
Fashioning the Strap and Flower
Now for the final touches – the adorable strap and flower!
Making the Strap
With white yarn, chain 15. Then, single crochet in the second chain from the hook and in each chain across. You will have 14 single crochet stitches in the strap. Fasten off white yarn.
Assembling the Flower
With white yarn, make a magic circle. Into the magic circle, chain 3 (this counts as the first double crochet), then develop 11 more double crochet stitches. Join with a slip stitch to the top of the chain-3. Fasten off white yarn, leaving a long tail for sewing. This flat circle of double crochet stitches is the base of our flower.
To form the flower petals, we will shape the circle. With the yarn needle and the long tail, weave in and out around the edge of the double crochet circle, like gathering fabric. Once you’ve gone all the way around, gently pull the yarn tail to gather the circle into a flower shape. Secure the yarn tightly to hold the flower shape. Sew the bead or button into the center of the flower.
Attaching Strap and Flower
Position the strap across the bootie as shown in the image, and sew one end securely to the side of the bootie using your yarn needle and white yarn. Sew the flower onto the other end of the strap. Sew the other end of the strap (with the flower attached) to the other side of the bootie, making sure the strap is positioned to comfortably fasten across the top of the bootie.
Finishing Touches
Weave in all yarn ends using your yarn needle. “Weave in ends” means to hide the loose ends of yarn by threading them through the back of your crochet work so they don’t unravel. Make sure all ends are secure.
Congratulations! You have now crafted a beautiful pair of crochet baby booties! Aren’t they just the sweetest? Imagine the joy of seeing a little one wearing these handmade treasures.
Share Your Creations!
We hope you enjoyed making these adorable baby booties! Don’t be shy – we’d absolutely love to see your finished booties! Please share photos of your creations online and tag us! Happy crocheting, and remember, every stitch you make is filled with love and care!