Sweetest Baby Booties You Can Make
Are you ready to embark on a delightful journey of yarn and hook? Today, we’re diving into the wonderfully rewarding world of crocheting baby booties! These adorable little shoes are not only incredibly cute but also make the most heartfelt handmade gifts. Imagine the joy of fashioning something so precious with your own two hands – it’s a truly special feeling. Let’s pick up our hooks and get ready to make these charming rainbow-trimmed baby booties, perfect for keeping tiny toes snug and stylish.
Materials You’ll Need
Before we begin this fun project, let’s gather all the things we’ll need. Having everything ready will make the process smooth and enjoyable. For these sweet baby booties, you will need:
- 🧶 Yarn: Soft baby yarn in several pastel colors: pink for the main part, white, yellow, turquoise, and lavender for the rainbow stripes, light mint green for the ankle cuff, and light pink for the inner lining and ties. Make sure it’s a soft and gentle yarn suitable for delicate baby skin.
- 🪡 Crochet Hook: A crochet hook suitable for your chosen yarn weight. Usually, the yarn label will suggest a hook size. For baby yarn, often a 3.5mm or 4mm hook works well, but check your yarn label for the best match.
- ✂️ Scissors: For snipping yarn ends.
- 🧵 Yarn Needle: Also known as a tapestry needle, for weaving in yarn ends to give your finished booties a neat and professional look.
Let’s Get Started: Step-by-Step Bootie Making Guide
Now for the exciting part – actually making the booties! Don’t worry if you’re completely new to crochet. We’ll take it one step at a time, and we’ll explain everything as we go. Remember, making something beautiful with your hands is all about enjoying the process, so relax, have fun, and let’s begin!
Forming the Bootie Sole
We’ll start by fashioning the sole of the bootie in pink yarn. The sole is the bottom part of the shoe, the flat piece that goes under the foot.
- Starting Chain: First, we need to make a slip knot on your hook. A slip knot is like the first loop on your hook that starts every crochet project. Then, chain 11. To chain, you wrap the yarn around your hook and pull it through the loop on your hook. Repeat this 11 times. This chain is the foundation of our sole.
- Round 1: Single Crochet Row: Now, we’ll work in single crochet. Single crochet is a basic stitch that makes a tight, dense fabric. It’s like building a low, solid wall. Skip the first chain from the hook (this is the loop already on your hook, don’t count it). Single crochet in each of the next 10 chains. To single crochet, insert your hook into the chain, yarn over (wrap the yarn around your hook), pull up a loop (you’ll have two loops on your hook), yarn over again, and pull through both loops. You’ve made your first single crochet! Repeat this in each of the next 9 chains. In the very last chain, make 3 single crochet stitches. This will round off the toe of the sole. Now, we need to work on the other side of the chain. Turn your work so you’re working along the opposite side of the chain. Single crochet in the next 9 chains. In the last chain (which is the very first chain you made), make 2 single crochet stitches. Finally, join with a slip stitch to the first single crochet of the round. A slip stitch is a way to join rounds neatly. To make a slip stitch, insert your hook into the stitch, yarn over, and pull through both the loop on your hook and the stitch you inserted into. You’ve completed the first round of the sole!
- Round 2: Increasing the Sole Size: We’re going to make the sole a bit bigger now. Chain 1 (this doesn’t count as a stitch, it’s just to bring the yarn up to the right height for the next round). 2 single crochet in the first stitch. This is called an increase – making two stitches in one stitch to widen the fabric. Single crochet in the next 9 stitches. 2 single crochet in each of the next 3 stitches. This further shapes the toe area. Single crochet in the next 9 stitches. 2 single crochet in each of the last 2 stitches. Join with a slip stitch to the first stitch of the round.
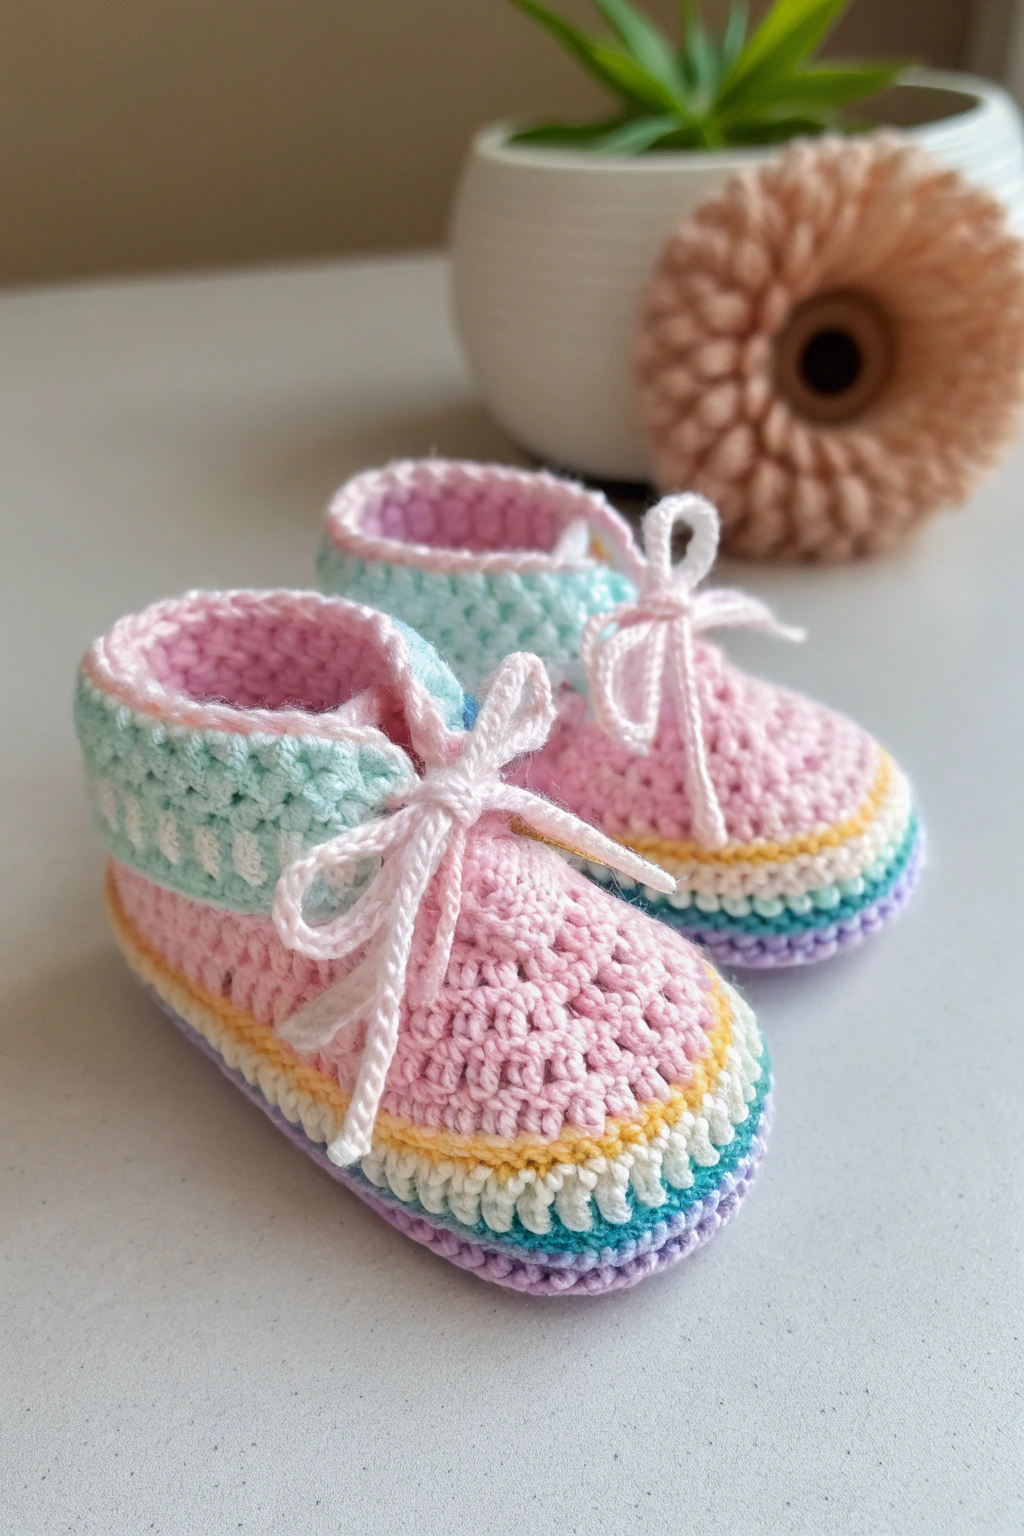
- Round 3: Final Sole Round: One more round to complete the sole. Chain 1. 2 single crochet in the first stitch. Single crochet in the next stitch. Repeat from * to * once more. This means repeat “2 single crochet in the next stitch, single crochet in the next stitch” one more time. Single crochet in the next 9 stitches. (2 single crochet in the next stitch, single crochet in the next stitch) repeat 3 times. Single crochet in the next 9 stitches. (2 single crochet in the next stitch, single crochet in the next stitch) repeat twice. Join with a slip stitch to the first stitch of the round. Fasten off and weave in ends. To fasten off, cut the yarn, pull the loop on your hook wider to pull the yarn tail through, and then pull tight to secure. Weaving in ends means using your yarn needle to thread the yarn tail back and forth through the stitches on the back of your work so it’s hidden and secure. You now have a cute little pink sole! Refer to the image to see the shape of the sole. Notice in the image how the sole is oval-shaped, wider at the toe and narrower at the heel.
Forming the Bootie Upper – Rainbow Stripes
Now we’ll start fashioning the upper part of the bootie, the part that goes around the foot, and we’ll add those lovely rainbow stripes!
- Round 1 (White Stripe): Join white yarn with a slip stitch to any stitch on the sole. To join yarn, make a slip knot with the new color, and pull it through a stitch on your project using your hook. Chain 1. Now we’re going to work in half double crochet. Half double crochet is a stitch that’s a bit taller than single crochet, making a slightly looser fabric. It’s like building a wall that’s a bit taller and less dense than the single crochet wall. Half double crochet in each stitch around. To half double crochet, yarn over, insert your hook into the stitch, yarn over, pull up a loop (three loops on hook), yarn over, and pull through all three loops. Join with a slip stitch to the first half double crochet.
- Round 2 (Yellow Stripe): Change to yellow yarn. To change colors, when you are about to complete the last stitch of the previous color, yarn over with the new color and pull through to finish the stitch. Then, chain 1. Half double crochet in each stitch around. Join with a slip stitch to the first half double crochet.
- Round 3 (Turquoise Stripe): Change to turquoise yarn. Chain 1. Half double crochet in each stitch around. Join with a slip stitch to the first half double crochet.
- Round 4 (Lavender Stripe): Change to lavender yarn. Chain 1. Half double crochet in each stitch around. Join with a slip stitch to the first half double crochet. Fasten off lavender yarn and weave in ends. You can see in the image how these colorful stripes are stacked on top of the pink sole, adding a playful touch. Observe in the image the order of colors and the width of each stripe.
Crafting the Ankle Cuff
Next, we’ll fashion the ankle cuff in light mint green yarn. This part goes around the ankle and keeps the bootie snug on the baby’s foot.
- Round 1 (Mint Green Cuff): Join light mint green yarn with a slip stitch to any stitch. Chain 1. Single crochet in each stitch around. Join with a slip stitch to the first single crochet.
- Round 2 (Textured Cuff): This round gives the cuff a nice textured look. Chain 1. (Front post double crochet, back post double crochet) repeat around. Let’s break down these new stitches. Double crochet is even taller than half double crochet, making a more open fabric. It’s like building a taller, more airy wall. To double crochet, yarn over, insert hook into stitch, yarn over, pull up a loop (three loops on hook), yarn over, pull through first two loops, yarn over, pull through last two loops. Now, for post stitches, we work around the stitch post instead of into the top of the stitch. Front post double crochet (fpdc): Yarn over, insert hook from front to back to front around the post of the next stitch, yarn over, pull up a loop, yarn over, pull through first two loops, yarn over, pull through last two loops. Back post double crochet (bpdc): Yarn over, insert hook from back to front to back around the post of the next stitch, yarn over, pull up a loop, yarn over, pull through first two loops, yarn over, pull through last two loops. So, you alternate these stitches all the way around. Join with a slip stitch to the first front post double crochet. Fasten off mint green yarn and weave in ends. Look at the image to see the texture of the cuff. The front post and back post double crochet stitches create vertical ribs in the cuff.
Fashioning the Inner Lining and Ties
Finally, we’ll add a soft pink inner lining and the sweet little ties.
- Inner Lining (Light Pink): Join light pink yarn with a slip stitch to any stitch on the inside of the cuff (the wrong side of the cuff). Chain 1. Single crochet in each stitch around the inside of the cuff. This creates a soft, finished edge inside. Join with a slip stitch to the first single crochet. Fasten off light pink yarn and weave in ends.
- Ties (Light Pink): We’ll now fashion the ties to make the booties adjustable. Join light pink yarn with a slip stitch to the front center of the bootie (where the toe is). Chain 30. This long chain will be our tie. Slip stitch in the same stitch where you started the chain. This secures the tie to the bootie. Fasten off light pink yarn and weave in ends. Repeat this step on the opposite side of the bootie, at the back center, to fashion the second tie. You can see in the image how the ties are long strands of yarn that thread through the ankle cuff and tie in a bow.
And there you have it! You’ve just fashioned the most adorable pair of baby booties! Repeat all these steps to make the second bootie to complete the pair.
Tips for Happy Bootie Making
- Tension is Key: Try to keep your yarn tension consistent throughout your project. Tension is how tightly or loosely you pull the yarn as you crochet. Consistent tension will make your booties look even and neat. If you’re new to crochet, don’t worry too much about tension right away; it gets easier with practice!
- Count Your Stitches: Especially in the sole rounds, counting your stitches helps ensure the sole shape is correct and both booties are the same size.
- Yarn Choice Matters: Using soft baby yarn is important for baby items. It will be gentle and comfortable against delicate skin.
- Practice Makes Perfect: If your first bootie isn’t perfect, don’t worry! Every crafter started somewhere. Keep practicing, and each bootie you make will be even better than the last.
Making these baby booties is such a rewarding experience. You’ve not only fashioned something beautiful and practical but also poured your love and care into every stitch. Imagine the smiles these handmade booties will bring! We hope you enjoyed this guide and feel inspired to make your own pair.
We would absolutely love to see your finished booties! Please share pictures of your wonderful handmade creations with us – it truly brightens our day to see what you make. Happy crafting, and may your hook always be busy and your yarn basket always full!