Sweet Stitches Crochet Cupcake
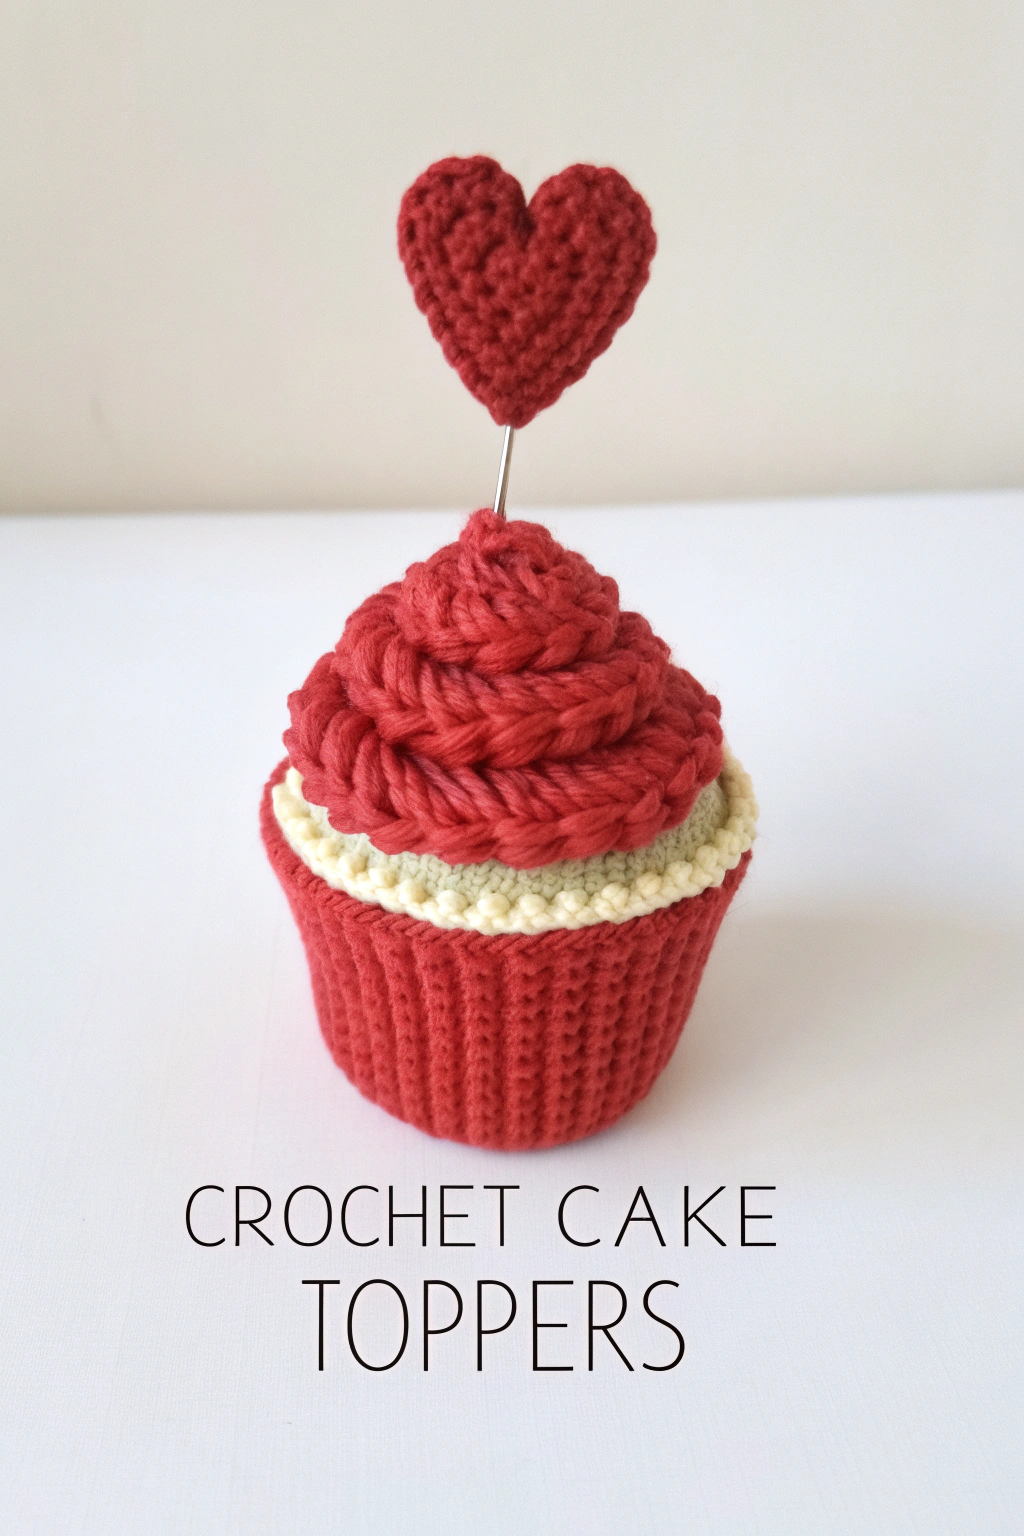
Have you ever wanted to whip up something adorable and sweet without turning on the oven? Well, grab your hooks, because today we’re diving into the delightful world of amigurumi (that’s the lovely Japanese art of knitting or crocheting small, stuffed yarn figures) to make this absolutely charming Crochet Cupcake with Heart Topper! Just look at that cutie in the picture – the perfect handmade touch for decoration, gifting, or even as a pincushion.
This project is wonderful for dipping your toes into crocheting in the round. Don’t worry if you’re just starting out; we’ll go through everything step-by-step. Ready to bring this yarny treat to life? Let’s begin!
What You’ll Need
Gather these simple supplies:
- 🧶 Worsted weight yarn (like cotton or acrylic) in three colours: Red (for the base, frosting, and heart), Light Green/Cream (for the cake), and Off-White/Cream (for the decorative border).
- 🪝 A crochet hook suitable for your yarn (a 4.0mm or G/6 hook often works well with worsted weight).
- 🧸 Polyester fiberfill for stuffing.
- ✨ A stitch marker (a safety pin or scrap piece of yarn works too!).
- ✂️ Scissors.
- 🪡 A yarn needle (also called a tapestry needle) for weaving in ends and assembly.
- ❤️ A small craft stick, skewer, or piece of sturdy wire for the heart topper stem.
- 💧 A dab of craft glue (optional, for securing the heart to the stick).
Getting Started: Essential Techniques Explained
Before we jump into the cupcake parts, let’s quickly understand the basic actions. If you’re completely new, practice these a few times first!
- Magic Ring (MR): This is a wonderful way to start pieces worked in a circle so there’s no hole in the middle. You essentially make an adjustable loop and work your first stitches into it, then pull the tail tight to close. Many great video tutorials online show this!
- Slip Knot: The very first loop you put on your hook.
- Chain (ch): Yarn over your hook and pull that yarn through the loop already on your hook. That’s one chain!
- Single Crochet (sc): This is our main stitch. Insert your hook into the indicated stitch, yarn over, pull up a loop (you’ll have 2 loops on your hook), yarn over again, and pull through both loops on your hook. Simple!
- Working in Rounds: We’ll be making circles, adding stitches strategically to keep it flat initially, then building upwards. We’ll work in a continuous spiral, meaning we won’t join the end of each round to the beginning with a slip stitch. This avoids a seam line.
- Stitch Marker: Because we work in a spiral, the start of the round moves. Place a stitch marker in the first stitch of every round and move it up as you go. This is crucial for not losing your place!
- Increase (inc): To make the circle bigger, you simply make two single crochet stitches into the same stitch from the round below.
- Decrease (dec): To make the piece smaller (like when closing up), you turn two stitches into one. A common way is the invisible decrease: Insert your hook into the front loop only of the next stitch, then insert your hook into the front loop only of the stitch after that (3 loops on hook if you count the initial one), yarn over and pull through the first two loops, then yarn over and pull through the remaining two loops.
- Back Loop Only (BLO): Look at the top of a stitch – it has two loops forming a ‘V’. For BLO, you insert your hook under only the loop furthest away from you. This technique forms the distinct vertical ribs seen on the red cupcake base in the image.
- Front Loop Only (FLO): The opposite of BLO. Insert your hook under only the loop closest to you. This leaves the back loop free and is used to build outwards, perfect for forming the frosting swirl’s base.
- Slip Stitch (sl st): Insert hook, yarn over, pull through the stitch and the loop on your hook in one motion. Used for joining or finishing off.
Alright, let’s get hooking!
Making the Cupcake Base (Red Yarn)
We’ll start from the bottom and work up. Use your Red yarn. Remember your stitch marker!
- Round 1: Make a Magic Ring (MR) and put 6 single crochet (sc) stitches into it. Pull the ring tight. (6 stitches)
- Round 2: Increase (inc) in every stitch around. (Place 2 sc in each stitch). (12 stitches)
- Round 3: [Sc in the next stitch, inc in the next stitch]. Repeat this sequence […] 6 times around. (18 stitches)
- Round 4: [Sc in the next 2 stitches, inc in the next stitch]. Repeat […] 6 times around. (24 stitches)
- Round 5: [Sc in the next 3 stitches, inc in the next stitch]. Repeat […] 6 times around. (30 stitches)
- Round 6: [Sc in the next 4 stitches, inc in the next stitch]. Repeat […] 6 times around. (36 stitches)
- Tip: Your circle should be flat at this point. If it’s curling, your tension might be too tight or you might need a slightly larger hook.
- Round 7: Now we build the sides. Work 1 sc in the Back Loop Only (BLO) of every stitch around. (36 stitches)
- You’ll see this round forms a distinct edge, turning the flat circle upwards.
- Rounds 8-15: Work 1 sc in both loops (as normal) of every stitch around. (36 stitches per round)
- Repeat this round 8 times total, or until the base reaches your desired height. The image shows a base that is roughly as tall as it is wide.
- At the end of Round 15, change colour to your Light Green/Cream yarn in the very last yarn over of the final stitch. Cut the Red yarn, leaving a tail to weave in later.
Forming the Cake (Light Green/Cream Yarn)
Continue directly from the base with your new colour.
- Round 16: Work 1 sc in the Back Loop Only (BLO) of every stitch around. (36 stitches)
- This creates another defined edge where the ‘cake’ meets the ‘wrapper’.
- Rounds 17-19: Work 1 sc in both loops of every stitch around. (36 stitches per round)
- Feel free to add another round or two here if you want a taller ‘cake’ section.
- Start stuffing the cupcake base firmly. Continue adding stuffing as you go in the next rounds.
- Round 20: [Sc in the next 4 stitches, decrease (dec)]. Repeat […] 6 times around. (30 stitches)
- Round 21: [Sc in the next 3 stitches, dec]. Repeat […] 6 times around. (24 stitches)
- Round 22: [Sc in the next 2 stitches, dec]. Repeat […] 6 times around. (18 stitches)
- Round 23: [Sc in the next stitch, dec]. Repeat […] 6 times around. (12 stitches)
- Make sure stuffing is complete and nicely shaped.
- Round 24: Decrease (dec) in every stitch around. (6 stitches)
- Cut the yarn, leaving a long tail. Using your yarn needle, weave the tail through the front loops only of the remaining 6 stitches and pull tight to close the hole. Weave in the end securely.
Adding the Decorative Border (Off-White/Cream Yarn)
Remember those front loops we left unused back in Round 16 (where you first switched to the cake colour)? We’ll use those now.
- Turn the cupcake upside down. Attach your Off-White/Cream yarn with a slip stitch to any available front loop from Round 16.
- Chain 1 (does not count as a stitch).
- Work one slip stitch into each front loop all the way around. The image shows a textured border that looks like slip stitches or possibly small bobbles. For beginners, slip stitching provides a nice, clean edge. (36 slip stitches).
- Alternatively, for a slightly more textured look similar to the image, you could try [slip stitch, chain 1] in each front loop around.
- Once you get back to the start, slip stitch into the first slip stitch (or the starting chain space if you did ch 1s) to join.
- Cut the yarn and weave in the ends securely.
Shaping the Frosting Swirl (Red Yarn)
This gives the cupcake its classic look! We’ll use the front loops left from Round 7 of the Cupcake Base (where you started working BLO).
- Turn the cupcake right side up. Attach your Red yarn with a slip stitch to any available front loop from Round 7.
- Round 1 (Frosting Base): Chain 1 (doesn’t count as a stitch). Work 1 single crochet (sc) into each front loop all the way around. Slip stitch to the first sc to join. (36 stitches)
- Round 2 (Starting the Swirl): Chain 1. Work 1 sc in the Front Loop Only (FLO) of every stitch around. Slip stitch to the first sc. (36 stitches)
- Working in FLO pushes the remaining back loops outwards, helping to form the base of the swirl.
- Round 3: Chain 1. [Sc in the next 4 FLO stitches, decrease (dec) using FLO only]. Repeat […] 6 times around. Slip stitch to the first sc. (30 stitches)
- Round 4: Chain 1. [Sc in the next 3 FLO stitches, dec using FLO only]. Repeat […] 6 times around. Slip stitch to the first sc. (24 stitches)
- Round 5: Chain 1. [Sc in the next 2 FLO stitches, dec using FLO only]. Repeat […] 6 times around. Slip stitch to the first sc. (18 stitches)
- Round 6: Chain 1. [Sc in the next FLO stitch, dec using FLO only]. Repeat […] 6 times around. Slip stitch to the first sc. (12 stitches)
- Round 7: Chain 1. Decrease (dec) using FLO only in every stitch around. Slip stitch to the first sc. (6 stitches)
- Cut the yarn, leaving a tail. Weave the tail through the front loops only of the remaining 6 stitches, pull tight to close the top swirl. Weave in the end securely into the frosting.
Making the Heart Topper (Red Yarn)
This little heart adds the perfect finishing touch! There are many ways to fashion a heart. This simple method involves working it flat, which matches the flat heart shown in the image. It can then potentially be folded or stitched to give it puffiness if desired.
- Method 1 (Flat Heart – similar to image):
- Make a Magic Ring (MR).
- Round 1: Chain 3 (counts as first double crochet + chain 1). Inside the ring, work: 3 treble crochet (tr – yarn over twice, insert hook, pull up loop, [yarn over, pull through 2 loops] 3 times), 3 double crochet (dc – yarn over, insert hook, pull up loop, [yarn over, pull through 2 loops] twice), chain 1, 1 tr (this forms the bottom point), chain 1, 3 dc, 3 tr, chain 3, slip stitch into the center of the ring.
- Pull the MR tail tight to gather the heart shape.
- Cut yarn, leaving a tail for attaching or weaving in.
- Method 2 (Two Halves – for a puffier heart):
- Make 2 identical small cup shapes:
- Round 1: MR, 6 sc into ring (6)
- Round 2: Inc in each st (12)
- Round 3: [Sc, inc]x6 (18)
- Finish off the first piece. Do not finish off the second piece.
- Join the two pieces by slip stitching the live loop of the second piece to a stitch on the first piece.
- Sc around both pieces, decreasing strategically where they join and at the bottom ‘V’ to form the heart shape. You might need around 24-30 sc total, depending on how you join. Stuff lightly before closing the bottom point. This is more advanced, so Method 1 is likely easier for beginners and closer to the image appearance.
- Make 2 identical small cup shapes:
Assembly
Almost there! Let’s put it all together.
- Attach Heart to Stick: Securely attach your finished red heart to the top of your craft stick or wire. You can use a dab of glue, or use the yarn tails from the heart to tie/sew it firmly onto the stick. Ensure it’s centered.
- Insert Topper: Gently push the bottom end of the stick down through the center of the frosting swirl and into the stuffed cupcake body until it feels stable.
- Final Check: Weave in any remaining loose ends neatly using your yarn needle.
Ta-Da! Your Crochet Cupcake Masterpiece
Look at that! You’ve successfully put together your very own Crochet Cupcake with a Heart Topper. How wonderful does it feel to turn simple strands of yarn into something so tangible and cute? This little cupcake is proof of your growing skills and patience.
Display it proudly, give it as a thoughtful handmade gift, or maybe even start planning a whole batch in different colours! The possibilities are endless once you get the hang of the basics.
We’d absolutely love to see your finished cupcakes! Feel free to share pictures online and inspire other budding crocheters. Keep practicing, keep hooking, and most importantly, keep enjoying the cozy satisfaction of making things with your own two hands. Happy crocheting!