Sweet Flower Headband: Crochet it Yourself!
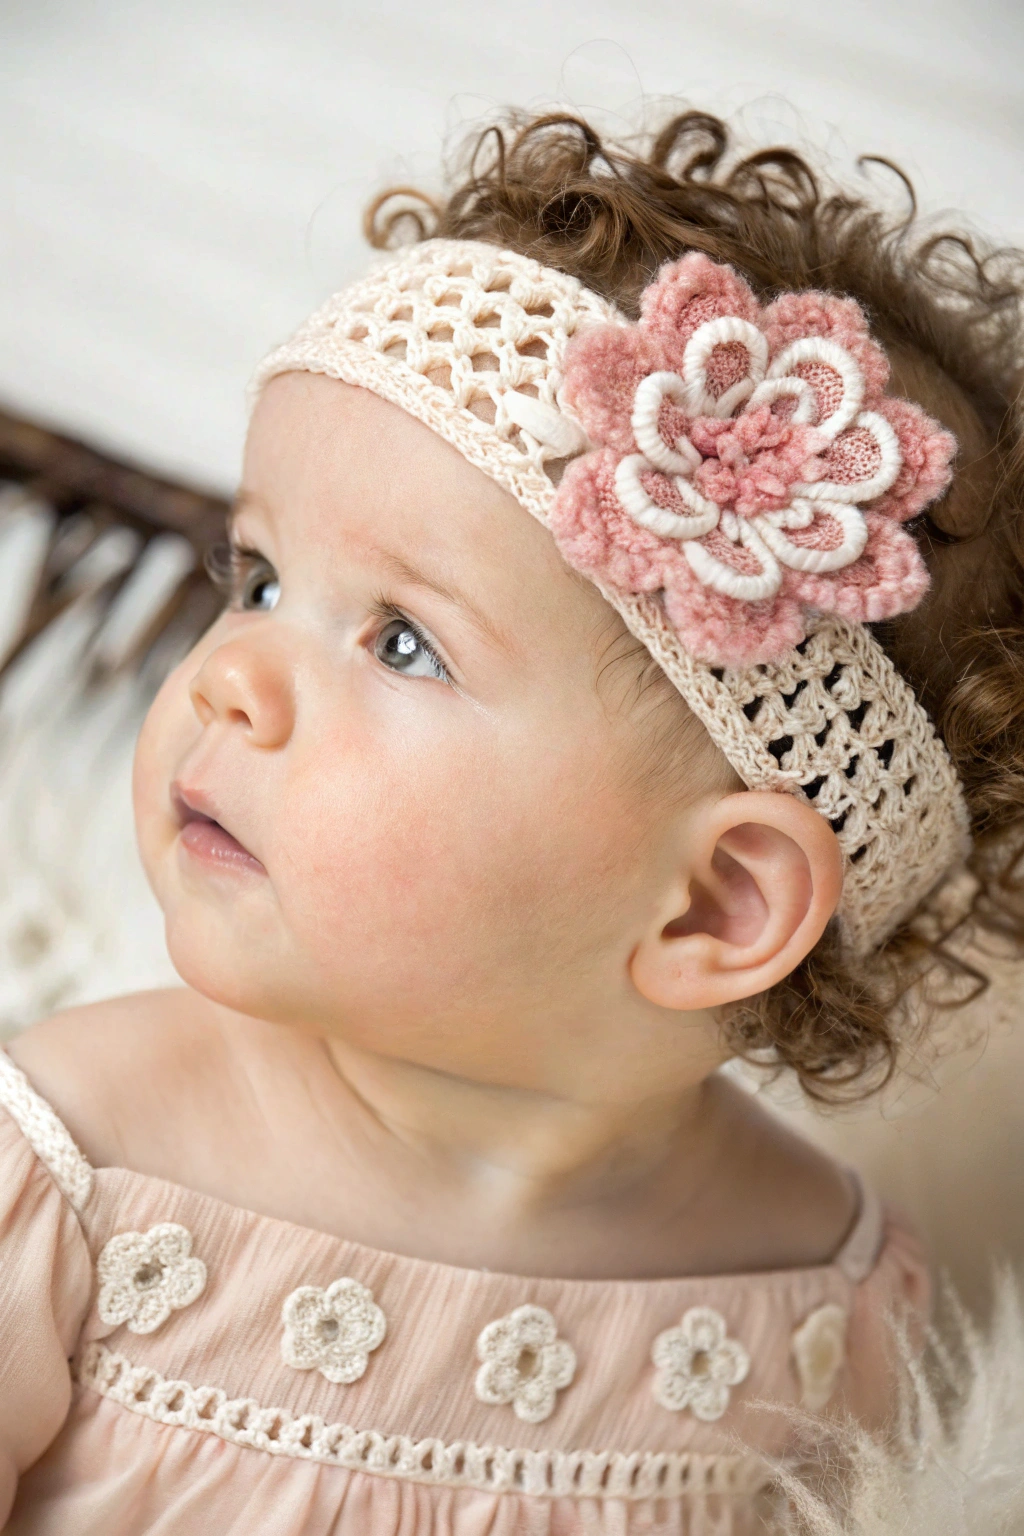
Are you ready to dive into a delightful project that’s perfect for gifting, baby showers, or just adding a touch of handmade charm to a little one’s wardrobe? Today, we’re going to make an absolutely adorable crocheted flower headband, just like the one you see in the picture! Don’t worry if you’re brand new to crochet – this guide is designed with you in mind. We’ll take it step by step, and before you know it, you’ll be so proud of the beautiful headband you’ve fashioned with your own hands. Get ready to experience the joy of transforming simple yarn into something truly special!
Gather Your Supplies
Before we begin, let’s collect everything we’ll need to build our lovely flower headband. Having all your materials ready will make the process smooth and enjoyable.
- 🧶 Yarn: You’ll need some soft, light-colored yarn for the headband itself. Cotton or a soft acrylic yarn in a cream or light beige color works wonderfully. For the flower, you’ll want some yarn in a pretty pink shade and a contrasting white or cream for the flower’s edges. Look for yarn labeled “DK” or “light worsted” – these are great for beginners as they’re easy to handle.
- 🪡 Crochet Hook: A 3.5mm or 4mm crochet hook is a good size to start with for DK or light worsted yarn. Check the yarn label for their recommended hook size as well.
- ✂️ Scissors: For snipping your yarn.
- 🧵 Yarn Needle (also called tapestry needle): This is like a sewing needle but with a larger eye to thread yarn through. We’ll use this to neatly tuck in the yarn ends so your headband looks polished.
Let’s Get Started: Making the Headband Base
The headband base is the foundation of our project. It’s the comfy band that sits around the head and holds our pretty flower. We’ll construct this part first.
Step 1: Forming the Chain Stitch Foundation
To begin, we need to form a chain. Think of a chain stitch as the very first step in almost all crochet projects – it’s like the starting line! To make a chain stitch, first, fashion a slip knot. This is like a loose knot that goes on your crochet hook. Hold your hook in your dominant hand (like you’re holding a pencil) and the yarn in your other hand. With the hook, grab the yarn and pull it through the loop on your hook. That’s your first chain stitch! Repeat this process, pulling yarn through the loop each time to develop a chain.
For a baby headband like the one in the image, you’ll want to make a chain that’s about 14-15 inches long. This might be around 70-80 chain stitches. Don’t worry about counting exactly at first, just chain until it looks about that length. If it’s for an older child or adult, you’ll need a longer chain – about 17-20 inches. It’s always better to fashion it a little longer and then adjust later if needed.
Step 2: Crafting the Single Crochet Rows
Now that we have our chain, we’re going to craft rows of single crochet stitches to build the band. Single crochet is a basic stitch that’s perfect for beginners. It produces a nice, close-knit fabric.
To make a single crochet, insert your hook into the second chain from your hook (skip the first chain). Imagine the chain stitches are like little ‘V’ shapes lying sideways – you’ll insert your hook under the top two strands of the ‘V’. Once your hook is inserted, yarn over (that means wrap the yarn around your hook from back to front) and pull the yarn through the chain stitch loop. You now have two loops on your hook. Yarn over again, and pull the yarn through both loops on your hook. Congratulations, you’ve fashioned a single crochet!
Make a single crochet stitch in each chain stitch all the way across your chain. When you reach the end of the row, you will have developed your first row of single crochet. To start the next row, chain one (this is called a “turning chain”—it gets you to the right height for the next row without making the edge too tight). Then, turn your work – flip it over like you’re turning a page in a book. Now, make single crochet stitches in each stitch across the row. You’ll insert your hook into the top of each single crochet stitch from the previous row.
Look at the headband in the image. You can see it’s fairly narrow. Craft about 3-4 rows of single crochet to form a similar width band. Keep going until your headband base is the width you like.
Step 3: Finishing the Band
Once you’ve developed the headband to your desired width, it’s time to finish off. To fasten off, cut the yarn leaving a tail of about 6 inches. Yarn over and pull this tail completely through the loop on your hook. Pull it snug – this builds a knot that secures your work.
Now, we need to neatly tuck in those yarn ends so they don’t unravel and look messy. Thread the yarn tail onto your yarn needle. Weave the needle through the stitches on the back of your headband, going in and out, to hide the yarn tail. Once you’ve woven it in a few inches, snip off the excess yarn close to the fabric. Do the same with the starting yarn tail from your foundation chain. This makes your headband look neat and professionally assembled.
Crafting the Flower
Now for the fun part – fashioning the beautiful flower that adorns our headband! The flower in the image has layers of petals, giving it a lovely textured look. We’ll make each petal separately and then assemble them.
Step 1: Making the Petals
Let’s start with the pink yarn for the main part of the petals. We’ll make several petals to form the flower. For each petal, we’ll begin with a chain, just like we did for the headband. Chain 10.
Now, we’re going to make double crochet stitches to craft the petal shape. Double crochet is a taller stitch than single crochet, which will give our petals some height and texture. To make a double crochet, yarn over, insert your hook into the third chain from your hook (skip the first two chains). Yarn over, pull through the chain stitch loop (you now have three loops on your hook). Yarn over, pull through the first two loops on your hook (two loops left). Yarn over again, and pull through the last two loops on your hook. That’s a double crochet!
In the same chain stitch where you just fashioned a double crochet, make another double crochet. We’re putting two double crochet stitches into one chain stitch to start shaping the petal. In the next chain stitch, make two more double crochet stitches. Continue making two double crochet stitches in each chain stitch across the chain. When you reach the end, you’ll have a slightly curved piece – this is your petal taking shape! Fasten off each petal just like we did for the headband, leaving a tail for sewing.
Make 5 petals with the pink yarn. These will be the inner layer of our flower.
Now, let’s craft the white or cream edges for the petals. Using your white or cream yarn, make more petals, but this time make them slightly larger to go around the pink petals. Chain 12. Then, just like before, make two double crochet stitches in the third chain from the hook, and two double crochet stitches in each chain stitch across. Make 5 white or cream petals.
Step 2: Assembling the Flower
We now have all the petal pieces to assemble our flower! Take your pink petals. Using your yarn needle and the yarn tails, sew the bottom straight edges of the pink petals together in a circle. Imagine arranging them like slices of a pie to form the center of the flower. Sew them securely so they hold their shape.
Next, take your white or cream petals. These will go around the pink petals. Sew the white petals around the pink petal circle, positioning each white petal behind a pink petal. This layering effect, as seen in the image, gives the flower depth and dimension. Sew them securely, ensuring the white edges peek out from behind the pink petals. You’re now developing a beautiful layered flower!
Step 3: Attaching the Flower to the Headband
Our final step is to attach the fashioned flower to the headband. Position the flower on the headband where you want it. In the image, the flower is slightly off-center. Using your yarn needle and a yarn tail from one of the flower pieces, sew the flower securely to the headband. Stitch through all the layers of the flower and through the headband base to ensure it’s firmly attached. Weave in all remaining yarn ends on the flower and headband, just like we did before, to produce a clean and finished look.
Tips for Beginners
- Tension is Key: Try to keep your yarn tension even as you crochet. Not too tight, not too loose. Consistent tension will help your stitches look uniform and your headband will have a nicer drape.
- Count Your Stitches (Sometimes): For the headband base, especially in the beginning, it can be helpful to count your stitches at the end of each row to make sure you’re not accidentally adding or losing stitches. This will keep your band straight.
- Don’t Be Afraid to Undo: Everyone makes mistakes, especially when learning! If you’re not happy with a stitch or a row, don’t be afraid to gently undo it and try again. It’s all part of the learning process. Crocheting should be fun and relaxing!
- Refer to the Image: Throughout this process, keep looking at the image of the headband. Notice how the flower is positioned, the texture of the headband band, and the layered look of the flower. This visual guide will be very helpful!
Share Your Headbands!
You did it! You’ve just made a gorgeous crocheted flower headband. Isn’t it satisfying to fashion something so pretty with your own two hands? We truly hope you enjoyed this project. We would absolutely love to see your creations! Please share photos of your finished headbands. Happy crocheting, and keep making beautiful things!
Conclusion
Crocheting this sweet flower headband is a wonderful way to begin your crafting journey. It’s a project that’s both beautiful and achievable, and the satisfaction of producing a handmade item is truly rewarding. Keep practicing, keep experimenting, and most importantly, keep enjoying the wonderful world of crochet! Happy crafting!