Sweet Blossom Crochet Tunic
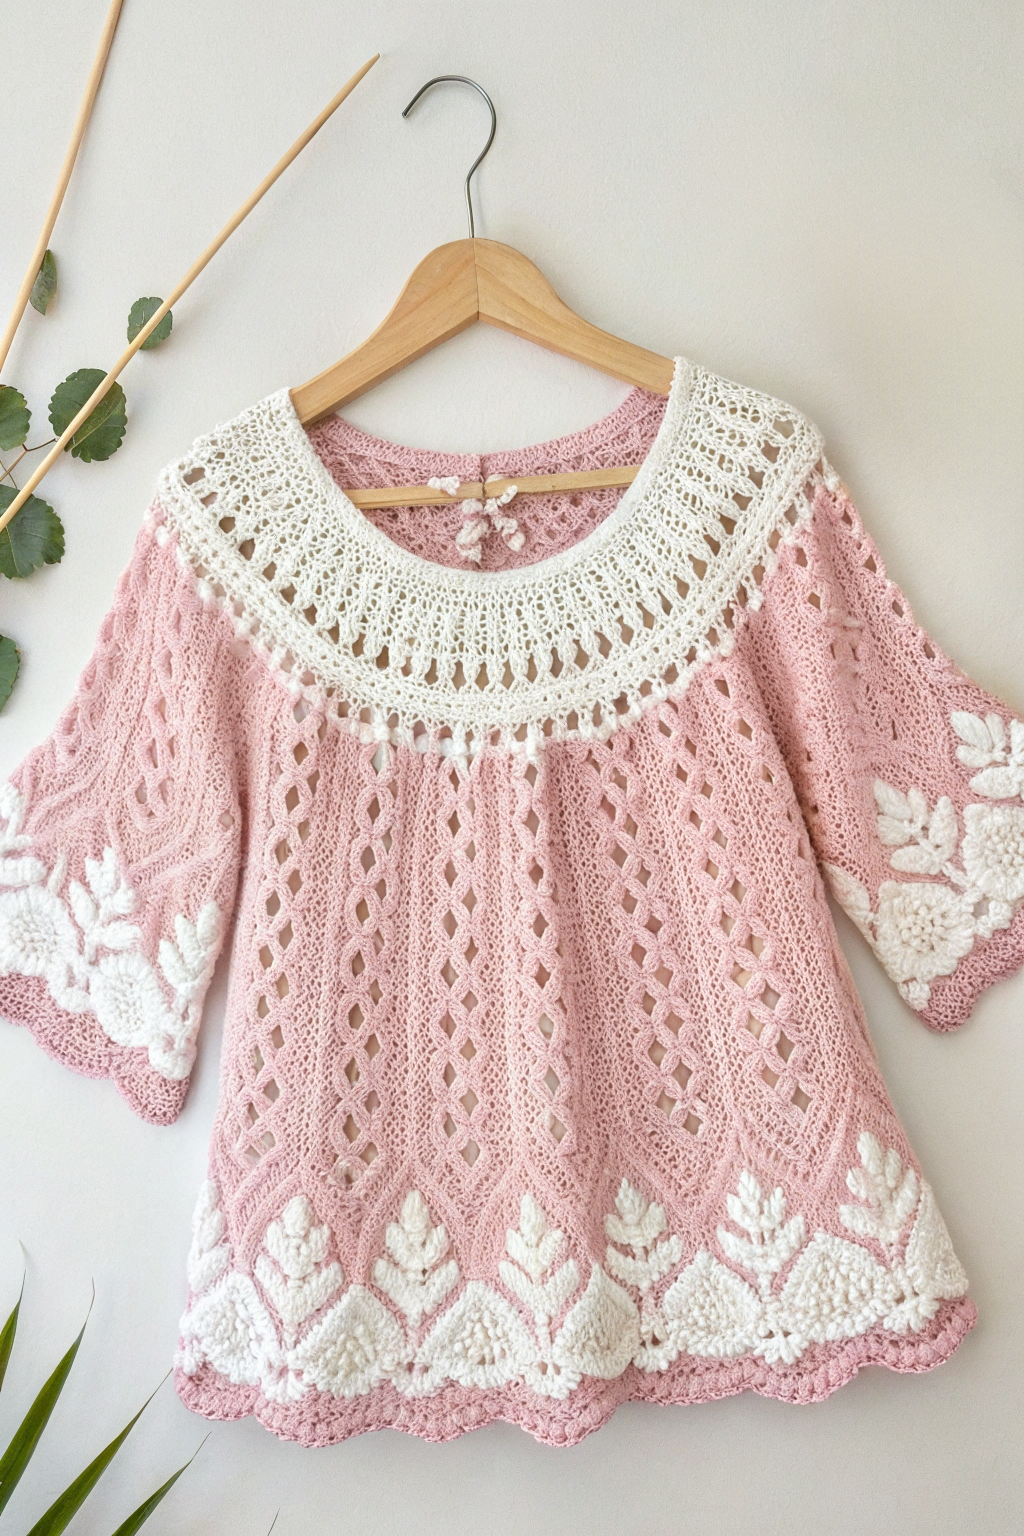
Ever look at a beautiful handmade garment and wish you could fashion one just like it? Today, we’re diving into just that! Take a peek at the lovely pink and white tunic in the picture. It boasts delicate lace, charming bell sleeves, and gorgeous textured details. While it looks intricate, we’ll break down how to assemble this Crochet Lace Tunic step by step. This guide is designed with beginners in mind, so grab your hook, pick some soft yarn, and let’s begin this rewarding project together. Imagine the delight of wearing or gifting something so special, made entirely by you!
Getting Started What You’ll Need
Before we jump into the stitches, let’s gather our supplies. Having everything ready makes the process much smoother.
- 🧶 Yarn: Sport weight (Category 2) or light DK (Category 3) cotton or cotton-blend yarn. You’ll need approximately 300-400g in total.
- Main Color (MC): Light Pink (approx. 200-250g)
- Contrast Color (CC): Bright White (approx. 100-150g)
- 🪝 Crochet Hook: Size 3.5mm (E/4) or the size needed to obtain the correct gauge.
- ✂️ Scissors: For trimming yarn ends.
- 🧵 Yarn Needle: For weaving in ends neatly.
- 📏 Measuring Tape: To check your gauge and measurements.
- ✨ Stitch Markers: Helpful for marking rounds or sections (optional but recommended).
Gauge The Secret Ingredient
Okay, let’s talk about gauge. This is super important! Gauge refers to how many stitches and rows fit into a specific measurement (like 4×4 inches). Matching the gauge ensures your finished tunic will be the right size.
Before you start the main piece, work a small test square (about 6×6 inches) using the pink yarn and the diamond lace pattern described for the body. Measure the central 4×4 inches. If you have more stitches than specified in a pattern gauge (or estimate based on yarn label), use a smaller hook. If you have fewer stitches, use a larger hook. Adjust until your swatch matches. This little step prevents big headaches later!
Making Your Tunic Step-by-Step
This tunic is worked from the top down, starting with the elegant white yoke.
Section 1: The White Lace Yoke (Contrast Color – White)
The yoke is the decorative white collar section. It’s worked in rounds, increasing in size with each round to form the circular shape that sits over the shoulders.
- Foundation: Using your white yarn (CC), begin with a foundation chain. Chain (ch) about 80-100 stitches (adjust based on desired neck opening size – measure loosely around the neck/shoulders where you want it to sit). A chain stitch is made by pulling a loop of yarn through the loop currently on your hook. Join the last chain to the first chain with a slip stitch (sl st) to form a ring, being careful not to twist the chain. A slip stitch is inserting your hook into a stitch, yarning over, and pulling the yarn through both the stitch and the loop on your hook – it’s used for joining or moving yarn without adding height.
- Round 1: Chain 3 (this counts as your first double crochet (dc) here and throughout). A double crochet is made by yarning over, inserting the hook into the stitch, yarning over, pulling up a loop (3 loops on hook), yarning over, pulling through two loops (2 loops on hook), yarning over, and pulling through the final two loops. Work 1 dc into each chain stitch around. Join with a sl st to the top of the beginning ch-3.
- Round 2 (Lace Pattern Starts): Chain 4 (counts as 1 dc + ch 1). Skip the next stitch, dc in the next stitch, chain 1. Repeat the instructions between the asterisks (*) all the way around. Join with a sl st to the 3rd chain of the beginning ch-4. This round establishes the openwork ‘holes’ seen in the yoke.
- Round 3 (Increase Round): Chain 3 (counts as 1 dc). Work 1 dc into the same stitch. Work 1 dc into the next ch-1 space, work 2 dc into the next dc. Repeat from * around. Join with a sl st to the top of the beginning ch-3. (This increases the number of stitches).
- Subsequent Yoke Rounds: Continue working rounds, alternating between rounds similar to Round 2 (forming the lace spaces) and rounds similar to Round 3 (working double crochets and incorporating increases). The image shows several rows of the openwork pattern separated by rows of solid double crochet. Increases should be spaced evenly around to keep the yoke flat. Aim for about 4-5 inches in yoke depth, trying it on periodically if possible. Ensure your increases are consistent so the yoke doesn’t ruffle or cup. Fasten off the white yarn.
Section 2: Dividing for Body and Sleeves & Working the Body (Main Color – Pink)
Now we switch to pink and shape the armholes and body.
- Divide: Lay the yoke flat. Decide how many stitches you need for the front, back, and each sleeve. Place stitch markers to mark the beginning of the back, the first sleeve, the front, and the second sleeve. Ensure the front and back sections have roughly the same number of stitches, and the sleeve sections have the same number.
- Join Pink Yarn: Attach your pink yarn (MC) with a sl st at the beginning of the back section (one of your markers).
- Round 1 (Body Foundation): Chain 3 (counts as 1 dc). Work the Diamond Lace Pattern across the back stitches until you reach the marker for the first sleeve. Chain about 6-10 stitches (this forms the underarm). Skip all the sleeve stitches. Work the Diamond Lace Pattern across the front stitches until you reach the marker for the second sleeve. Chain the same number of underarm stitches as before (6-10). Skip the second set of sleeve stitches. Join with a sl st to the top of the beginning ch-3. You now have one large round forming the body.
- Diamond Lace Pattern: This pattern uses a combination of chains and double crochets to form the diamond shapes. A typical way to achieve this look is:
- Row 1: Ch 1, skip 1 st, dc in next st. Repeat around. Join.
- Row 2: Sl st into the first ch-1 space. Ch 3 (counts as dc). Dc in the same space. Ch 1, skip next dc, 2 dc in next ch-1 space. Repeat around. Join.
- Row 3: Sl st to the space between the 2-dc group. Ch 4 (counts as dc, ch 1). Dc in the space between the next 2-dc group, ch 1. Repeat around. Join.
- Row 4: Ch 3 (counts as dc). 2 dc in next ch-1 space, ch 1, skip next dc. Repeat ending with 1 dc in the last ch-1 space before the join. Join.
- Repeat these or similar rows to build the pattern. Key: Stagger the placement of the double crochets and chain spaces to build the diamond effect. Pay close attention to the image for the exact structure.
- Continue Body: Keep working the Diamond Lace Pattern in continuous rounds (without joining each round if you prefer a seamless look, just mark the beginning of the round). The tunic has a slight A-line shape, meaning it gets gradually wider towards the hem. To achieve this, incorporate subtle increases every few inches. An increase in this pattern might involve working an extra
dc, ch 1, dcgroup into one of the chain spaces periodically. Work until the body reaches your desired length, stopping before the white hem border section. Do not fasten off the pink yarn yet if proceeding directly to the pink hem edge.
Section 3: The Bell Sleeves (Main Color – Pink)
Now let’s go back and put together those lovely sleeves.
- Join Pink Yarn: Attach the pink yarn (MC) with a sl st at the center of the underarm chain stitches you made earlier.
- Round 1: Chain 3 (counts as 1 dc). Work the Diamond Lace Pattern evenly around the armhole opening (picking up stitches from the yoke edge and the underarm chains). Join with a sl st to the top of the beginning ch-3.
- Continue Sleeve: Work the Diamond Lace Pattern in rounds. The sleeves in the image extend to about 3/4 length, finishing elegantly below the elbow. Work even (no increases or decreases) for the upper part of the sleeve.
- Bell Shape: To get the bell shape, start increasing in the last few inches of the sleeve length. Similar to the body increases, add extra stitch groups evenly around the circumference in increase rounds. The image shows a gentle flare. Work until the pink portion of the sleeve reaches the desired length, stopping before the white cuff section. Fasten off pink yarn.
- Repeat: Follow steps 1-4 for the second sleeve.
Section 4: Textured White Borders (Contrast Color – White)
This is where the tunic gets its standout features! The white borders on the hem and sleeves feature prominent, raised leaf motifs. These effects often utilize stitches like bobble or popcorn stitches to build texture, but achieving the specific look here requires careful arrangement.
- Bobble Stitch (Example): Yarn over, insert hook, yarn over, pull up loop, yarn over, pull through 2 loops (2 loops on hook). Repeat this process 3-4 more times in the same stitch. You’ll have multiple loops on your hook (e.g., 5 loops for a 4-dc bobble). Yarn over and pull through ALL loops on the hook. Chain 1 to secure the bobble (this ch-1 may count as a stitch depending on the pattern). Bobbles pop forward on the side facing you as you work them.
- Popcorn Stitch (Example): Work 4-5 dc all into the same stitch. Drop the loop from your hook. Insert your hook from front to back into the top of the first dc you made in that group. Put the dropped loop back onto the hook. Pull the dropped loop through the first dc stitch. Chain 1 to secure. Popcorns pop forward on the side facing you.
- Hem Border:
- Join white yarn (CC) where you left off with the pink body (or join fresh if you fastened off).
- Work 1-2 rounds of plain single crochet (sc). A single crochet is inserting the hook, yarning over, pulling up a loop (2 loops on hook), yarning over, and pulling through both loops. This forms a solid base.
- Work the Leaf Motif round: This requires careful stitch placement. Following the image closely, you’ll work sections of single crochet or double crochet, interspersed with the prominent, raised leaf shapes. These are carefully formed, likely using textured stitches like bobbles or popcorns arranged specifically to achieve that distinct, somewhat pointed leaf appearance pointing upwards. Space these motifs evenly around the hem. You might work something like: [sc in next 5 st, form the specific leaf motif over next 3-5 st based on the visual, sc in next 5 st], repeat.
- Work a final round to form the scalloped edge. This is often done by working a group of stitches (like 5 dc) into one stitch, skipping a few stitches, working a slip stitch or single crochet, skipping a few stitches, and then repeating the group of stitches. Follow the gentle wave pattern seen in the image. Fasten off white yarn.
- Sleeve Cuffs:
- Join white yarn (CC) to the end of one sleeve.
- Repeat the process for the Hem Border (steps 1b-1d) on the smaller circumference of the sleeve cuff. The leaf motifs are identical but scaled to fit the sleeve width, replicating the same raised, distinct appearance.
- Repeat for the second sleeve cuff.
Section 5: Finishing Touches
Almost there! The final details make all the difference.
- Weave in Ends: Use your yarn needle to carefully weave in all loose yarn ends on the inside of the tunic. This makes your work look tidy and secure.
- Neckline Bow (Optional): The image shows a small pink bow attached at the center front of the neckline, just below the white yoke. To make this, chain a short length (approx. 20-30 chains) with pink yarn. Fasten off, leaving long tails. Tie the chain into a small bow shape. Use the tails to securely sew the bow onto the neckline.
- Blocking (Recommended): Wet blocking can help even out stitches and shape the lace beautifully. Gently wash your finished tunic according to the yarn label instructions. Squeeze out excess water (do not wring!). Lay it flat on towels, gently shaping it to the desired dimensions. Allow it to air dry completely.
Your Beautiful Handiwork
And there you have it – your very own Sweet Blossom Crochet Tunic! Feel that sense of accomplishment? Taking yarn and hook and bringing this lovely piece into being is truly special. The delicate lace, the textured leaves, the soft colors – it’s a garment full of charm.
Don’t hesitate to share pictures of your finished tunic! Seeing handmade items enjoyed is one of the best parts of the crafting community. Happy hooking!