Sunshine Yellow Custard Bites
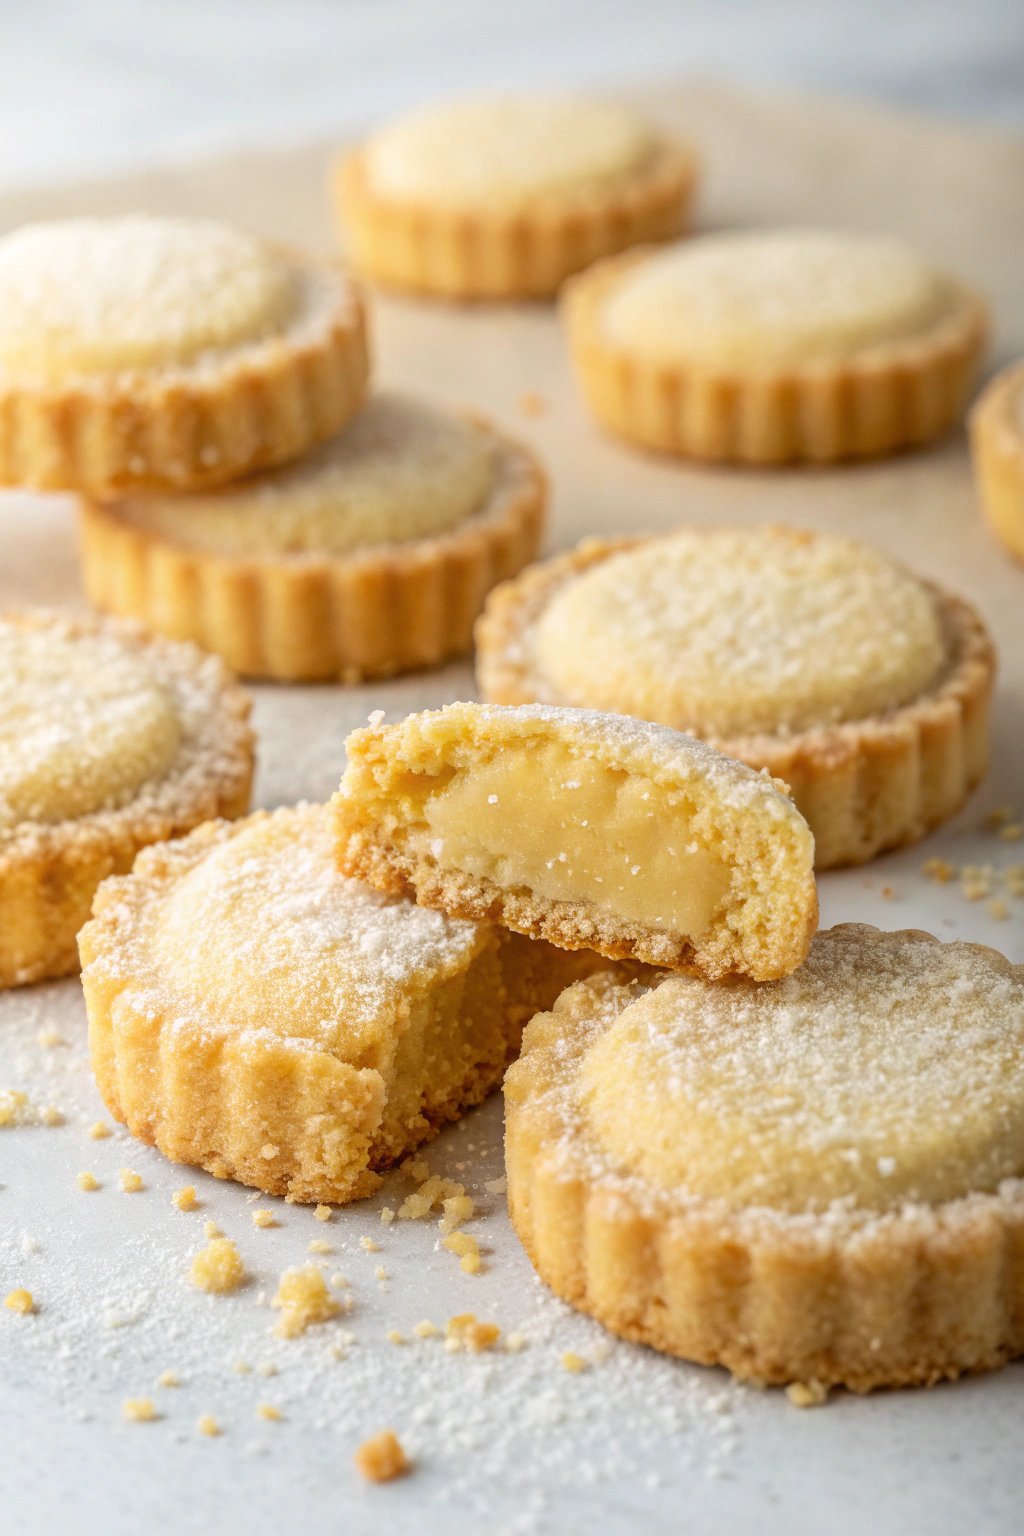
These delightful Mini Custard Tarts offer a wonderful baking project, yielding individual portions of sweet, creamy goodness encased in a buttery, crumbly pastry. The image showcases perfectly baked tartlets: each one features a distinct fluted edge on its golden-brown crust, holding a generous amount of smooth, pale yellow custard filling. A final dusting of powdered sugar provides a beautiful finish, hinting at the sweetness within. One tart is broken open, revealing the satisfyingly set, yet tender custard texture inside. Preparing these gems at home brings a special kind of satisfaction. This guide walks beginner bakers through each step to achieve these lovely results.
Gathering Your Supplies
Success begins with the right components and tools. Here’s what one needs:
Halal Ingredients Needed
- 🧈 175g Halal Unsalted Butter (cold and cubed)
- 🍚 250g Plain Flour (plus extra for dusting)
- 🍬 50g Icing Sugar (also known as powdered sugar)
- 🥚 1 Large Halal Egg Yolk
- 💧 2-3 tbsp Cold Water
- 🥛 300ml Whole Halal Milk
- 🍦 150ml Halal Double Cream (or Heavy Cream)
- 💛 4 Large Halal Egg Yolks
- 🍭 75g Caster Sugar (superfine sugar)
- 🌽 2 tbsp Cornflour (cornstarch)
- ✨ 1 tsp alcohol free Vanilla Extract
- ❄️ Icing Sugar (for dusting)
Kitchen Equipment
- 🥣 Large Mixing Bowl
- 🍴 Pastry Blender or Fingertips
- 🌯 Cling Film (Plastic Wrap)
- 📏 Rolling Pin
- 🍪 8-10 Individual Mini Tartlet Tins (approx. 8-10cm diameter, fluted edges preferred)
- ✂️ Scissors
- 📜 Baking Parchment
- ⚖️ Ceramic Baking Beans (or uncooked rice/dried lentils)
- 🥘 Saucepan (Medium size)
- 🥚 Whisk
- 🥣 Sieve
- 🥅 Cooling Rack
Preparing the Perfect Mini Custard Tarts
Follow these steps carefully for pastry and custard perfection, mirroring the tarts shown in the photograph.
Step 1: Making the Sweet Shortcrust Pastry
- Place the flour and icing sugar into the large mixing bowl. Add the cold, cubed butter.
- Using fingertips (or a pastry blender), rub the butter into the flour mixture. The goal is to coat the flour with fat. Continue until the mixture resembles fine breadcrumbs. Work quickly to keep the butter cold; this helps ensure a tender, crumbly crust like the one visible in the image.
- In a small bowl, lightly beat the egg yolk with 2 tablespoons of cold water.
- Make a well (a small indentation) in the centre of the flour mixture and pour in the egg yolk mixture.
- Using a knife or your hand, gently mix everything together until the dough just starts to come together. Avoid over-mixing, as this can make the pastry tough. If it seems too dry, add the remaining tablespoon of cold water, a tiny bit at a time.
- Tip the dough onto a lightly floured surface and gently bring it together into a smooth ball. Do not knead. Flatten the ball into a disc shape – this makes it easier to roll out later.
- Wrap the dough disc tightly in cling film. Place it in the refrigerator to chill for at least 30 minutes. Chilling is crucial: it allows the gluten in the flour to relax (preventing shrinkage) and firms up the butter (ensuring flakiness).
Step 2: Lining the Tartlet Tins
- Preheat the oven to 190°C (170°C Fan / Gas Mark 5). Place the mini tartlet tins on a baking sheet.
- Lightly flour a clean work surface and the rolling pin. Unwrap the chilled dough and roll it out until it’s about 3-4mm thick.
- Using a round cutter slightly larger than the tartlet tins, cut out circles of pastry.
- Carefully lift each pastry circle and gently press it into a tartlet tin. Ensure the pastry fits snugly against the bottom and sides, especially into the fluted edges seen in the picture. Be gentle to avoid stretching the dough.
- Trim any excess pastry from the top edge using a sharp knife held parallel to the tin’s rim for a neat finish.
- Prick the base of each pastry case a few times with a fork. This helps prevent the bottom from puffing up during baking.
- Place the lined tins back in the refrigerator for another 15 minutes to firm up again.
Step 3: Blind Baking the Pastry Cases
- Cut out small squares of baking parchment, large enough to cover the base and sides of each pastry case. Scrunch them up and then un-scrunch them – this makes them more pliable.
- Place a parchment square inside each chilled pastry case. Fill them with ceramic baking beans or uncooked rice/lentils. These weights stop the pastry base from rising and the sides from collapsing inwards. This process is called blind baking.
- Bake the pastry cases in the preheated oven for 15 minutes.
- Carefully remove the baking sheet from the oven. Lift out the parchment paper and baking beans (these will be hot!).
- Return the tartlet cases to the oven for another 5-7 minutes, or until the pastry looks pale golden and feels dry to the touch. This ensures the base is properly cooked.
- Remove the tins from the oven and set them aside on the baking sheet while preparing the filling. Reduce the oven temperature to 170°C (150°C Fan / Gas Mark 3).
Step 4: Preparing the Smooth Custard Filling
- Pour the milk, double cream, and vanilla extract into the medium saucepan. Heat gently over medium-low heat until it reaches a simmer. A simmer means the liquid is hot with small bubbles forming around the edge of the pan, but it is not boiling vigorously. Remove from heat immediately.
- While the milk mixture is heating, place the egg yolks, caster sugar, and cornflour into a clean mixing bowl. Whisk them together until the mixture is pale, thick, and smooth. This forms the base of the custard.
- Now, it’s time to temper the eggs. This technique prevents the hot milk from scrambling the eggs. While whisking the egg yolk mixture continuously, slowly pour about half of the hot milk mixture into the bowl in a thin, steady stream.
- Once combined, pour this warmed egg mixture back into the saucepan containing the remaining hot milk.
- Return the saucepan to medium-low heat. Cook the custard, whisking constantly and ensuring the whisk reaches all corners of the pan, for about 5-8 minutes. The custard will gradually thicken. It’s ready when it’s thick enough to coat the back of a spoon. Do not let it boil.
- Remove the custard from the heat. To achieve the perfectly smooth filling seen in the image, pour the custard through a sieve into a jug or bowl. This removes any potential small lumps. Let it cool slightly for a few minutes.
Step 5: Assembling and Baking the Tarts
- Carefully pour the slightly cooled custard into each pre-baked pastry case. Fill them almost to the top, as observed in the finished tarts pictured.
- Place the baking sheet with the filled tarts back into the oven, now set at the lower temperature of 170°C (150°C Fan / Gas Mark 3).
- Bake for 15-20 minutes. The custard should be just set. It should still have a slight wobble in the very centre when the baking sheet is gently shaken. Avoid over-baking, as this can cause the custard to split or become rubbery.
- Remove the tarts from the oven and leave them in their tins on a wire rack to cool completely. The custard will finish setting as it cools.
Step 6: The Finishing Touch
- Once the mini custard tarts are completely cool, carefully remove them from their tins.
- Just before serving, generously dust the tops with icing sugar using a small sieve. This replicates the snowy finish seen in the photograph, adding a final touch of sweetness and visual appeal.
Sharing the Sunshine
Presenting these homemade Sunshine Yellow Custard Bites is a moment of pure delight. Their golden, crumbly shells and smooth, creamy centres offer a wonderful contrast in textures. They are perfect for afternoon tea, dessert, or sharing with friends and family. Feel encouraged to embark on this baking journey and perhaps share snapshots of your beautifully prepared tartlets! The simple pleasure found in baking and sharing such treats is truly rewarding.