Sunny Lemon Raspberry Meringue Pie
Imagine presenting this lovely Lemon Raspberry Meringue Pie, a dessert composed of delightful layers packed with texture and taste, ideal for making any occasion feel special. Its construction – a crumbly bottom, soft cake, tangy raspberry filling, smooth lemon curd, topped with beautiful meringue – makes preparing it a truly satisfying endeavor. This tutorial guides beginners step-by-step in producing this specific pie, breaking down the process into simple actions using accessible halal ingredients. Following the instructions precisely is the path to a wonderful homemade dessert you’ll be proud to serve.
Getting Ready: Ingredients and Tools
Having everything prepared beforehand makes the baking process smooth and enjoyable. Gather these items:
Halal Ingredients:
- 🍪 For the Biscuit Crust:
- 2 cups Digestive biscuit crumbs (ensure no non-halal additives)
- ½ cup Unsalted butter, melted (halal certified if specified)
- ¼ cup Granulated sugar
- 🍰 For the Cake Base:
- ½ cup All-purpose flour
- ¼ tsp Baking powder
- Pinch of salt
- ¼ cup Unsalted butter, softened (halal)
- ¼ cup Granulated sugar
- 🥚 1 Large egg (halal source)
- 2 tbsp Milk (halal)
- ¼ tsp Vanilla extract (alcohol-free)
- 🍓 For the Raspberry Layer:
- 2 cups Fresh or frozen raspberries
- ¼ cup Granulated sugar
- 1 tbsp Cornstarch
- 1 tbsp Lemon juice, fresh
- 🍋 For the Lemon Curd:
- ½ cup Granulated sugar
- 2 tbsp Cornstarch
- Pinch of salt
- ½ cup Water
- 🍋 2 Large egg yolks (halal source)
- ¼ cup Lemon juice, fresh (about 1-2 lemons)
- zest of 1 Lemon
- 2 tbsp Unsalted butter (halal)
- ☁️ For the Meringue Topping:
- 🥚 4 Large egg whites (halal source), room temperature
- ½ tsp Cream of tartar (or white vinegar)
- ¾ cup Granulated sugar
- ½ tsp Vanilla extract (alcohol-free)
Kitchen Equipment:
- 🥧 9-inch Round tart pan with removable bottom (or springform pan)
- 🥣 Several Mixing bowls (small, medium, large)
- 🥄 Measuring cups and spoons
- ⚡️ Electric mixer (handheld or stand mixer)
- 🍳 Small saucepan
- 🔥 Medium saucepan
- 🧱 Whisk
- 🔪 Spatula
- 🧁 Piping bag with a star tip (like Wilton 1M)
- 🔦 Kitchen torch (optional, for browning meringue)
- 🌡️ Oven
- 📜 Parchment paper
Building the Pie Layer by Layer
Follow these detailed instructions to assemble the Lemon Raspberry Meringue Pie exactly as shown in the picture. Take each step slowly; precision is key for beginners.
Step 1: Prepare the Biscuit Crust
- In a medium bowl, combine the digestive biscuit crumbs and ¼ cup of granulated sugar.
- Pour the ½ cup of melted unsalted butter over the crumb mixture. Stir with a fork until all the crumbs are evenly moistened. The mixture should clump together when pressed.
- Tip the buttery crumbs into the 9-inch tart pan. Press the crumbs firmly and evenly onto the bottom and up the sides of the pan using the bottom of a glass or your fingers. Make sure the base is compact and the sides are neat.
- Place the tart pan in the refrigerator to chill the crust for at least 30 minutes. This helps it firm up.
Step 2: Make the Cake Base Layer
- Preheat the oven to 350°F (175°C).
- In a small bowl, whisk together the ½ cup all-purpose flour, ¼ tsp baking powder, and the pinch of salt. Set aside.
- In a separate medium bowl, use an electric mixer to beat the ¼ cup softened unsalted butter and ¼ cup granulated sugar together until the mixture becomes light and fluffy. This usually takes about 2-3 minutes. Light and fluffy means the color lightens, and the texture looks airy.
- Add the 1 large egg and ¼ tsp alcohol-free vanilla extract to the butter mixture. Beat well to combine.
- Gradually add the flour mixture to the wet ingredients, alternating with the 2 tbsp milk. Start and end with the flour mixture (add about one-third of the flour, then half the milk, another third of flour, the rest of the milk, and finally the remaining flour). Mix on low speed just until combined after each addition. Overmixing can make the cake tough.
- Remove the chilled crust from the refrigerator. Carefully spread the cake batter evenly over the bottom of the biscuit crust using a small spatula.
- Bake for 15-20 minutes, or until a wooden skewer inserted into the center of the cake layer comes out clean.
- Let the tart cool completely in the pan on a wire rack.
Step 3: Prepare the Raspberry Filling
- While the base cools, prepare the raspberry layer. In a medium saucepan, combine the 2 cups raspberries (if using frozen, do not thaw), ¼ cup granulated sugar, 1 tbsp cornstarch, and 1 tbsp fresh lemon juice.
- Stir everything together. Place the saucepan over medium heat.
- Bring the mixture to a gentle simmer, stirring constantly. Cook for about 5-7 minutes, or until the raspberries have broken down slightly and the sauce has thickened. Thickened means it coats the back of a spoon.
- Remove the saucepan from the heat and let the raspberry filling cool completely. As it cools, it will thicken further.
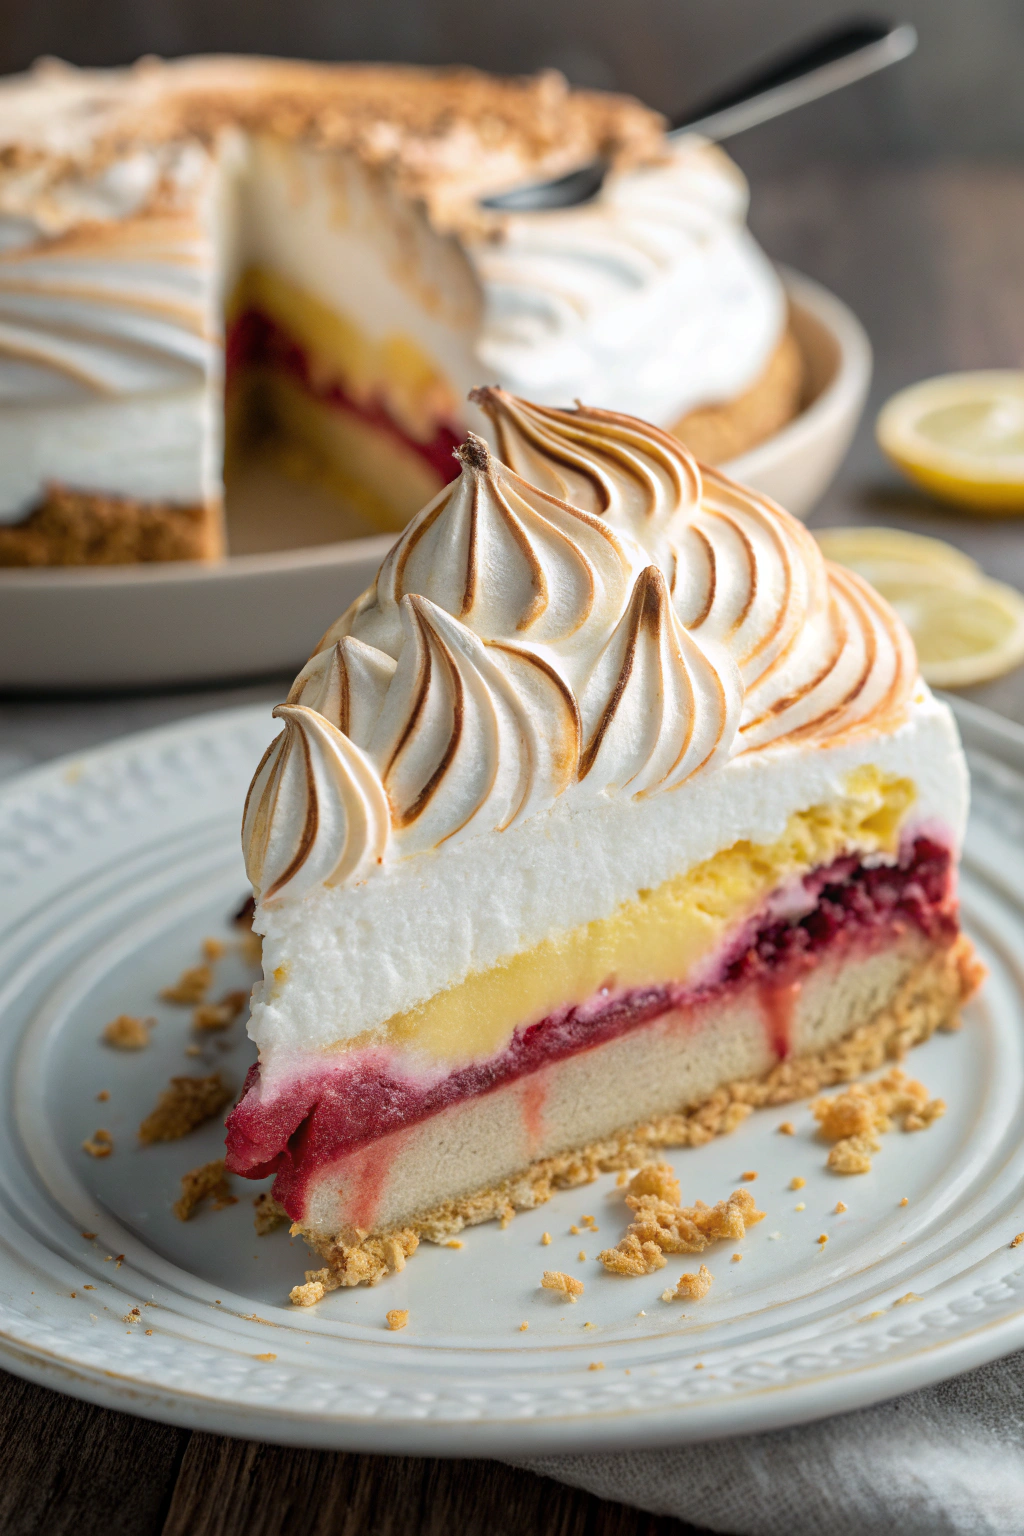
- Once the cake base and raspberry filling are both cool, gently spread the raspberry filling evenly over the cake layer in the tart pan. Ensure it forms a distinct, vibrant red layer as seen in the photo.
Step 4: Make the Lemon Curd
- In a small saucepan (off the heat), whisk together the ½ cup granulated sugar, 2 tbsp cornstarch, and pinch of salt. Gradually whisk in the ½ cup water until smooth.
- Place the saucepan over medium heat. Bring the mixture to a boil, whisking constantly. Boil for 1 minute until it becomes thick and translucent. Remove from heat immediately.
- In a separate small bowl, lightly beat the 2 large egg yolks.
- Temper the eggs: This is important to prevent scrambling. Slowly drizzle about half of the hot sugar mixture into the beaten egg yolks while whisking continuously.
- Pour the egg yolk mixture back into the saucepan with the remaining sugar mixture. Whisk well.
- Return the saucepan to low heat. Cook, whisking constantly, for about 2-3 minutes, until the curd thickens further. Do not let it boil vigorously.
- Remove from heat. Whisk in the ¼ cup fresh lemon juice, lemon zest, and 2 tbsp unsalted butter until the butter is melted and the curd is smooth.
- Let the lemon curd cool slightly for about 10-15 minutes, stirring occasionally to prevent a skin from forming.
- Pour the warm lemon curd evenly over the raspberry layer in the tart pan. The result is the smooth, pale yellow layer visible beneath the meringue.
- Chill the tart in the refrigerator for at least 2-3 hours, or until the lemon curd is completely set and firm.
Step 5: Whip Up the Meringue Topping
- Ensure the bowl and beaters of the electric mixer are completely clean and free of any grease, as fat prevents egg whites from whipping properly.
- In the large, clean bowl, beat the 4 large room-temperature egg whites and ½ tsp cream of tartar on medium speed until soft peaks form. Soft peaks mean that when you lift the beaters, the peaks gently curl over.
- With the mixer still running on medium-high speed, gradually add the ¾ cup granulated sugar, one tablespoon at a time, beating well after each addition. Continue beating until the meringue is stiff, glossy, and the sugar has dissolved completely. Rub a little meringue between your fingers; it should feel smooth, not gritty. Stiff peaks mean the peaks stand straight up when the beaters are lifted.
- Beat in the ½ tsp alcohol-free vanilla extract.
Step 6: Assemble and Finish the Pie
- Remove the chilled tart from the refrigerator.
- Transfer the prepared meringue into a piping bag fitted with a star tip.
- Pipe the meringue generously over the set lemon curd layer. Start from the outer edge and work inwards, piping tall, distinct swirls as shown in the image. Pile it high for that impressive look.
- Torching the Meringue (Optional but recommended for the pictured look): If using a kitchen torch, hold it several inches away from the meringue. Move the flame continuously over the surface until the ridges of the piped swirls are golden brown. Be careful not to burn it. Work quickly and keep the flame moving. Safety first: Always follow the manufacturer’s instructions for your kitchen torch.
- Oven Browning (Alternative): If not using a torch, preheat your oven’s broiler (grill) element to high. Place the pie on a baking sheet several inches below the broiler. Watch constantly for 1-2 minutes, rotating the pie as needed, until the meringue peaks are lightly browned. Meringue burns very fast under the broiler, so do not leave it unattended.
- Carefully remove the sides of the tart pan before serving. The finished pie presents beautifully with its layers: the golden biscuit crust, the pale cake base, the red raspberry filling, the yellow lemon curd, and the toasted meringue peaks.
Serving Your Masterpiece
Slice the Lemon Raspberry Meringue Pie with a sharp knife dipped in hot water and wiped clean between each cut for neat slices that showcase all the beautiful layers. The crumbs scattered on the plate in the image add a rustic touch. This pie is best enjoyed chilled on the day it is prepared.
Preparing a dessert like this from scratch offers immense satisfaction. Sharing this beautiful, homemade pie, made with halal ingredients, is a wonderful way to connect with family and friends. Give this recipe a try, embrace the process, and feel proud of the delicious outcome! Share photos of your finished pies; seeing beginner bakers succeed is always inspiring.