Snuggle-Ready Baby Mittens: Knit a Pair Today!
Ready to fashion something truly adorable and useful? Let’s make these charming knit baby mittens! They are the perfect project for beginner knitters and bring so much joy to craft. Imagine the satisfaction of knowing you hand-fashioned something so cozy and sweet for a little one. These mittens aren’t just practical for keeping tiny hands warm; they are also incredibly cute and make a thoughtful handmade gift. Follow along, and you’ll be amazed at how easily you can build these little treasures with your own hands!
Materials You’ll Need
Before we begin, gather these simple supplies. You can easily find these at your local craft store or even online.
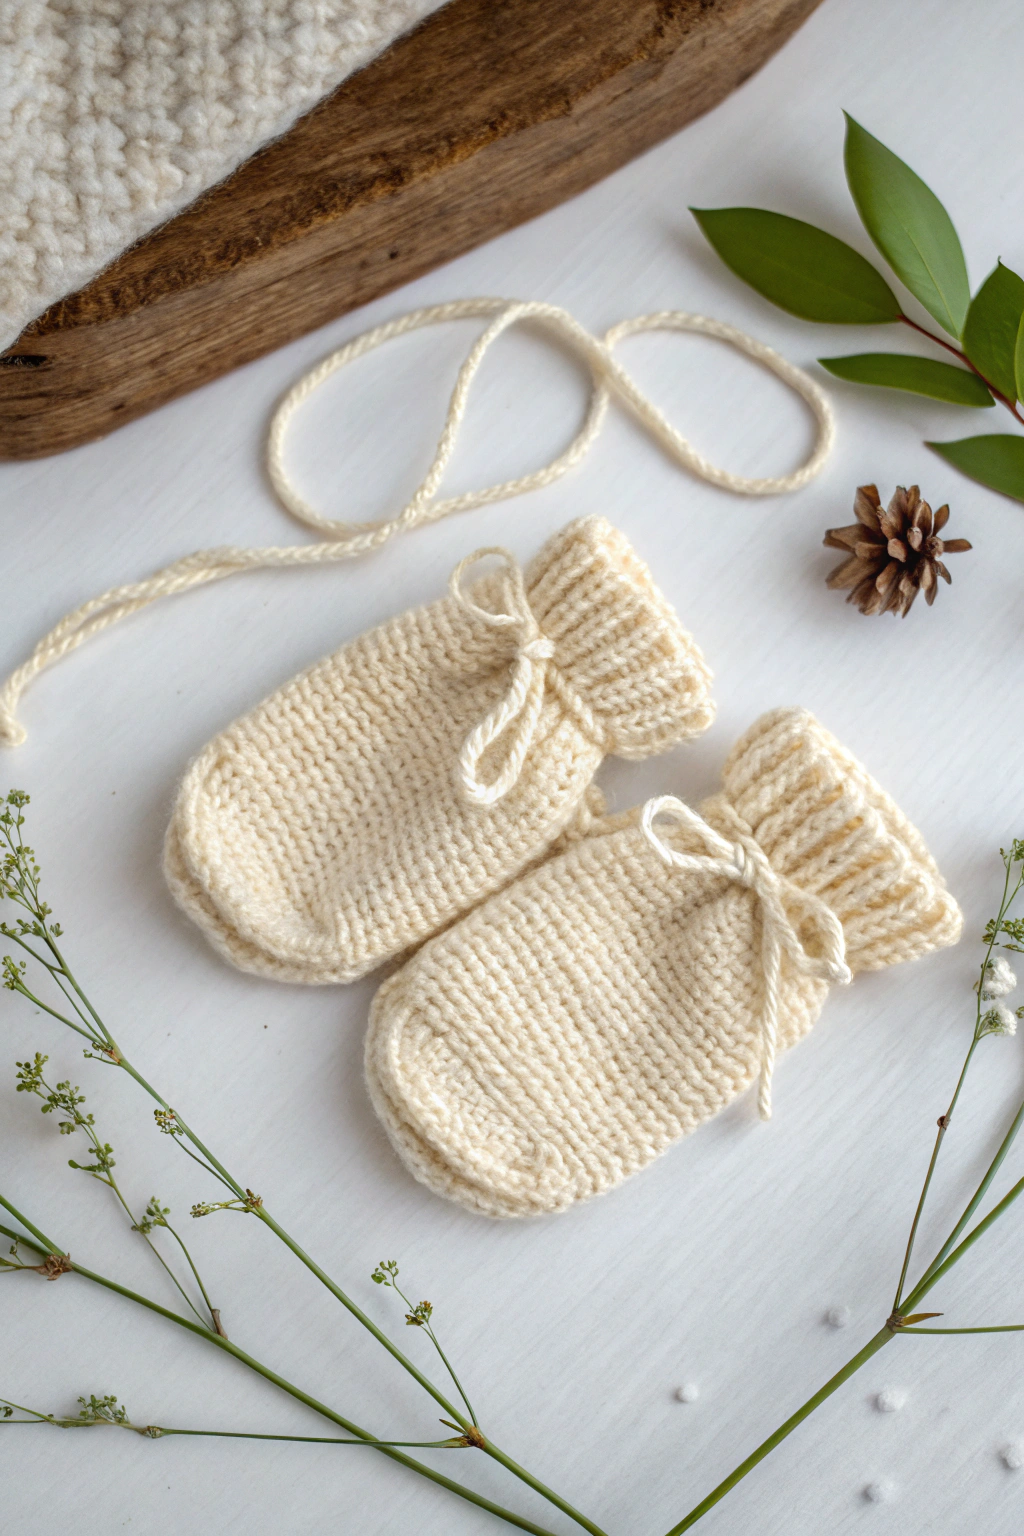
- 🧶 Bulky Weight Yarn: Choose a soft, baby-friendly yarn in a cream or off-white color, just like the mittens in the image. This thicker yarn works up quickly, which is great for beginners!
- 🪡 Knitting Needles: Size US 9 (5.5mm) straight knitting needles. This size is generally recommended for bulky weight yarn and will help you form a nice, cozy fabric.
- 🧵 Yarn Needle: Also known as a tapestry needle or darning needle. This is used to weave in the yarn ends and seam the mitten.
- ✂️ Scissors: For cutting the yarn.
Let’s Get Started: Knitting Baby Mittens Step-by-Step
Don’t worry if you’ve never knitted before! We’ll go through each step slowly and simply. Knitting is all about repeating basic movements, and soon you’ll be in a rhythm. Refer to the image to see how the finished mittens should look as we progress.
Casting On
This is the first step to begin any knitting project. Casting on develops the first row of loops on your needle, which will be the foundation for your mitten.
- Hold one knitting needle in your right hand.
- Make a slip knot in your yarn. To do this, form a loop with your yarn, then bring the working yarn (the yarn coming from the ball) over and through the loop. Tighten it gently on your needle. This knot counts as your first stitch.
- Now, we’ll use the “thumb method” to cast on the rest. Hold the needle with the slip knot in your right hand. Drape the yarn over your left thumb and index finger, holding the yarn ends in your palm.
- Bring the needle tip down and under the yarn on your thumb, then scoop up the yarn from your index finger.
- Bring the needle tip back through the loop on your thumb, and then drop the loop off your thumb. You’ve just fashioned a new stitch!
- Repeat steps 4 and 5 until you have 24 stitches on your needle. This number will give you a mitten size suitable for a newborn. Count your stitches carefully!
Tip for Beginners: Don’t pull the cast-on stitches too tight! They need to be loose enough to knit into easily in the next row.
Knitting the Cuff
The cuff is the ribbed part at the bottom of the mitten, as you can see in the image. Ribbing makes the edge stretchy and snug. We’ll use a simple “knit one, purl one” rib.
- Row 1: Now we’ll start knitting. “Knit one” means to insert your right needle into the first stitch from front to back, wrap the yarn around the needle tip, and pull it through to fashion a new stitch. “Purl one” is a slightly different movement; you bring the yarn to the front, insert the right needle into the stitch from back to front, wrap the yarn, and pull it through. For this row, knit the first stitch, then purl the next stitch, and repeat this pattern (knit one, purl one) all the way across the row.
- Row 2 and all Cuff Rows: Turn your work around so the needle with the stitches is now in your left hand. Repeat Row 1: knit the knit stitches and purl the purl stitches. You’ll see the ribbing pattern starting to emerge – vertical lines of knit stitches separated by purl stitches.
- Continue knitting in this knit one, purl one rib pattern for 10 rows. This will construct a nice, deep cuff, just like in the image. You can count your rows to make sure they are even.
Understanding Knit and Purl: Knit and purl are the two basic stitches in knitting. Think of them as two sides of the same coin. Knit stitches look like ‘V’ shapes, and purl stitches look like horizontal bumps. Alternating them develops different textures, like our ribbing!
Knitting the Mitten Body
Now we’ll make the main part of the mitten, called the body. We’ll use stockinette stitch, which is a very simple and classic stitch pattern.
- Row 1 and all Body Rows: For stockinette stitch, you simply knit every stitch in every row. Insert your right needle into each stitch from front to back, wrap the yarn, and pull through to fashion a new knit stitch.
- Continue knitting every stitch for 15 rows. This will build the body of the mitten to the right length. Refer to the image to see the length of the mitten body in proportion to the cuff.
Tip for Consistent Knitting: Try to keep your tension even as you knit. This means pulling the yarn neither too tight nor too loose. Consistent tension will produce a fabric that looks even and professional.
Shaping the Top
To close the top of the mitten, we need to decrease the number of stitches. Decreasing means fashioning fewer stitches in a row, which narrows the fabric. We’ll use a simple decrease called “knit two together.”
- Decrease Row 1: “Knit two together” (k2tog) means you insert your right needle into the next TWO stitches together as if they were one stitch, and then knit them together as one stitch. This reduces two stitches into one. For this decrease row, knit two together, then knit 2 stitches. Repeat this pattern (k2tog, knit 2) across the row. You’ll have fewer stitches at the end of this row.
- Decrease Row 2: Knit every stitch in this row (just plain knit stitches, no decreases).
- Decrease Row 3: Knit two together, then knit 1 stitch. Repeat this pattern (k2tog, knit 1) across the row. Again, you’ll have fewer stitches.
- Decrease Row 4: Knit every stitch.
- Decrease Row 5: Knit two together across the entire row. This means you’ll knit every pair of stitches together. You’ll be left with very few stitches.
Understanding Decreases: Decreases are essential for shaping knitted items. “Knit two together” is a common and easy decrease that gently slopes the fabric inward, perfect for closing the top of our mittens.
Closing the Top
Now we’ll gather the remaining stitches to neatly close the mitten top.
- Cut the yarn, leaving a tail about 12 inches long.
- Thread this yarn tail onto your yarn needle.
- Slip the tip of the yarn needle through all the stitches remaining on your knitting needle, as if you were taking them off the needle.
- Pull the yarn needle and yarn tail all the way through the stitches, and then gently pull the yarn to gather the top of the mitten closed like a drawstring bag.
- Securely sew the gathered top closed by weaving the yarn needle back and forth through the gathered stitches a few times.
Tip for a Neat Top: Pull the yarn tail snugly but not too tight, so the top gathers nicely without puckering too much.
Seaming the Mitten
The mitten is still flat. Now we need to seam the side to assemble it into a mitten shape.
- Fold the knitted piece in half, with the wrong side (the purl side of stockinette stitch) facing outwards and the cuff at the bottom.
- Using your yarn needle and the yarn tail from closing the top (or attach a new yarn tail if needed), sew up the side seam of the mitten, starting from the cuff and going all the way up to the gathered top.
- Use a simple whip stitch or mattress stitch to construct a neat seam. Whip stitch is just going over and over the edges. Mattress stitch is a bit more invisible but slightly more complex – for now, a simple whip stitch will work perfectly!
- Weave in all yarn ends neatly inside the mitten using your yarn needle. This means threading the yarn end through the knitted stitches to hide it and secure it so it doesn’t unravel.
Making a Pair: Repeat all the steps above to fashion a second mitten – you’ll need two for a pair!
Making the Ties
The mittens in the image have sweet little ties to help keep them on baby’s wrists. We can easily make these ties.
- Cut two lengths of yarn, each about 24 inches long. You’ll need one tie for each mitten.
- To develop a simple tie, you can chain crochet a long strand. If you know basic crochet, make a slip knot on your crochet hook (size G or H hook would work). Chain stitch until your tie is about 12 inches long. Fasten off and weave in the ends. If you don’t crochet, you can simply braid the yarn! Divide each 24-inch strand into three equal strands and braid them together. Tie a knot at each end. Another option is to i-cord knit a tie if you know that technique.
- Thread one tie through the cuff of each mitten, near the cast-on edge. Weave it in and out of the ribbing stitches all the way around the cuff opening. Tie the ends of the tie together to secure it.
Tip for Ties: Make sure the ties are securely attached, but not too tight around the cuff, so they are comfortable for the baby.
Finishing Touches
Congratulations, you’ve just crafted a beautiful pair of baby mittens!
- Weave in all loose ends again to make sure everything is secure and neat.
- Gently block the mittens if you like. Blocking just means lightly dampening the mittens and shaping them to dry flat. This can make the stitches look more even and polished, but it’s optional for baby mittens.
Share Your Creations!
We hope you enjoyed making these adorable baby mittens! Isn’t it wonderful to produce something so lovely with your own hands? We’d absolutely love to see your finished mittens!