Simple Halal Chocolate Lava Cake
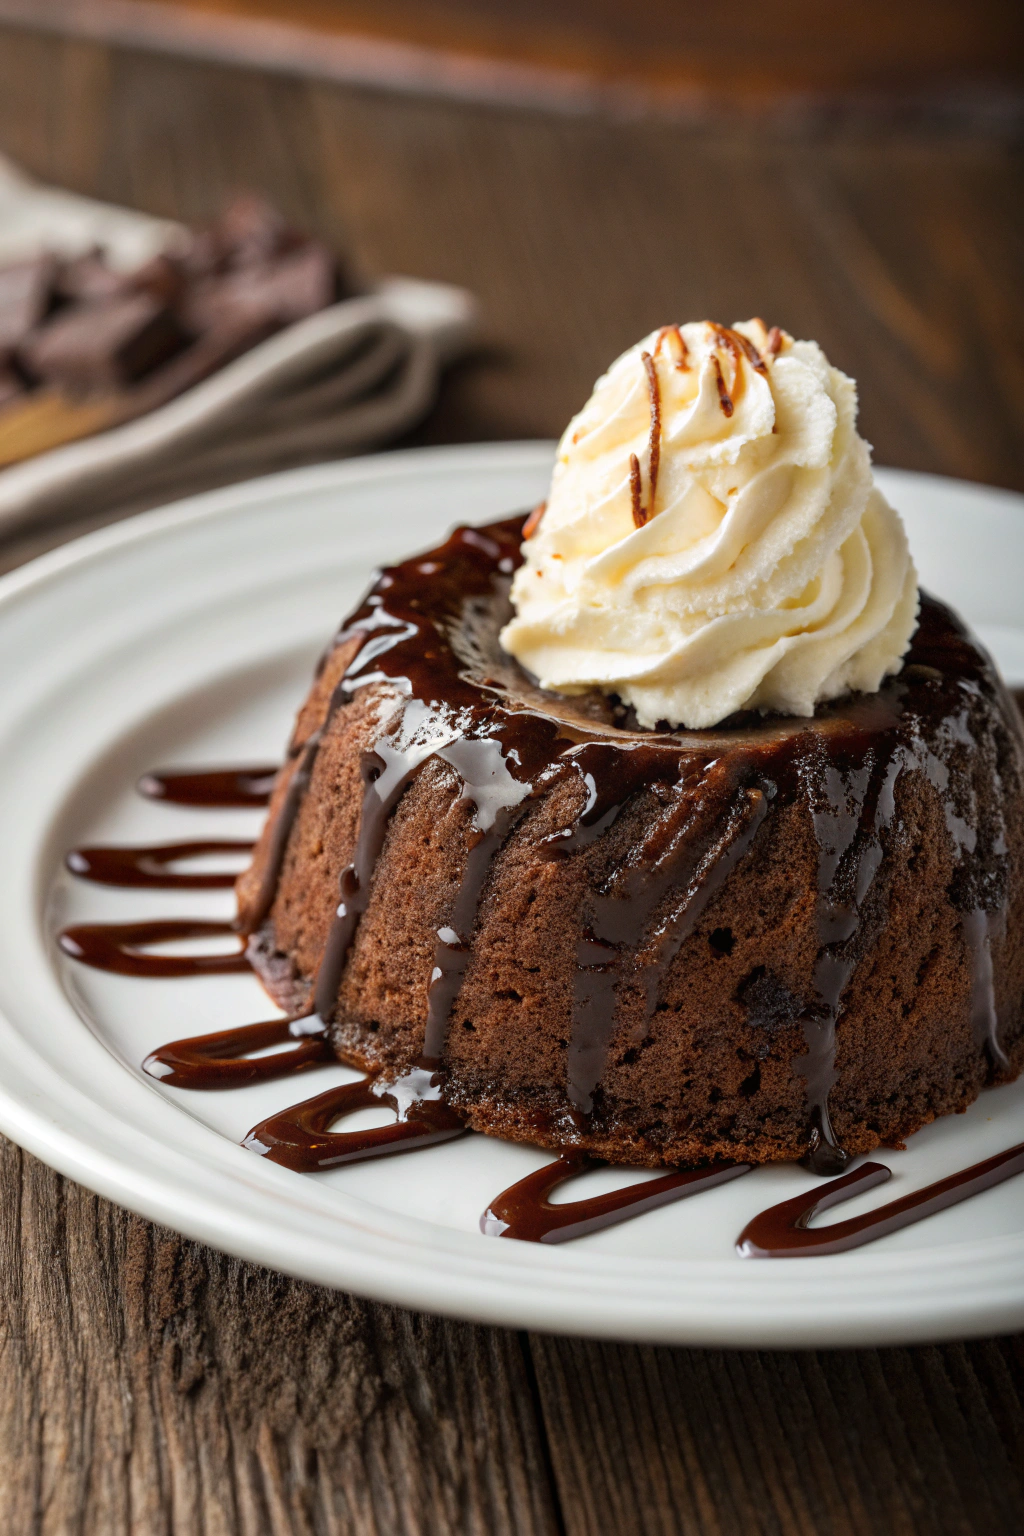
This recipe makes it easy to bake warm, gooey chocolate lava cakes right at home. Perfect for a special dessert or a comforting treat, these individual cakes are surprisingly simple to put together, even for those new to baking. Imagine biting into a rich chocolate cake with a molten center – it’s an experience that’s both indulgent and deeply satisfying. Refer to the image to see the delightful presentation of this classic dessert.
Halal Ingredients You’ll Need
- 🍫 1/2 cup (1 stick) unsalted butter, halal certified or plant-based
- 🍫 4 ounces bittersweet chocolate, halal certified and alcohol-free, chopped
- 🥚 2 large eggs
- 🥚 2 large egg yolks (separate the yolks from the whites of two more eggs)
- 🍚 1/4 cup granulated sugar (regular white sugar)
- 🍚 1/4 cup all-purpose flour, plus extra for dusting ramekins
- 🥄 Pinch of salt
- 🍦 Whipped cream, halal certified (for serving, optional)
- 🍫 Chocolate sauce, halal certified (for serving, optional)
Kitchen Equipment You’ll Need
- 🥣 Mixing bowls (medium and small sizes)
- 🥄 Measuring cups and spoons
- 🥄 Whisk
- 🥄 Spatula or wooden spoon
- 🔥 Oven
- ⏲️ Timer or clock
- 🧁 4 ramekins (small oven-safe dishes, about 6 ounces each)
- 🧈 Pastry brush or your finger (for greasing)
- Baking sheet
Let’s Learn Basic Kitchen Techniques
Before starting, it’s helpful to understand a few common cooking terms. Don’t worry, they are all very straightforward!
Preheating the oven: This means turning on your oven to a specific temperature before you put the food in. This ensures the oven is hot enough from the beginning, which is important for baking correctly. For this recipe, the oven needs to be preheated to 425°F (220°C). You’ll see a light turn on or hear a sound when your oven reaches the right temperature.
Greasing: This means coating the inside of a baking dish with butter or oil to prevent food from sticking. For the ramekins, a thin layer of butter will do the trick. This step is crucial so your lava cakes come out easily after baking.
Dusting: After greasing, sometimes recipes ask you to “dust” with flour. This is another way to prevent sticking and helps give cakes a nice edge. It’s a simple step – just sprinkle a little flour and tap the ramekin to spread it evenly, then turn it upside down and gently tap out any extra flour.
Melting chocolate: This is gently heating chocolate until it becomes liquid. There are a few ways to melt chocolate, but for this recipe, a simple method is used: combining chocolate and butter in a bowl and heating it gently. It’s important to melt it slowly so the chocolate doesn’t burn.
Whisking: This means mixing ingredients together quickly using a kitchen tool called a whisk. A whisk has loops of wire and helps to incorporate air into mixtures, making them light and fluffy. In this recipe, whisking eggs and sugar will make the lava cakes tender.
Step-by-Step Instructions: Making Your Halal Chocolate Lava Cakes
Now, let’s get started on baking these delicious lava cakes! Remember to refer to the image as you go through the steps to see how the dessert should look.
Step 1: Prepare the Ramekins
First, take your four ramekins. These are the small dishes you’ll bake the lava cakes in. Use a pastry brush or your finger to generously grease the inside of each ramekin with softened butter. Make sure to coat the bottom and sides completely.
Step 2: Dust the Ramekins with Flour
Next, take a spoonful of flour and put it into one of the greased ramekins. Tilt and rotate the ramekin so the flour coats the inside, just like you did with the butter. Do this over a sink or a plate to catch any excess flour. Repeat this for all four ramekins. Tap each ramekin upside down gently to remove any extra flour. This dusting helps the cakes release cleanly after baking.
Step 3: Melt Butter and Chocolate
Take a medium-sized mixing bowl and put the chopped bittersweet chocolate and butter into it. There are a couple of ways to melt these together. One way is to place the bowl over a saucepan of simmering water (make sure the bottom of the bowl doesn’t touch the water). Another way, if you have a microwave, is to microwave them in short intervals (about 20-30 seconds at a time) at medium power, stirring in between, until melted and smooth. Be careful not to overheat the chocolate. It should be shiny and liquid, as seen in the chocolate glaze on the cake in the image.
Step 4: Whisk Eggs, Egg Yolks, and Sugar
In a separate small mixing bowl, add the eggs, egg yolks, and granulated sugar. Use a whisk to mix these together vigorously until the mixture becomes lighter in color and slightly thicker. This might take about 2-3 minutes. This step is important for the texture of the lava cakes.
Step 5: Combine Wet Ingredients
Pour the melted chocolate and butter mixture into the bowl with the egg and sugar mixture. Gently fold them together using a spatula or wooden spoon until just combined. “Folding” means mixing gently by cutting down into the mixture, across the bottom, and turning over to combine, rather than stirring vigorously. This helps keep the mixture light.
Step 6: Add Flour and Salt
Now, add the flour and a pinch of salt to the bowl. Gently fold again until everything is just combined and you have a smooth batter. Be careful not to overmix at this stage, as overmixing can make the cakes tough.
Step 7: Divide Batter into Ramekins
Divide the chocolate batter evenly among the four prepared ramekins. Each ramekin should be about three-quarters full.
Step 8: Bake the Lava Cakes
Place the ramekins on a baking sheet. This makes it easier to put them in and take them out of the oven. Carefully place the baking sheet in the preheated oven. Bake for 12-15 minutes. The baking time is crucial – you want the edges of the cakes to be set but the center to remain molten. Observe in the image how the cake has a slightly firm exterior.
Step 9: Check for Doneness
After 12 minutes, check if the lava cakes are ready. The edges should look set and firm, but the center will still be soft. A slight jiggle in the center is okay – that’s the lava! If you bake them for too long, they will become fully cooked like regular cakes, and you won’t have the molten center. If unsure, it’s better to slightly underbake than overbake.
Step 10: Let Cool Briefly and Invert
Carefully remove the baking sheet from the oven. Let the lava cakes cool in the ramekins for just a minute or two. This short cooling time helps them firm up slightly, making them easier to unmold. To invert them, gently run a thin knife or spatula around the inside edge of each ramekin to loosen the cake. Place a serving plate upside down on top of a ramekin, then quickly flip it over. Gently tap the ramekin to release the lava cake onto the plate. Repeat for the remaining ramekins.
Serve and Enjoy!
Serve your warm halal chocolate lava cakes immediately. They are best enjoyed right away when the center is still gooey and molten, as you can see in the image. You can add a dollop of halal whipped cream on top, just like in the picture, and drizzle with halal chocolate sauce for extra indulgence. A sprinkle of powdered sugar is also a lovely simple touch.
These halal chocolate lava cakes are a delightful treat that’s easier to make than you might think. With a little practice, anyone can put together this impressive dessert. Baking and sharing homemade halal food brings so much joy. Don’t be afraid to try this recipe, even if you are new to baking. Enjoy the process of making something delicious from scratch, and savor every warm, chocolatey bite! We encourage you to share your baked lava cake “creations” with family and friends. Enjoy!