Oven Rack Removal Hack: The Easiest Way to Clean Your Oven
Cleaning the oven is a dreaded chore for most homeowners. The thought of scrubbing away at those stubborn, baked-on messes can be daunting, especially when the oven racks are in the way. But what if we told you there’s a simple hack that can make this task a breeze? Say goodbye to the struggle of cleaning around those pesky racks and hello to a spotless oven with minimal effort.
In this comprehensive guide, we’ll share a game-changing oven rack removal hack that will revolutionize your cleaning routine. Not only will this trick make the process easier, but it will also ensure a more thorough clean, leaving your oven looking (and smelling) like new. So, grab your cleaning supplies and get ready to bid farewell to those unsightly spills and splatters once and for all.
Why Remove Oven Racks for Cleaning?
Removing oven racks before cleaning offers several significant advantages that can streamline the process and deliver superior results. Here are a few compelling reasons to adopt this hack:
- Improved Access to Oven Interior: With the racks out of the way, you’ll have unobstructed access to every nook and cranny of your oven. No more awkward reaching and stretching to clean hard-to-reach areas.
- Prevent Baked-On Grime Buildup: Oven racks are prime targets for spills and splatters, which can quickly accumulate into a stubborn, baked-on mess. By removing them, you can focus your efforts on a thorough cleaning without worrying about damaging the racks themselves.
- Deeper Cleaning of Oven Walls and Floor: Without the racks in place, you can efficiently clean the oven walls, floor, and even the ceiling, ensuring a comprehensive and spotless finish.
By incorporating this simple hack into your cleaning routine, you’ll not only save time and effort but also achieve a level of cleanliness that’s nearly impossible with the racks in place.
The Oven Rack Removal Hack (Step-by-Step)
Now that you understand the benefits of removing oven racks for cleaning, let’s dive into the step-by-step process of this game-changing hack:
Step 1: Allow Oven to Cool Completely
Safety should always be your top priority when working with ovens. Before attempting to remove the racks, ensure that your oven is completely cool to the touch. This will prevent any potential burns or accidents.
Step 2: Locate Oven Rack Release Mechanisms
Most modern ovens are designed with rack release mechanisms that allow for easy removal and reinsertion of the racks. These mechanisms can vary in design and location, so consult your oven’s manual or manufacturer’s website for specific instructions.
In many cases, you’ll find small levers or hooks on the side walls of the oven cavity that need to be pulled or pushed to release the racks. Take a moment to familiarize yourself with these mechanisms before proceeding.
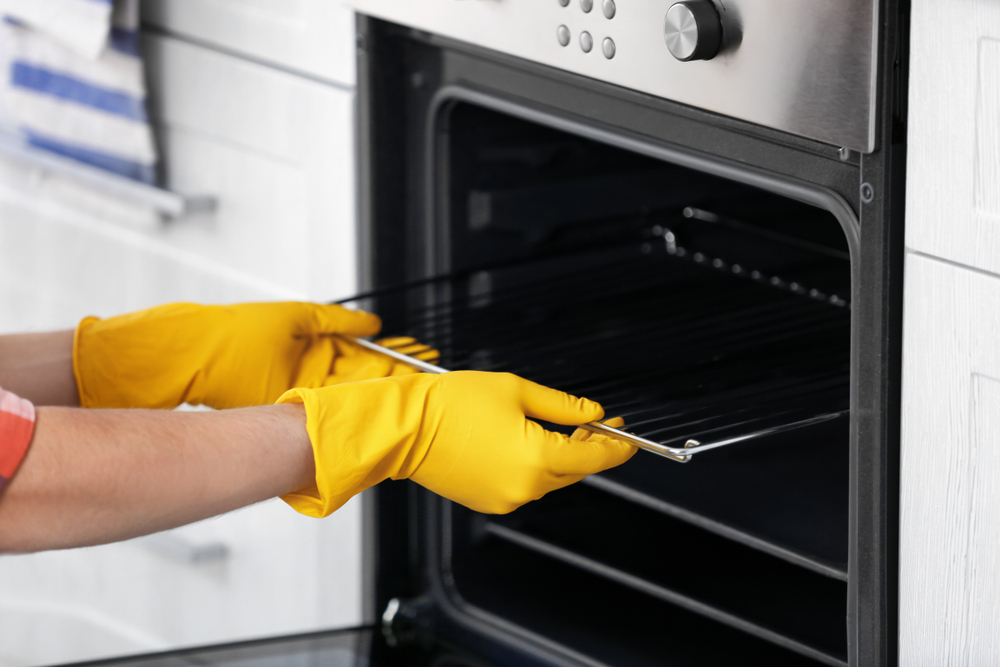
Step 3: Demonstrate the Removal Technique
With the release mechanisms identified, it’s time to put the hack into action. Here’s a step-by-step guide to removing your oven racks:
- Grasp the rack firmly with both hands, one hand on each side.
- Gently pull the rack towards you until it stops, typically halfway out of the oven.
- Locate the release mechanism on the side of the oven cavity and engage it (pull, push, or twist as instructed).
- Once the mechanism is engaged, the rack should be free to slide out completely.
- Repeat the process for any remaining racks.
Remember, if you’re unsure about the proper technique, consult your oven’s manual or consider seeking professional assistance to avoid damaging your appliance.
Step 4: Reassemble and Reinsert Racks After Cleaning
After you’ve thoroughly cleaned your oven and racks, it’s time to reassemble everything. Follow these steps to reinsert the racks safely and securely:
- Align the rack with the guides or grooves inside the oven cavity.
- Gently push the rack into the oven until it stops, usually about halfway.
- Engage the release mechanism on the side of the oven cavity to secure the rack in place.
- Carefully push the rack all the way into the oven until it’s properly seated.
- Repeat the process for any remaining racks.
Remember, the racks should slide in and out smoothly without excessive force. If you encounter any resistance or difficulty, double-check the alignment and release mechanisms before proceeding.
Tips for Efficient Oven Cleaning
Now that you’ve mastered the oven rack removal hack, it’s time to tackle the cleaning process itself. Here are some tips and recommendations to ensure a thorough and efficient clean:
Recommended Cleaning Products and Tools
- Oven cleaner: Choose a powerful, fume-free oven cleaner specifically designed for removing baked-on messes. Look for eco-friendly options or make your own natural cleaner using baking soda and vinegar.
- Abrasive pads or scouring pads: For stubborn stains and stuck-on grime, an abrasive pad can provide the extra scrubbing power you need.
- Rubber gloves: Protect your hands from harsh chemicals and abrasives by wearing durable rubber gloves.
- Old towels or rags: Have a few old towels or rags on hand for wiping down surfaces and drying the oven cavity after cleaning.
Soaking Racks in a Bathtub or Sink
While the oven cavity is being cleaned, take advantage of this time to soak the oven racks in a bathtub or sink filled with hot water and a generous amount of oven cleaner or a baking soda solution. This will help loosen any baked-on grime, making it easier to scrub off later.
Tackling Stubborn Stains and Baked-On Messes
For those pesky, baked-on messes that just won’t budge, try this simple trick: Make a paste by mixing baking soda and water, and apply it directly to the stain. Let it sit for 15-20 minutes, then scrub with an abrasive pad or scouring pad. The gentle abrasion combined with the baking soda’s cleaning power should help lift even the most stubborn stains.
Safety Precautions and Protective Gear
When working with oven cleaners and abrasives, it’s essential to take proper safety precautions:
- Wear rubber gloves to protect your hands from harsh chemicals and abrasives.
- Ensure adequate ventilation by opening windows or using exhaust fans to prevent inhaling fumes.
- Avoid mixing different cleaning products, as this can create hazardous fumes.
- Keep children and pets away from the cleaning area for their safety.
By following these tips and taking the necessary precautions, you’ll be able to achieve a spotless oven with minimal effort and maximum safety.
Benefits of Regular Oven Cleaning
While the oven rack removal hack and efficient cleaning techniques are game-changers, it’s important to understand the broader benefits of regular oven cleaning:
- Improved Food Quality and Taste: A clean oven ensures that your food doesn’t pick up any unpleasant odors or flavors from built-up grime and residue.
- Reduced Risk of Fires and Smoke: Leftover grease and food particles can easily catch fire or cause excessive smoke, posing a safety hazard. Regular cleaning helps mitigate these risks.
- Energy Efficiency and Oven Longevity: A well-maintained oven operates more efficiently, saving you money on energy bills and extending the lifespan of your appliance.
- Aesthetic Appeal of a Clean Oven: Let’s be honest, no one enjoys the sight of a grimy, baked-on mess inside their oven. A clean oven not only looks inviting but also adds to the overall aesthetic of your kitchen.
By incorporating regular oven cleaning into your routine, you’ll enjoy these benefits while maintaining a safe and pleasant cooking environment.
Frequently Asked Questions
Even with this comprehensive guide, you may still have a few lingering questions. Here are some commonly asked queries and expert advice to help you navigate the oven rack removal and cleaning process with confidence:
Q: How often should I clean my oven?
A: The frequency of oven cleaning depends on several factors, such as how often you use your oven and the types of food you cook. As a general rule, it’s recommended to give your oven a thorough cleaning every three to six months. However, if you notice excessive buildup or smoke during cooking, it’s best to clean it sooner.
Q: Can I leave the oven racks in during the self-cleaning cycle?
A: Most manufacturers advise against leaving oven racks in during the self-cleaning cycle, as the extreme temperatures can warp or discolor the racks. However, some newer oven models may be designed to accommodate racks during self-cleaning. Always consult your oven’s manual for specific instructions.
Q: Is it safe to use harsh chemicals like oven cleaners?
A: While oven cleaners can be effective, they often contain harsh chemicals that can be harmful if not used properly. Always ensure adequate ventilation, wear protective gear, and follow the manufacturer’s instructions carefully. Consider using eco-friendly or natural cleaning solutions like baking soda and vinegar as an alternative.
Q: How do I prevent future buildup and spills in my oven?
A: Prevention is key to minimizing future oven messes. Use oven liners or place a baking sheet on the bottom rack to catch spills and drips. Additionally, wipe up any spills or splatters as soon as they occur (once the oven has cooled down) to prevent them from baking on.
Conclusion
Cleaning your oven doesn’t have to be a daunting task anymore. By incorporating the oven rack removal hack into your routine, you’ll unlock a world of easier and more efficient cleaning. Not only will this simple trick save you time and effort, but it will also ensure a thorough clean, leaving your oven looking (and smelling) like new.
Remember, the key to success is following the step-by-step instructions, using the right cleaning products and tools, and taking the necessary safety precautions. Don’t be afraid to tackle those stubborn, baked-on messes – with the right techniques, they’ll be a thing of the past.
We encourage you to try out this oven rack removal hack and share your experiences in the comments below. Your feedback and insights can help fellow readers tackle their oven cleaning challenges with confidence.
Say goodbye to the dreaded oven cleaning chore and embrace a sparkling, fresh-smelling oven with this game-changing hack. Your future self (and your taste buds) will thank you!