How to Organize Your Pantry Like a Pro: The Ultimate Guide
Have you ever found yourself standing in front of an overcrowded, chaotic pantry, feeling overwhelmed and frustrated? If so, you’re not alone. A disorganized pantry can lead to wasted time, increased stress, and unnecessary food waste. However, with the right approach, you can transform your pantry into a well-organized, functional space that streamlines your meal planning, grocery shopping, and cooking experience.
In this comprehensive guide, we’ll walk you through a step-by-step process to help you organize your pantry like a pro. From decluttering and categorizing to implementing effective storage solutions, we’ve got you covered. Get ready to bid farewell to pantry chaos and embrace a new era of organization and efficiency!
Importance of an Organized Pantry
Before we dive into the nitty-gritty of pantry organization, let’s explore the benefits of having a well-organized pantry:
1. Time-saving
Imagine being able to quickly locate the ingredients you need for a recipe, without wasting precious minutes rummaging through cluttered shelves. An organized pantry allows you to save time during meal planning, grocery shopping, and cooking, as everything is neatly arranged and easily accessible.
2. Reduce Food Waste
Have you ever discovered expired canned goods or forgotten items lurking in the depths of your pantry? With a properly organized pantry, you’ll be able to keep track of expiration dates and inventory, reducing the risk of food waste and saving you money in the long run.
3. Stress Reduction
Clutter and disorganization can contribute to increased stress levels and a sense of overwhelm. By creating an organized and visually appealing pantry, you’ll not only streamline your cooking process but also experience a sense of calm and satisfaction every time you open the door.
Step-by-Step Guide to Pantry Organization
Now that you understand the importance of an organized pantry, let’s dive into the step-by-step process to achieve pantry perfection:
Step 1: Inventory and Purge
The first step in organizing your pantry is to take inventory of what you have and purge any expired or unwanted items. Here’s how to tackle this crucial step:
- Remove everything from your pantry and place it on a flat surface or countertop.
- Carefully check expiration dates and discard any expired items.
- Separate items you no longer need or use, and consider donating them to a local food bank or shelter.
- Make a note of any items you have multiples of, as this will help you avoid overbuying in the future.
By starting with a clean slate, you’ll have a better understanding of what you need to organize and store effectively.
Step 2: Clean and Prepare the Space
With your pantry cleared out, it’s time to give it a thorough cleaning. This step not only ensures a fresh start but also helps identify any potential issues, such as pests or moisture problems, that need to be addressed:
- Remove any shelving or storage units for a deep clean.
- Wipe down all surfaces, including walls, shelves, and floors, using a mild cleaning solution.
- Check for any signs of pests or moisture damage and address them accordingly.
- Consider investing in pantry organization tools, such as shelving units, clear containers, and labels, to make the next steps easier.
A clean and prepared space will provide the perfect canvas for your new, organized pantry.
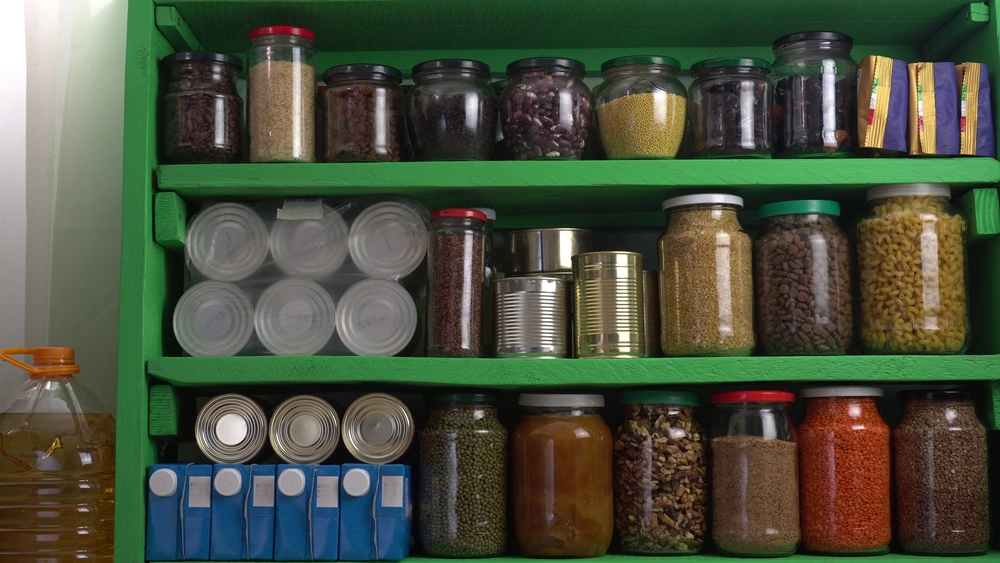
Step 3: Categorize and Group Items
Now that your pantry is clean and ready, it’s time to categorize and group your items. This step is crucial for creating an organized and efficient pantry:
- Divide your items into categories, such as baking supplies, canned goods, snacks, grains, and so on.
- Group like items together within each category for easy access and visibility.
- Consider using clear containers or baskets to store similar items, making it easier to see what you have at a glance.
By categorizing and grouping your items, you’ll create a logical flow and ensure that everything has a designated place in your pantry.
Step 4: Implement a Storage System
With your items categorized and grouped, it’s time to implement an effective storage system. This step will help maximize your pantry space and create a visually appealing and functional layout:
- Utilize vertical space by installing shelving units or adding stackable containers.
- Place frequently used items at eye level for easy access.
- Consider using lazy susans or turntable organizers for corner spaces or hard-to-reach areas.
- Implement zoning by designating specific areas or shelves for different categories (e.g., baking supplies, snacks, canned goods).
- Use clear containers or baskets to store items, making it easy to identify their contents at a glance.
By implementing an effective storage system, you’ll not only maximize your pantry space but also create a visually appealing and organized layout.
Step 5: Label and Maintain Organization
The final step in organizing your pantry like a pro is to label and maintain your newly implemented system. Labeling will help you quickly identify items and ensure that everything stays in its designated place:
- Use clear, legible labels on containers, baskets, and shelves to identify their contents.
- Consider using a label maker or chalkboard labels for a professional and easily updatable look.
- Implement a “first-in, first-out” (FIFO) system by placing newer items behind older ones to ensure proper rotation and minimize waste.
- Schedule regular purges (e.g., monthly or quarterly) to eliminate expired or unwanted items and maintain organization.
By labeling and maintaining your pantry organization system, you’ll ensure that your hard work pays off in the long run, and your pantry remains a stress-free, functional space.
Additional Tips and Tricks
To take your pantry organization to the next level, consider implementing these additional tips and tricks:
- Utilize the back of your pantry door for additional storage by installing racks or hanging organizers for spices, oils, or small items.
- Invest in airtight containers or vacuum sealers to extend the shelf life of dry goods and prevent pest infestations.
- Place a small step stool or ladder inside your pantry for easy access to top shelves.
- Use turntables or lazy susans for corner spaces or hard-to-reach areas, making it easier to access items without having to remove everything in front.
- Implement a pantry inventory system, such as a whiteboard or app, to keep track of what you have and what needs to be restocked.
By incorporating these additional tips and tricks, you’ll create a truly customized and efficient pantry organization system that meets your specific needs and preferences.
Conclusion
Organizing your pantry like a pro is a game-changer when it comes to streamlining your meal planning, reducing food waste, and minimizing stress in the kitchen. By following the step-by-step guide outlined in this post, you’ll be well on your way to achieving pantry perfection.
Remember, the key to maintaining an organized pantry is to make it a habit. Set aside time for regular purges, label and categorize new items as they come in, and don’t be afraid to tweak your system as your needs evolve.
Now that you have the tools and knowledge to organize your pantry like a pro, it’s time to take action! Share your pantry organization journey with us in the comments below, and don’t forget to subscribe for more household organization tips and tricks.