Make Your Own Adorable Crochet Bug Toy
Ready to dive into a super fun and rewarding crochet project? Let’s get our hooks ready and fashion the most delightful little bug friend you can imagine! This step-by-step guide will walk you through making your very own charming amigurumi bug toy, perfect for gifting, decorating, or simply bringing a touch of handmade happiness into your life. Even if you’ve never picked up a crochet hook before, don’t worry! We’ll take it slow and explain everything in simple terms, making this project accessible and enjoyable for everyone. Get ready to be amazed at what you can build with just yarn and a hook!
What You’ll Need to Make Your Bug Buddy
Before we begin, let’s gather all the materials we’ll need to construct our cute crochet bug. Having everything ready will make the process smooth and relaxing.
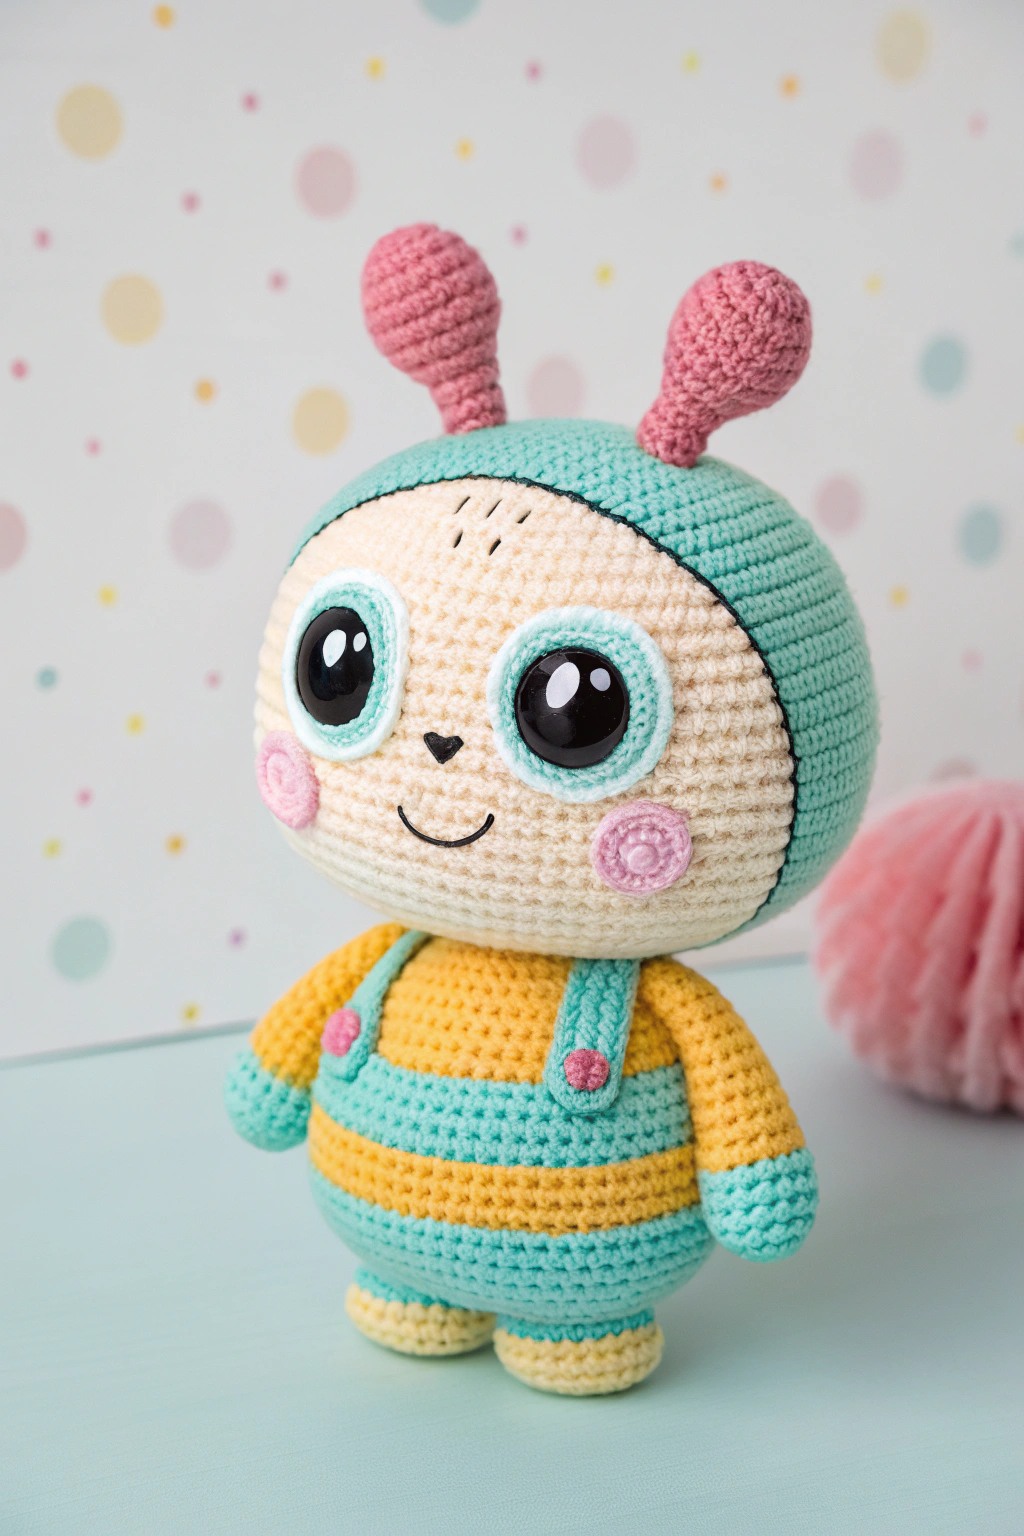
- 🧶 Yarn: You’ll need yarn in several colors to match the bug in the image. We will use a soft, light beige or cream color for the face, a vibrant yellow and a pretty blue-green for the body and head rim, and a sweet light pink for the cheeks, ears, and button details. Any DK weight yarn or similar will work great – just choose your favorite soft yarn!
- 🪡 Crochet Hook: A 3.0mm or 3.5mm crochet hook is a good size for DK weight yarn. If your yarn label suggests a different hook size, you can use that too. The hook size mostly affects how tight or loose your stitches are, so choose one that feels comfortable for you.
- 📍 Stitch Markers: These little tools are incredibly helpful for keeping track of rounds, especially when working in spirals. If you don’t have official stitch markers, you can use a small piece of yarn in a different color – anything to mark your place!
- 🧵 Tapestry Needle: This is a blunt-tipped needle with a large eye, perfect for weaving in yarn ends and sewing pieces together neatly.
- ✂️ Scissors: For snipping yarn ends. Sharp scissors make this task much easier.
- ☁️ Fiberfill Stuffing: To give your bug toy its cuddly shape! You can find this at any craft store.
- 👀 Safety Eyes: Two black safety eyes, approximately 10mm in size, will bring your bug to life! These have plastic backs that securely attach them to your crochet work.
- 🩷 Pink Felt (Optional): For the cheek details if you prefer felt over crocheted cheeks.
- ⚫ Black Embroidery Floss (Optional): For embroidering the mouth and eyelashes if you prefer embroidery over crocheted details.
Let’s Get Started! Step-by-Step Guide to Making Your Amigurumi Bug
Now for the fun part – let’s fashion our adorable bug! We’ll start by developing each part separately and then assemble them to bring our little friend to life. Remember to refer to the image as we go to see how each part should look.
Making the Head
The head is formed in rounds, starting from the top and working downwards. We’ll use the beige yarn for the main part of the head and then switch to the blue-green for the rim around the face.
Round 1: Start with a magic ring. A magic ring is a way to begin crocheting in the round without leaving a hole in the center. To make a magic ring, wrap the yarn around your fingers twice, slip knot onto hook, pull through loop on hook. Then, yarn over and pull through to secure, and you have formed the magic ring. Now, make 6 single crochet stitches into the magic ring. A single crochet stitch is a basic stitch. To form it, insert your hook into the ring, yarn over (wrap the yarn around your hook), pull the yarn through the ring (you’ll have two loops on your hook), yarn over again, and pull through both loops on your hook. You’ve completed one single crochet! Pull the tail of the magic ring to tighten the center. (6 stitches)
Round 2: Make 2 single crochet stitches in each stitch around. This is called increasing. For each stitch from the previous round, you will make two single crochet stitches in the same stitch. This will make your circle get bigger. (12 stitches)
Round 3: * Make 1 single crochet in the next stitch, then make 2 single crochet in the stitch after that. Repeat from * around. This means you will alternate between making one single crochet and then increasing (making two single crochet in one stitch). (18 stitches)
Round 4: * Make 1 single crochet in each of the next 2 stitches, then make 2 single crochet in the stitch after that. Repeat from * around. (24 stitches)
Round 5: * Make 1 single crochet in each of the next 3 stitches, then make 2 single crochet in the stitch after that. Repeat from * around. (30 stitches)
Round 6: * Make 1 single crochet in each of the next 4 stitches, then make 2 single crochet in the stitch after that. Repeat from * around. (36 stitches)
Round 7-14: Make 1 single crochet in each stitch around for 8 rounds. This means you will just keep crocheting in a circle without increasing. This will start to shape the head into a rounded form. (36 stitches per round)
Round 15: Now we will start decreasing to shape the bottom of the head. * Make 1 single crochet in each of the next 4 stitches, then single crochet 2 stitches together. Single crochet 2 stitches together is a decrease. To do this, insert your hook into the next stitch, yarn over, pull through (two loops on hook), insert hook into the next stitch, yarn over, pull through (three loops on hook), yarn over, and pull through all three loops. You have decreased one stitch. Repeat from * around. (30 stitches)
Round 16: * Make 1 single crochet in each of the next 3 stitches, then single crochet 2 stitches together. Repeat from * around. (24 stitches)
Round 17: * Make 1 single crochet in each of the next 2 stitches, then single crochet 2 stitches together. Repeat from * around. (18 stitches)
Round 18: * Make 1 single crochet in the next stitch, then single crochet 2 stitches together. Repeat from * around. (12 stitches)
Round 19: Single crochet 2 stitches together all around. (6 stitches)
Fasten off and leave a long tail for sewing. To fasten off, cut the yarn, yarn over, and pull the loop all the way through to make a knot. Weave in the end using your tapestry needle, pushing the needle through a few stitches and then trimming the yarn.
Switching to Blue-Green Yarn for the Head Rim:
Round 20: Attach the blue-green yarn to any stitch in the last round of beige. Make 1 single crochet in each stitch around. (6 stitches)
Round 21: Make 2 single crochet in each stitch around. (12 stitches)
Round 22: * Make 1 single crochet in the next stitch, then make 2 single crochet in the stitch after that. Repeat from * around. (18 stitches)
Round 23: * Make 1 single crochet in each of the next 2 stitches, then make 2 single crochet in the stitch after that. Repeat from * around. (24 stitches)
Round 24: * Make 1 single crochet in each of the next 3 stitches, then make 2 single crochet in the stitch after that. Repeat from * around. (30 stitches)
Round 25: * Make 1 single crochet in each of the next 4 stitches, then make 2 single crochet in the stitch after that. Repeat from * around. (36 stitches)
Round 26: Make 1 single crochet in each stitch around. (36 stitches)
Fasten off the blue-green yarn and weave in the ends.
Placement of Safety Eyes: Look at the image. Position the safety eyes between Rounds 10 and 11 of the beige head, about 8 stitches apart. Push the posts of the safety eyes through the crochet fabric and secure them on the inside with the plastic backs. It’s easier to do this before stuffing the head.
Cheeks: With pink yarn, make two small circles for the cheeks.
Round 1: Magic ring, 6 single crochet in the ring. (6 stitches)
Round 2: Make 2 single crochet in each stitch around. (12 stitches) Fasten off and leave a tail for sewing. Sew the cheeks onto the face, just below and slightly to the sides of the eyes, as seen in the image.
Nose: With black yarn, embroider a small, inverted triangle for the nose between the cheeks and below the eyes. Or, you can make a tiny black crocheted triangle if you prefer.
Mouth: With black yarn, embroider a simple curved smile below the nose. Look at the image for the shape and placement.
Eyelashes and Eyebrows: With black yarn, embroider small eyelashes on the outer corners of the eyes and little dash eyebrows above the eyes, as shown in the image.
Making the Body
The body is developed in rounds, similar to the head, using yellow and blue-green stripes to fashion overalls.
Starting with Yellow Yarn:
Round 1: Magic ring, 6 single crochet in the ring. (6 stitches)
Round 2: Make 2 single crochet in each stitch around. (12 stitches)
Round 3: * Make 1 single crochet in the next stitch, then make 2 single crochet in the stitch after that. Repeat from * around. (18 stitches)
Round 4: * Make 1 single crochet in each of the next 2 stitches, then make 2 single crochet in the stitch after that. Repeat from * around. (24 stitches)
Round 5: * Make 1 single crochet in each of the next 3 stitches, then make 2 single crochet in the stitch after that. Repeat from * around. (30 stitches)
Round 6: * Make 1 single crochet in each of the next 4 stitches, then make 2 single crochet in the stitch after that. Repeat from * around. (36 stitches)
Round 7-10: Make 1 single crochet in each stitch around for 4 rounds with yellow yarn. (36 stitches per round)
Switch to Blue-Green Yarn:
Round 11-14: Make 1 single crochet in each stitch around for 4 rounds with blue-green yarn. (36 stitches per round)
Switch back to Yellow Yarn:
Round 15-18: Make 1 single crochet in each stitch around for 4 rounds with yellow yarn. (36 stitches per round)
Switch back to Blue-Green Yarn:
Round 19-22: Make 1 single crochet in each stitch around for 4 rounds with blue-green yarn. (36 stitches per round)
Round 23: * Make 1 single crochet in each of the next 4 stitches, then single crochet 2 stitches together. Repeat from * around. (30 stitches)
Round 24: * Make 1 single crochet in each of the next 3 stitches, then single crochet 2 stitches together. Repeat from * around. (24 stitches)
Round 25: * Make 1 single crochet in each of the next 2 stitches, then single crochet 2 stitches together. Repeat from * around. (18 stitches)
Round 26: * Make 1 single crochet in the next stitch, then single crochet 2 stitches together. Repeat from * around. (12 stitches)
Fasten off and leave a long tail for sewing.
Making the Legs (x2)
With Beige Yarn:
Round 1: Magic ring, 6 single crochet in the ring. (6 stitches)
Round 2: Make 2 single crochet in each stitch around. (12 stitches)
Round 3-6: Make 1 single crochet in each stitch around for 4 rounds. (12 stitches per round)
Fasten off and leave a tail for sewing. Make two legs.
Making the Arms (x2)
With Yellow Yarn:
Round 1: Magic ring, 6 single crochet in the ring. (6 stitches)
Round 2: Make 2 single crochet in each stitch around. (12 stitches)
Round 3-7: Make 1 single crochet in each stitch around for 5 rounds. (12 stitches per round)
Fasten off and leave a tail for sewing. Make two arms.
Making the Antennae (x2)
With Pink Yarn:
Round 1: Magic ring, 4 single crochet in the ring. (4 stitches)
Round 2: Make 2 single crochet in each stitch around. (8 stitches)
Round 3-10: Make 1 single crochet in each stitch around for 8 rounds. (8 stitches per round)
Round 11: Single crochet 2 stitches together all around. (4 stitches)
Round 12: Single crochet 2 stitches together all around. (2 stitches)
Fasten off and leave a tail for sewing. Make two antennae.
Making the Overalls Straps (x2)
With Blue-Green Yarn:
Chain 20. A chain stitch is the foundation of crochet. To make a chain, form a slip knot on your hook. Yarn over and pull through the loop on your hook. That’s one chain stitch. Repeat to get a chain of 20.
Row 1: Single crochet in the second chain from the hook, and in each chain across. (19 stitches)
Fasten off and leave a tail for sewing. Make two straps.
Making the Buttons (x4)
With Pink Yarn:
Round 1: Magic ring, 6 single crochet in the ring. (6 stitches) Fasten off and leave a tail for sewing. Make four buttons.
Assembling Your Bug
Now comes the exciting part – putting all our fashioned pieces together!
- Stuffing: Stuff the head and body firmly with fiberfill stuffing. Make sure to stuff them enough so they hold their shape nicely but are still soft and cuddly.
- Attaching the Head to the Body: Position the head on top of the body and use your tapestry needle and the long tail of yarn left on the head to sew the head securely to the body. Go around several times to make sure it’s firmly attached.
- Attaching the Legs: Sew the legs to the bottom of the body, evenly spaced, as shown in the image.
- Attaching the Arms: Sew the arms to the sides of the body, slightly below the head. Look at the image to see the best placement.
- Attaching the Antennae: Sew the antennae to the top of the head, spaced apart as seen in the image.
- Attaching the Overalls Straps and Buttons: Sew one end of each overall strap to the front of the body, and the other end to the back of the body, forming the overalls straps. Then, sew two buttons to the front of the overalls where the straps attach, and one button to each strap where they attach to the back, as you can see in the image.
You Did It!
Congratulations! You’ve just crafted your very own adorable crochet bug toy! Isn’t it amazing what you can produce with yarn and a hook? Take a moment to admire your handmade friend and feel proud of your accomplishment. You’ve taken yarn and transformed it into something charming and unique.
This little bug is ready for all sorts of adventures, or simply to bring a smile to someone’s face. Don’t be afraid to experiment with different colors and yarn types to make more bug friends!
Happy crocheting, and keep making wonderful things!