Knit Your Own Cozy Pilot Dream Hat
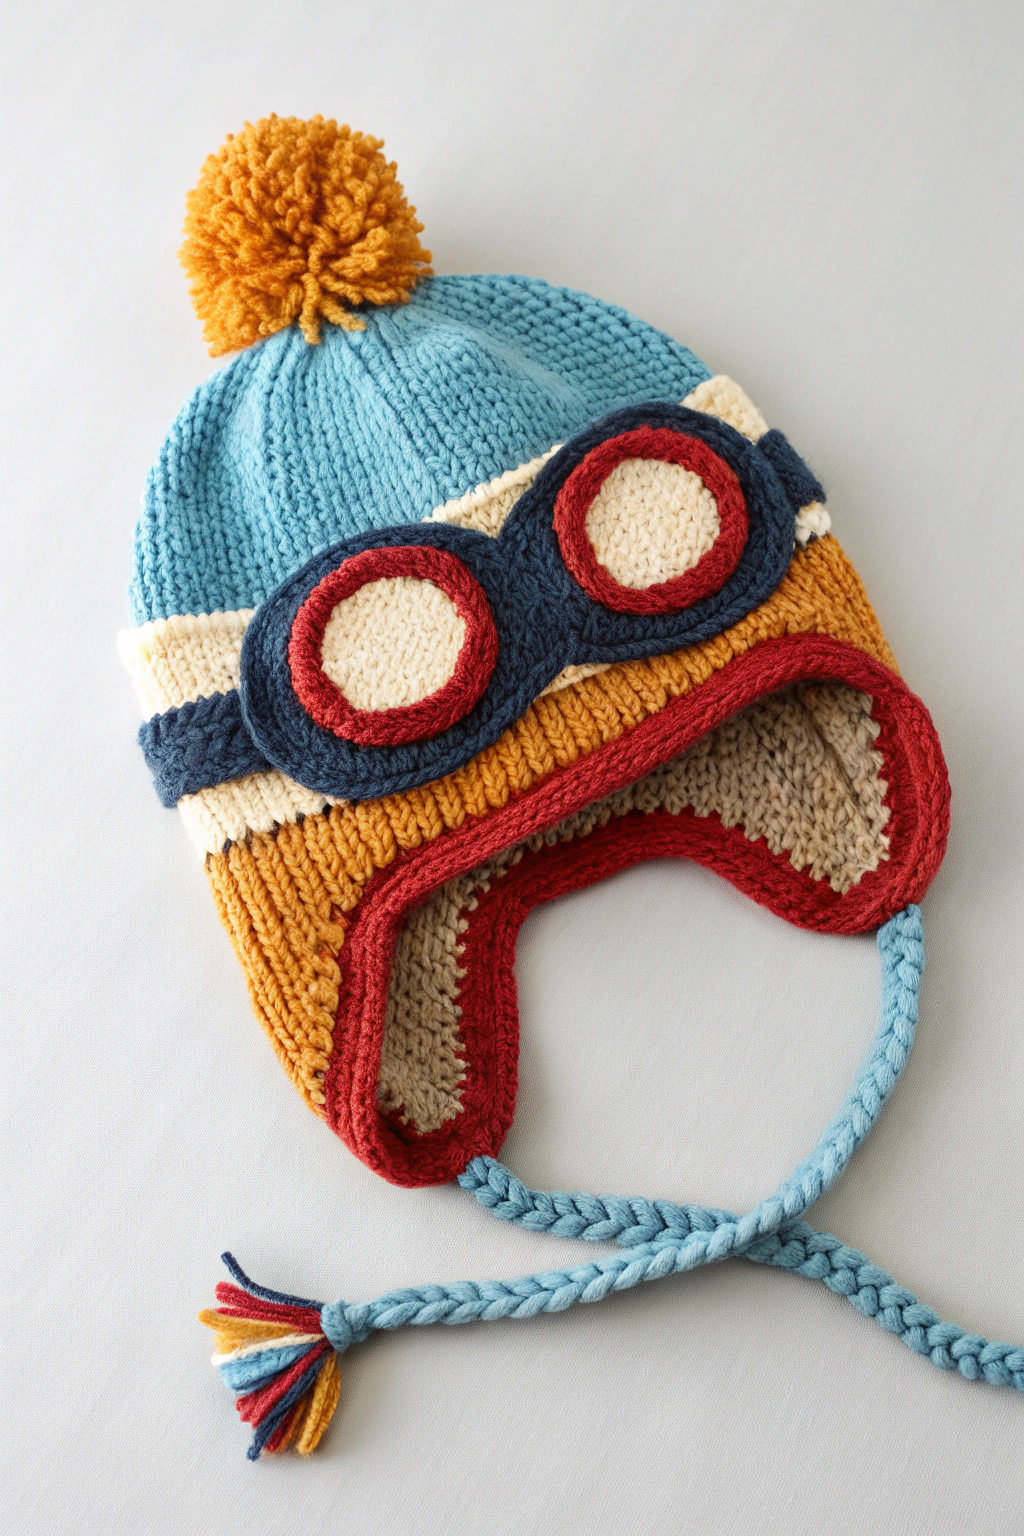
Ready to embark on a fun knitting adventure? Let’s fashion an adorable pilot hat, complete with charming goggles, just like the one you see in the picture! This project is perfect for anyone wanting to learn how to knit or practice their skills while producing something truly special and unique. Don’t worry if you’re just starting out – we’ll guide you through each step with clear and simple instructions. Get ready to feel the joy of making something beautiful with your own hands!
Materials You’ll Need
Before we begin, gather these materials to ensure you have everything you need for your pilot hat project.
- 🧶 Yarn in the following colors: light blue, cream, dark blue, mustard yellow, red, and beige. We recommend a soft, medium-weight yarn, like a worsted or DK weight wool or acrylic blend, which is gentle and easy to work with for beginners.
- 🪡 Knitting needles in a size appropriate for your yarn. Check the yarn label for recommended needle size. If the label suggests size US 6 (4mm), that’s a great starting point. You’ll need both straight needles and double-pointed needles (DPNs) or a circular needle for working in the round. Don’t worry if you’ve never used DPNs or circular needles before – we’ll explain it all!
- ✂️ Scissors to trim your yarn.
- 📍 Yarn needle or tapestry needle with a large eye for weaving in ends and assembling pieces.
- 📏 Measuring tape to check your gauge and hat size.
- Pom-pom maker (optional, but helpful) or cardboard to fashion a pom-pom.
Let’s Get Started: Making Your Pilot Hat
We will build this hat in sections, just like constructing a little knitted masterpiece! We’ll start with the main part of the hat, then move on to the cute goggle details, the ear flaps to keep warm, and finally, the finishing touches that bring it all together. Refer to the image frequently to see how each part looks and fits together.
Forming the Hat Base
- Cast On: Let’s begin by making the main body of the hat in light blue. “Casting on” is the very first step in knitting – it’s how you get the yarn onto your needle to start forming rows. For this hat, we’ll use the long-tail cast-on method. If you’re completely new to this, imagine making a loop with the yarn, placing it on your needle, and tightening it – that’s the basic idea! Cast on 96 stitches using your light blue yarn and straight needles. This number of stitches will give us the width of the hat.
- Knit Stitch Rows (Garter Stitch): Now, we’re going to knit every row. This is called “garter stitch,” and it makes a nice, bumpy texture that’s perfect for a cozy hat. “Knit stitch” is the most fundamental stitch in knitting. To knit a stitch, you insert your right needle into the front of the first stitch on your left needle, wrap the yarn around the right needle, and pull it through to form a new stitch. Do this for every stitch in the row. Knit every row until your work measures about 6 inches (approximately 15 cm) from the cast-on edge. You can see in the image that the main blue part of the hat is quite long.
- Color Change and Ribbing: Next, we’ll introduce a cream stripe and some ribbing to make the edge of the hat snug. “Ribbing” is a stretchy knit that helps edges fit nicely. Change to cream yarn. For the next inch (about 2.5 cm), we’ll work in knit 1, purl 1 ribbing, often written as k1, p1. “Purl stitch” is like the reverse of knit stitch. It makes the opposite side of the fabric look like knit stitch. To purl, you bring the yarn to the front, insert your right needle into the front of the stitch from right to left, wrap the yarn around, and pull it through to the back. Alternate between knit stitch and purl stitch across each row (k1, p1, k1, p1, and so on).
- Second Color Stripe: Now, we’ll add another stripe. Change back to light blue yarn and knit in garter stitch (knit every row) for about 0.75 inches (approximately 2 cm). This creates a smaller blue stripe above the cream ribbing. Observe in the image how this stripe adds detail just above the cream section.
- Decreasing for the Crown: To shape the top of the hat, we need to “decrease” stitches, which means knitting two stitches together to make one. We’ll do this evenly across the row to gradually narrow the hat.
- Round 1: Knit 2 stitches together (k2tog) across the entire row. This will halve the number of stitches.
- Round 2: Knit every stitch.
- Round 3: Knit 2 stitches together (k2tog) across the entire row again.
- Round 4: Knit every stitch.
- Continue repeating rounds 3 and 4 until you have only about 10-12 stitches left.
- Finishing the Crown: Cut the yarn, leaving a long tail. Thread the yarn tail through your yarn needle. Slip the remaining stitches off your knitting needle onto the yarn needle. Pull the yarn tight to close the top of the hat snugly, gathering the stitches together. Secure tightly and weave in the yarn end on the inside of the hat. “Weaving in ends” means using your yarn needle to tuck the loose yarn tails into the knitted fabric so they don’t unravel and are hidden.
Crafting the Goggles
The goggles are made in three parts: the lenses (beige circles), the frames (dark blue), and the red outer rings. We’ll make two of each for both eyes!
- Making the Lenses (Beige Circles):
- Using beige yarn and double-pointed needles (or a circular needle using the magic loop method, if you prefer working in the round), cast on 6 stitches. Working in the round means you’re knitting in a spiral, without seams, which is perfect for small circles.
- Round 1: Knit into the front and back of each stitch (kfb) around. “Knit into the front and back” is an increase technique that makes two stitches from one. You’ll now have 12 stitches.
- Round 2: Knit 1, knit into the front and back of the next stitch (k1, kfb), repeat around. You’ll now have 18 stitches.
- Round 3: Knit 2, knit into the front and back of the next stitch (k2, kfb), repeat around. You’ll now have 24 stitches.
- Round 4: Knit every stitch.
- Round 5: Knit every stitch.
- Bind off all stitches. “Binding off” is how you finish your knitting and take the stitches off the needle so they don’t unravel. Leave a yarn tail for sewing. Make two beige circles. These are the lenses of your goggles.
- Making the Goggle Frames (Dark Blue Rings):
- Using dark blue yarn and double-pointed needles, cast on 8 stitches.
- Round 1: Knit into the front and back of each stitch (kfb) around. You’ll now have 16 stitches.
- Round 2 – 4: Knit every stitch for 3 rounds.
- Bind off all stitches. Leave a yarn tail for sewing. Make two dark blue rings. These will form the frames around the lenses.
- Making the Red Outer Rings:
- Using red yarn and double-pointed needles, cast on 12 stitches.
- Round 1: Knit into the front and back of each stitch (kfb) around. You’ll now have 24 stitches.
- Round 2 – 3: Knit every stitch for 2 rounds.
- Bind off all stitches. Leave a yarn tail for sewing. Make two red rings. These are the outermost rings of the goggles, providing a pop of color.
Assembling the Goggles and Attaching to the Hat
- Assemble the Goggles: Place a beige lens circle inside a dark blue frame ring. Sew the beige circle to the inside of the dark blue ring using the beige yarn tail, going around the circle. Then, place the dark blue framed lens inside a red outer ring. Sew the dark blue frame to the red ring using the dark blue yarn tail. Repeat this for the second set of goggle pieces so you have two complete goggles.
- Position and Attach Goggles to Hat: Refer to the image to see the placement of the goggles. Position the assembled goggles on the front of the hat, just above the cream stripe and onto the lower light blue section. Use the yarn tails from the red rings to sew the goggles securely to the hat. Make sure they are evenly spaced and look like goggles!
Fashioning the Ear Flaps
The ear flaps are those cozy triangular pieces that hang down to keep ears warm. We’ll make two of these in mustard yellow with a red border.
- Making the Mustard Yellow Triangles:
- Using mustard yellow yarn and straight needles, cast on 3 stitches.
- Row 1: Knit.
- Row 2: Knit into the front and back of the first stitch (kfb), knit to the last stitch, knit into the front and back of the last stitch (kfb). You’ve increased by 2 stitches.
- Repeat Row 2 until you have 21 stitches. You are increasing 2 stitches every other row, making the triangle wider.
- Knit in garter stitch (knit every row) until the ear flap measures about 4 inches (approximately 10 cm) long from the cast-on point, measuring along the center.
- Adding the Red Border:
- Change to red yarn. Knit 2 rows of garter stitch in red.
- Bind off all stitches. Make two ear flaps.
- Attaching Ear Flaps to Hat: Position the ear flaps on either side of the hat, at the bottom edge, just below where the goggles are placed and aligned with the sides of the face when the hat is worn. See the image for placement. Sew the top edges of the ear flaps to the hat using the red yarn tails.
Constructing the Braided Ties
The braids are those charming strings that hang from the ear flaps and can be tied under the chin. We’ll make two braids using light blue yarn.
- Forming the Braids: Cut six strands of light blue yarn, each about 24 inches (approximately 60 cm) long. Divide them into three groups of two strands each. Make a braid just like you would braid hair. Tie a knot at the end of the braid to secure it. Make two braids.
- Attaching Braids to Ear Flaps: Attach one braid to the bottom point of each ear flap. You can sew them on securely using the light blue yarn ends. In the image, you can see colorful strands at the end of the braid. To mimic this, take small pieces of red, dark blue, cream, and mustard yellow yarn and tie them onto the end of each braid, then trim the ends to make a little colorful tassel.
Finishing with the Pom-pom
No pilot hat is complete without a fluffy pom-pom on top! We’ll make a cheerful orange pom-pom.
- Making the Pom-pom: Using orange yarn, fashion a pom-pom. You can use a pom-pom maker or wrap yarn around a piece of cardboard and then tie it in the middle and cut the loops to form a pom-pom. Make it quite full and round, about 3 inches (approximately 7.5 cm) in diameter.
- Attaching the Pom-pom: Securely sew the pom-pom to the very top center of the hat using the yarn tails from the pom-pom. Make sure it’s firmly attached.
You Did It!
Congratulations! You have just fashioned your very own cozy and incredibly cute pilot hat! Take a moment to admire your handiwork. You went from yarn and needles to this wonderful handmade item. Imagine the warmth and smiles this hat will bring.
Don’t be shy – show off your amazing crafting skills! We’d absolutely love to see your finished pilot hats. Share photos of your crafts online and inspire others to experience the joy of knitting. Happy making!