Knit Your Own Cheerful Striped Beanie!
Hey there, fellow craft lovers! Ready to dive into a super fun and rewarding knitting project? Get ready to fashion the most adorable and cozy beanie you’ve ever seen – just like the one pictured! This striped beanie with a fluffy pompom is not only stylish but also a fantastic way to learn or practice your knitting skills. Don’t worry if you’re brand new to knitting; we’ll go through each step together, nice and slow, making sure it’s easy and enjoyable for everyone. Imagine the satisfaction of making this beautiful hat with your own hands – it’s a truly wonderful feeling! So, grab your yarn and needles, and let’s get started on this exciting crafting adventure!
Materials You’ll Need to Get Started
Before we begin, let’s gather all the bits and bobs we need to build our lovely beanie. Having everything ready will make the whole process smooth and relaxing. Here’s what you’ll need:
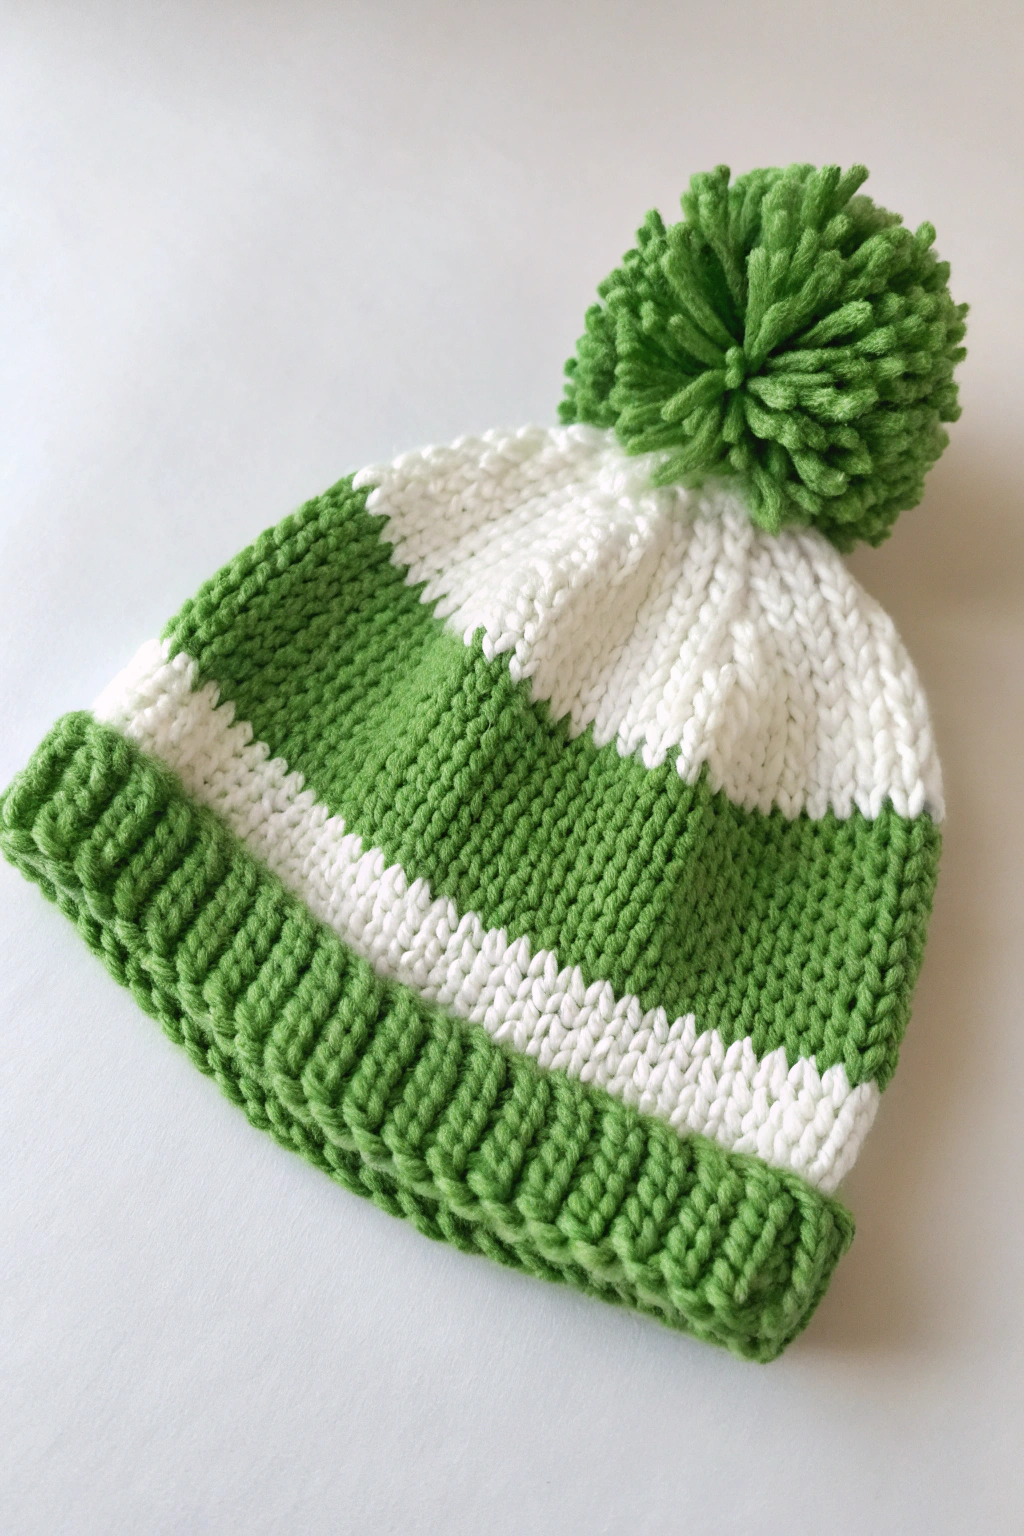
- 🧶 Yarn: You’ll need two colors of yarn in a medium weight (worsted weight is perfect!). Looking at the image, we’re using a lovely bright green and a crisp white. Choose your favorite colors to fashion your own unique beanie! Make sure they are both the same type of yarn for consistent texture and thickness. About 100 yards of each color should be plenty.
- 🪡 Knitting Needles: You’ll need a set of circular knitting needles, size US 7 (4.5 mm). Circular needles are great for hats because they allow you to knit in the round, which means you’ll construct the hat in one continuous piece without seams! The length of the cable doesn’t matter too much for a beanie, but a 16-inch or 24-inch cable will work nicely.
- ✂️ Scissors: For snipping yarn ends. Every crafter’s essential tool!
- 📍 Tapestry Needle (or Yarn Needle): This is a large, blunt needle with a big eye, perfect for weaving in yarn ends and assembling the pompom.
- 📏 Measuring Tape: To check your gauge and the size of your beanie as you develop it.
- Pompom Maker (Optional): While you can fashion a pompom using cardboard or even your hand, a pompom maker can make things a bit easier and ensure a nice, round, fluffy pompom like the one in the picture. If you don’t have one, don’t worry! We’ll explain how to make a pompom without it too.
Let’s Get Started: Making Your Cozy Beanie
Now for the fun part – actually making our beanie! If you’ve never knitted before, don’t worry at all! We’ll start with the absolute basics. Think of knitting as interlooping yarn to form fabric. It’s like building with yarn instead of bricks!
Getting Started: Basic Knitting Techniques
Let’s quickly go over the basic techniques you’ll need to produce this beanie. These are the building blocks of knitting, and once you understand them, you can fashion all sorts of amazing things!
- Casting On: This is how you get the yarn onto your needle to begin knitting. It’s like building the first row of your knitted fabric. There are many ways to cast on, but for beginners, the long-tail cast-on is a good, sturdy method. Imagine you’re developing a foundation for your knitted project. You can find many excellent video tutorials online by searching “long-tail cast on knitting” – watching a video is often the easiest way to learn this first step!
- Knit Stitch (k): This is the most fundamental stitch in knitting. It forms a ‘v’ shape on the front of your work. Think of it as the basic brick in your knitting wall. To make a knit stitch, you insert your right needle into the front of the loop on your left needle, wrap the yarn around the right needle, and pull it through. Again, a quick online video search for “knit stitch” will show you exactly how it’s done.
- Purl Stitch (p): This is another basic stitch, and it looks like a little bump on the front of your work. It’s often used together with the knit stitch to fashion different textures. To make a purl stitch, you bring the yarn to the front of your work, insert your right needle into the loop from back to front, wrap the yarn, and pull it through. Search “purl stitch knitting” online for a visual guide.
- Ribbing (k1, p1 rib): This is a stretchy stitch pattern that’s perfect for the brim of a hat. It’s made by alternating knit and purl stitches. “k1, p1 rib” means you knit one stitch, then purl one stitch, and repeat that pattern. This creates a vertical ribbed texture, which you can see clearly at the bottom edge of the beanie in the image.
- Knitting in the Round: Since we’re using circular needles, we’ll be knitting in the round. This means you’re knitting in a spiral, constantly working on the right side of your fabric. Once you cast on and join your work into a circle, you’ll just keep knitting around and around to develop the body of the hat.
- Changing Colors: For our striped beanie, we’ll need to change yarn colors. To do this, simply finish the last stitch of the old color, then start knitting with the new color. It’s best to tie the new yarn to the old yarn with a simple knot at the back (inside) of your work to secure it. We’ll weave in these ends later to hide them neatly.
- Decreasing (k2tog): To shape the top of the beanie, we need to decrease, which means reducing the number of stitches. “k2tog” means “knit two stitches together.” This takes two stitches and turns them into one, effectively decreasing the stitch count. This helps to form the crown of the hat, making it curve inwards.
Step-by-Step Instructions: Knitting Your Striped Beanie
Ready to assemble your beanie? Follow these steps, referring to the image as we go!
Round 1: With your green yarn, cast on 96 stitches using the long-tail cast-on method onto your circular needles. Make sure your cast-on is not too tight, as this will be the brim of your hat and needs to stretch comfortably.
Round 2: Join to work in the round. This means you’ll carefully slip the first cast-on stitch onto your right needle, then knit the very first stitch again together with the last cast-on stitch. This forms a closed circle. Be careful not to twist your stitches when you join!
Round 3-20: Work in k1, p1 rib. That means *knit 1 stitch, purl 1 stitch, repeat from * to the end of the round. Do this for about 18 rounds, or until your ribbed brim measures about 2 inches, like you can see in the image. This ribbed section will give your beanie a snug and stretchy fit.
Round 21: Now we’re moving onto the main body of the hat and introducing stripes! Switch to white yarn. Knit every stitch (knit stitch all around). This is called stockinette stitch in the round, which forms the smooth, classic knitted fabric you see in the image for the main part of the hat.
Round 22-36: Continue knitting every stitch with white yarn for 15 rounds. This will develop the first white stripe. Refer to the image – you can see the white stripe is quite wide.
Round 37: Switch back to green yarn. Knit every stitch with green yarn.
Round 38-52: Continue knitting every stitch with green yarn for 15 rounds. This forms the first green stripe, which should be the same width as the white stripe below it.
Round 53: Switch back to white yarn. Knit every stitch with white yarn.
Round 54-68: Continue knitting every stitch with white yarn for 15 rounds. This develops the second white stripe.
Round 69: Switch back to green yarn. Knit every stitch with green yarn.
Round 70-84: Continue knitting every stitch with green yarn for 15 rounds. This forms the final green stripe before we start decreasing for the top.
Round 85: Start decreasing to shape the crown of the beanie. With green yarn, *knit 10 stitches, knit 2 stitches together (k2tog), repeat from * to the end of the round. This will reduce the number of stitches and start to close the top of the hat.
Round 86: Knit every stitch.
Round 87: *Knit 9 stitches, k2tog, repeat from * to the end of the round.
Round 88: Knit every stitch.
Round 89: *Knit 8 stitches, k2tog, repeat from * to the end of the round.
Round 90: Knit every stitch.
Round 91: *Knit 7 stitches, k2tog, repeat from * to the end of the round.
Round 92: Knit every stitch.
Round 93: *Knit 6 stitches, k2tog, repeat from * to the end of the round.
Round 94: Knit every stitch.
Round 95: *Knit 5 stitches, k2tog, repeat from * to the end of the round.
Round 96: Knit every stitch.
Round 97: *Knit 4 stitches, k2tog, repeat from * to the end of the round.
Round 98: Knit every stitch.
Round 99: *Knit 3 stitches, k2tog, repeat from * to the end of the round.
Round 100: Knit every stitch.
Round 101: *Knit 2 stitches, k2tog, repeat from * to the end of the round.
Round 102: Knit every stitch.
Round 103: *Knit 1 stitch, k2tog, repeat from * to the end of the round.
Round 104: K2tog all around. You should have very few stitches left.
Finishing: Cut your yarn, leaving a tail of about 8 inches. Thread this tail through your tapestry needle. Slip the remaining stitches off your knitting needle onto the tapestry needle. Pull the yarn tight to close the top of the beanie securely. Weave in all your yarn ends on the inside of the hat using the tapestry needle, hiding them neatly so they don’t unravel.
Making the Pompom
No beanie is complete without a fluffy pompom! The pompom in the image is a lovely full green pompom.
Using a pompom maker: If you have a pompom maker, follow the instructions that came with it to fashion a green pompom. They are usually very straightforward.
Without a pompom maker: You can easily make a pompom using your hand or cardboard. For a hand-fashioned pompom:
- Wrap green yarn around your four fingers (held together) about 100-150 times for a nice full pompom. The more you wrap, the denser your pompom will be.
- Carefully slide the yarn off your fingers, keeping the loops together.
- Cut a separate piece of yarn about 12 inches long and tie it very tightly around the middle of the yarn loops, making sure it’s secure. This will hold your pompom together. Tie a double knot.
- Cut through all the loops on both sides of the tie you just fashioned.
- Fluff up your pompom and trim any uneven bits with scissors to form a nice round shape.
Attaching the Pompom: Use the yarn tails from tying your pompom (or use a separate piece of yarn and your tapestry needle) to securely attach the pompom to the very top center of your beanie. Make sure it’s firmly attached so it won’t come off.
Wear Your Wonderful Beanie!
Congratulations! You’ve just produced a beautiful striped beanie! Isn’t it satisfying to see something so lovely that you’ve crafted with your own two hands? This cozy and cheerful beanie is perfect for keeping warm on chilly days, and it also makes a fantastic handmade gift. The best part is, you made it yourself!
Now, go ahead and wear your amazing new beanie with pride! And don’t forget to share pictures of your creations! We’d absolutely love to see your versions of this cheerful striped beanie. Happy knitting!