Knit Your Dreamy Lace Shawl
Get ready to cast on and create the most beautiful lace shawl you’ve ever imagined! This project is perfect for beginner knitters who are eager to learn something a little bit fancy but still totally achievable. Don’t worry if you’ve never tried lace knitting before – we’ll guide you through every step with super easy-to-understand instructions. Knitting is such a relaxing and rewarding hobby, and there’s nothing quite like the feeling of wearing something you’ve made with your own hands. Let’s dive in and create this stunning shawl together!
Materials You’ll Need
Before we start, let’s gather everything we need. Having your materials ready will make the whole process smooth and enjoyable.
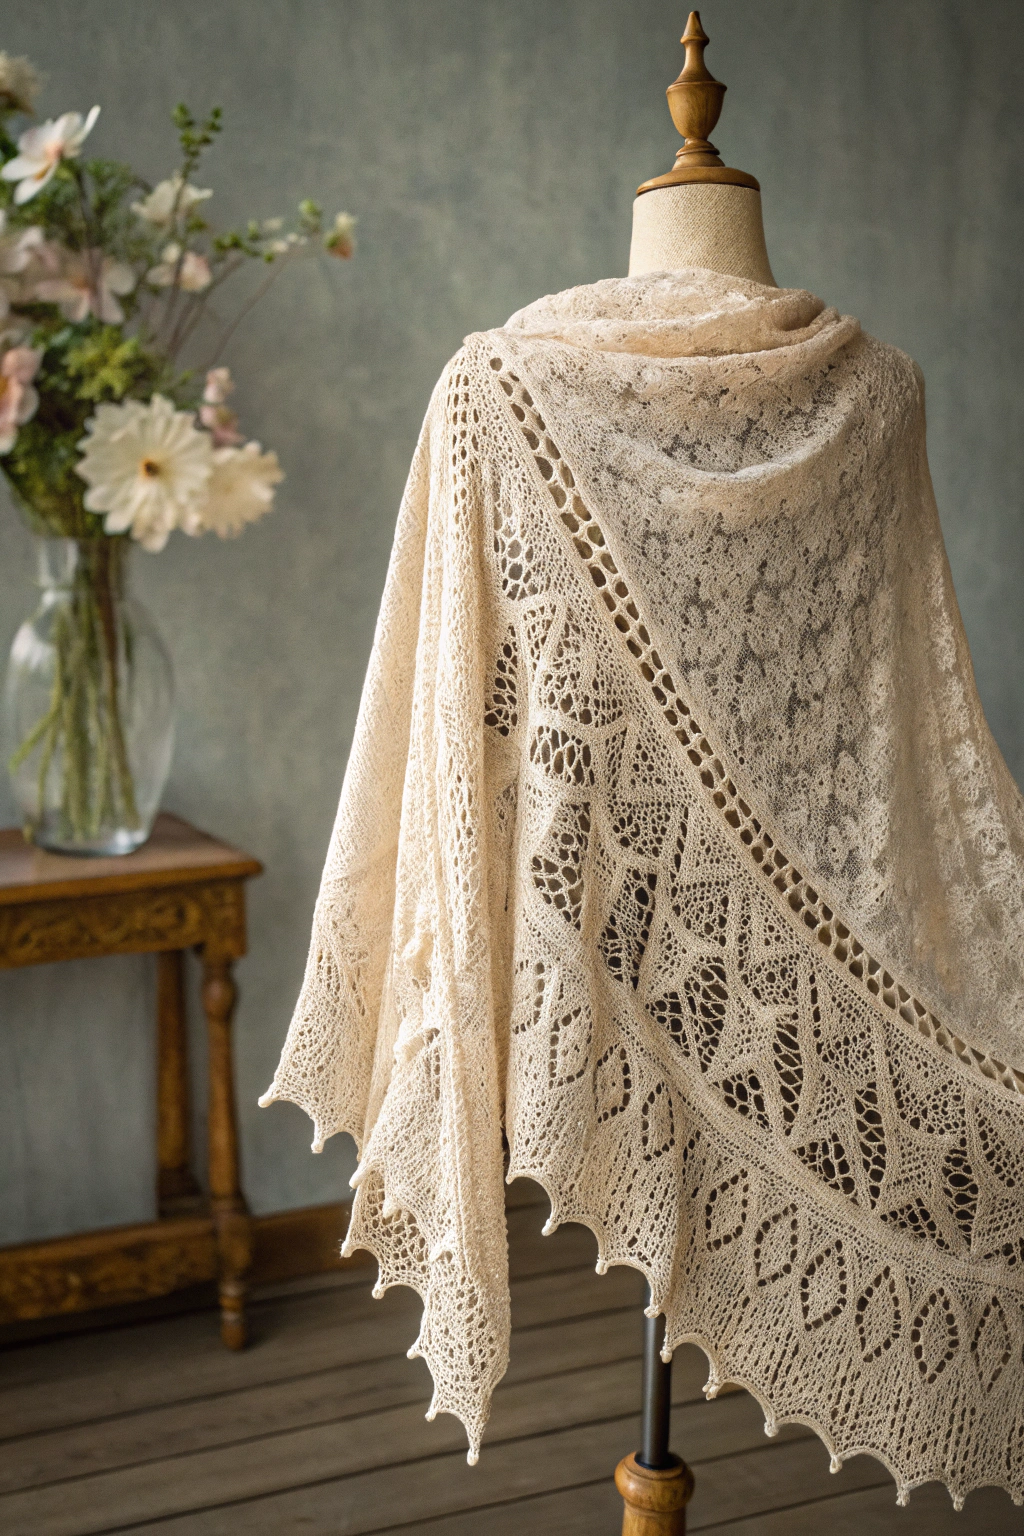
- 🧶 Yarn: About 400 yards of DK weight yarn. DK weight yarn is a good middle-ground – not too thin and not too thick – making it easy for beginners to handle. Choose a light color like the creamy shade in the picture to really show off the delicate lace pattern. A soft, natural fiber like merino wool or a cotton blend will feel lovely against your skin.
- 🪡 Knitting Needles: US size 6 (4.0 mm) knitting needles. This size is usually a good match for DK weight yarn and will create a fabric that is not too tight and not too loose, perfect for a drapey shawl. Straight needles will work just fine for this project.
- ✂️ Scissors: For cutting yarn. Any pair of scissors will do!
- 📍 Stitch Markers: About 6 stitch markers. These little rings are super helpful for marking important places in your knitting, especially when you’re working on a pattern like lace. They are like little flags that tell you where to do certain things.
- 📏 Tapestry Needle (Yarn Needle): For weaving in the yarn ends when you’re finished. This is a needle with a large eye and a blunt tip, making it easy to thread yarn and tuck in those loose ends neatly.
Getting Started: Basic Knitting Skills
If you’re brand new to knitting, don’t worry! We’ll go over the basic skills you’ll need for this shawl. Think of knitting like building with yarn and needles. We’re going to learn how to make different kinds of ‘yarn bricks’ to create our beautiful fabric.
Casting On
First, we need to cast on. This is how you get the yarn onto your needles to start knitting. Imagine it as creating the very first row of loops that will be the foundation of your shawl.
- Make a slip knot. To do this, make a loop with your yarn, then bring the yarn end over and through the loop, creating a knot that can slide open and closed. Don’t make it too tight.
- Place the slip knot onto your left needle.
- Hold the needle with the slip knot in your left hand. Hold the other needle in your right hand.
- Hold the yarn in your left hand, letting it drape over your index finger. This is called the working yarn.
- Insert the right needle into the slip knot from left to right.
- Wrap the working yarn around the right needle from back to front (counter-clockwise).
- Use the right needle to pull the yarn through the loop on the left needle, creating a new loop on the right needle.
- Slide the new loop onto the left needle. You have now cast on one stitch.
- Repeat steps 5-8 until you have cast on the number of stitches needed for the pattern. For this shawl, we’ll start with 3 stitches.
Knit Stitch (k)
The knit stitch is the most basic stitch in knitting. It’s like the foundation brick in our yarn wall. It creates a ‘V’ shape on the front of your work.
- Hold the needle with the cast-on stitches in your left hand. Hold the empty needle in your right hand.
- Insert the right needle into the first stitch on the left needle from front to back.
- Wrap the working yarn around the right needle from back to front (counter-clockwise).
- Use the right needle to pull the yarn through the loop, creating a new loop on the right needle.
- Slide the stitch off the left needle. You have now made one knit stitch.
- Repeat steps 2-5 for all stitches on the left needle. You’ve completed a row of knit stitches!
Yarn Over (yo)
A yarn over is a way to add a loop of yarn to your needle. This creates a hole in your knitting, which is essential for lace patterns. Think of it like making a little extra space in our yarn wall – creating a decorative opening.
- Bring the working yarn to the front of your work, between the needles.
- Then, bring the yarn over the right needle from front to back. You have now created a loop on the right needle.
- Continue with the next stitch as instructed in the pattern. The yarn over will create a hole in the fabric.
Knit Two Together (k2tog)
Knit two together is a way to decrease stitches. It makes two stitches become one. Imagine it as taking two yarn bricks and joining them together to make one slightly bigger brick, which reduces the total number of bricks in the row. This is important for shaping our shawl.
- Insert the right needle into the next TWO stitches on the left needle from front to back, as if you were going to knit them both at once.
- Wrap the working yarn around the right needle from back to front (counter-clockwise).
- Use the right needle to pull the yarn through BOTH stitches, creating one new stitch on the right needle.
- Slide both stitches off the left needle. You have decreased one stitch.
Slip Slip Knit (ssk)
Slip slip knit is another way to decrease stitches, similar to k2tog, but it creates a slightly different slant to the decrease. It’s like making our yarn bricks lean a little to the left.
- Slip the next stitch knitwise: Insert the right needle into the next stitch on the left needle as if to knit, but just slip it onto the right needle without working it.
- Slip the next stitch knitwise again in the same way. You now have two slipped stitches on the right needle.
- Insert the left needle into the front of both slipped stitches from left to right.
- Knit these two slipped stitches together. You have decreased one stitch.
Binding Off
Binding off is how you finish your knitting so that the stitches don’t unravel. It’s like securing the top of our yarn wall so it’s nice and finished.
- Knit two stitches.
- Insert the left needle into the first stitch on the right needle (the stitch furthest to the right).
- Lift the first stitch over the second stitch and off the needle. You now have one stitch bound off.
- Knit one more stitch. You now have two stitches on the right needle again.
- Repeat steps 2-4 until only one stitch remains on the right needle.
- Cut the yarn, leaving a tail of about 6 inches.
- Pull the yarn tail through the last loop and tighten it to secure. This last knot finishes off your knitting!
Let’s Knit Your Shawl! Step-by-Step Guide
Now that we’ve covered the basics, let’s start knitting our beautiful lace shawl! We’ll be working in rows, back and forth, to create a triangular shape, just like the shawl in the image. Observe in the image how the shawl starts narrow at the top and widens towards the bottom with a lovely lace border.
Starting the Center Triangle
We’ll begin at the very top point of the triangle.
Round 1: Cast on 3 stitches.
Round 2: Knit all stitches (knit stitch is abbreviated as ‘k’). (You will have 3 stitches)
Round 3: k1, yarn over (yo), k1, yo, k1. (You will have 5 stitches. You’ve increased by 2 stitches in this row by using yarn overs!)
Round 4 and all even-numbered rounds: Knit all stitches. (No increases or decreases on even rows. Just plain knit rows to build the fabric).
Round 5: k1, yo, k3, yo, k1. (You will have 7 stitches)
Round 7: k1, yo, k5, yo, k1. (You will have 9 stitches)
Round 9: k1, yo, k7, yo, k1. (You will have 11 stitches)
Continue in this pattern, increasing by 2 stitches every odd-numbered row by placing yarn overs on either side of the center stitches, and knitting all stitches on every even-numbered row. Keep going until your shawl is the size you want before starting the lace border. For a shawl similar in size to the one in the image, you might knit until you have around 150-160 stitches in total. This center triangle is the plain part of the shawl you see in the image, above the decorative lace edge.
Creating the Lace Border
Now for the fun part – the lace! The lace border is what makes this shawl so special and delicate, just like you can see in the image with its beautiful openwork pattern. We will start working the lace pattern along the bottom edge of our growing triangle.
Round 1 (Lace Border Row): k2, yo, k2tog, k1, yo, slip slip knit (ssk), k to the last 5 stitches, k2tog, yo, k1, yo, ssk, k2. (This row introduces the lace pattern. Don’t worry if it looks complicated at first, just follow it step-by-step).
Round 2 (and all even-numbered rounds of the lace border): Knit all stitches. (Remember, even rows are usually plain knit rows in lace knitting, giving the lace pattern structure).
Round 3: k2, yo, k2tog, k2, yo, ssk, k to the last 6 stitches, k2tog, yo, k2, yo, ssk, k2.
Round 5: k2, yo, k2tog, k3, yo, ssk, k to the last 7 stitches, k2tog, yo, k3, yo, ssk, k2.
Round 7: k2, yo, k2tog, k4, yo, ssk, k to the last 8 stitches, k2tog, yo, k4, yo, ssk, k2.
Round 9: k2, yo, k2tog, k5, yo, ssk, k to the last 9 stitches, k2tog, yo, k5, yo, ssk, k2.
Continue repeating Rounds 1-10 of the lace border pattern until the lace edge is as wide as you like. Observe in the image how the lace border creates a scalloped edge. You can make your lace border longer or shorter depending on your preference. The more you repeat these lace rows, the deeper and more prominent your lace edge will become.
Helpful Tip: Use stitch markers! Place stitch markers after the first 2 stitches, after the k2tog, after the ssk, before the k2tog, and before the last 2 stitches. This will help you keep track of the different sections of the lace pattern and make it easier to see where to do your yarn overs and decreases.
Binding Off and Finishing
Once your shawl is the size you want and you’ve completed the lace border, it’s time to bind off.
Binding Off Row: Bind off all stitches using the bind off method we learned earlier.
After binding off, cut the yarn, leaving a tail of about 6 inches. Use your tapestry needle to weave in all loose ends on the wrong side of your shawl. This means threading the yarn tail through the knitted stitches to hide it securely.
Blocking: To really make your lace pattern shine and to give your shawl its final beautiful shape, blocking is highly recommended. Blocking is like ironing for knitting! It helps to open up the lace and even out your stitches.
- Soak your finished shawl in lukewarm water with a little bit of gentle wool wash (if you used wool yarn) for about 20-30 minutes.
- Gently squeeze out the excess water – don’t wring it!
- Lay your shawl out flat on a blocking board or a clean towel.
- Gently stretch and shape your shawl to open up the lace pattern and create nice, even edges. You can use pins to hold the edges in place while it dries.
- Let your shawl dry completely flat. This might take overnight or even a day or two depending on the yarn and room humidity.
You Did It!
Congratulations! You’ve knitted your very own beautiful lace shawl. Isn’t it amazing what you can create with just yarn and needles? Take a moment to admire your handiwork – you should be so proud!
Knitting is a journey, and you’ve just taken a wonderful step further in your crafting adventure. We hope you enjoyed making this shawl as much as we enjoyed guiding you through it. Now you have a gorgeous, handmade shawl to wear yourself or to give as a thoughtful gift.
We’d absolutely love to see your creations! Please share photos of your finished shawls online and tag us – we can’t wait to see your unique versions of this lovely pattern. Happy knitting, and remember, every stitch is a step towards creating something beautiful!