Knit This Beautiful Textured Cardigan
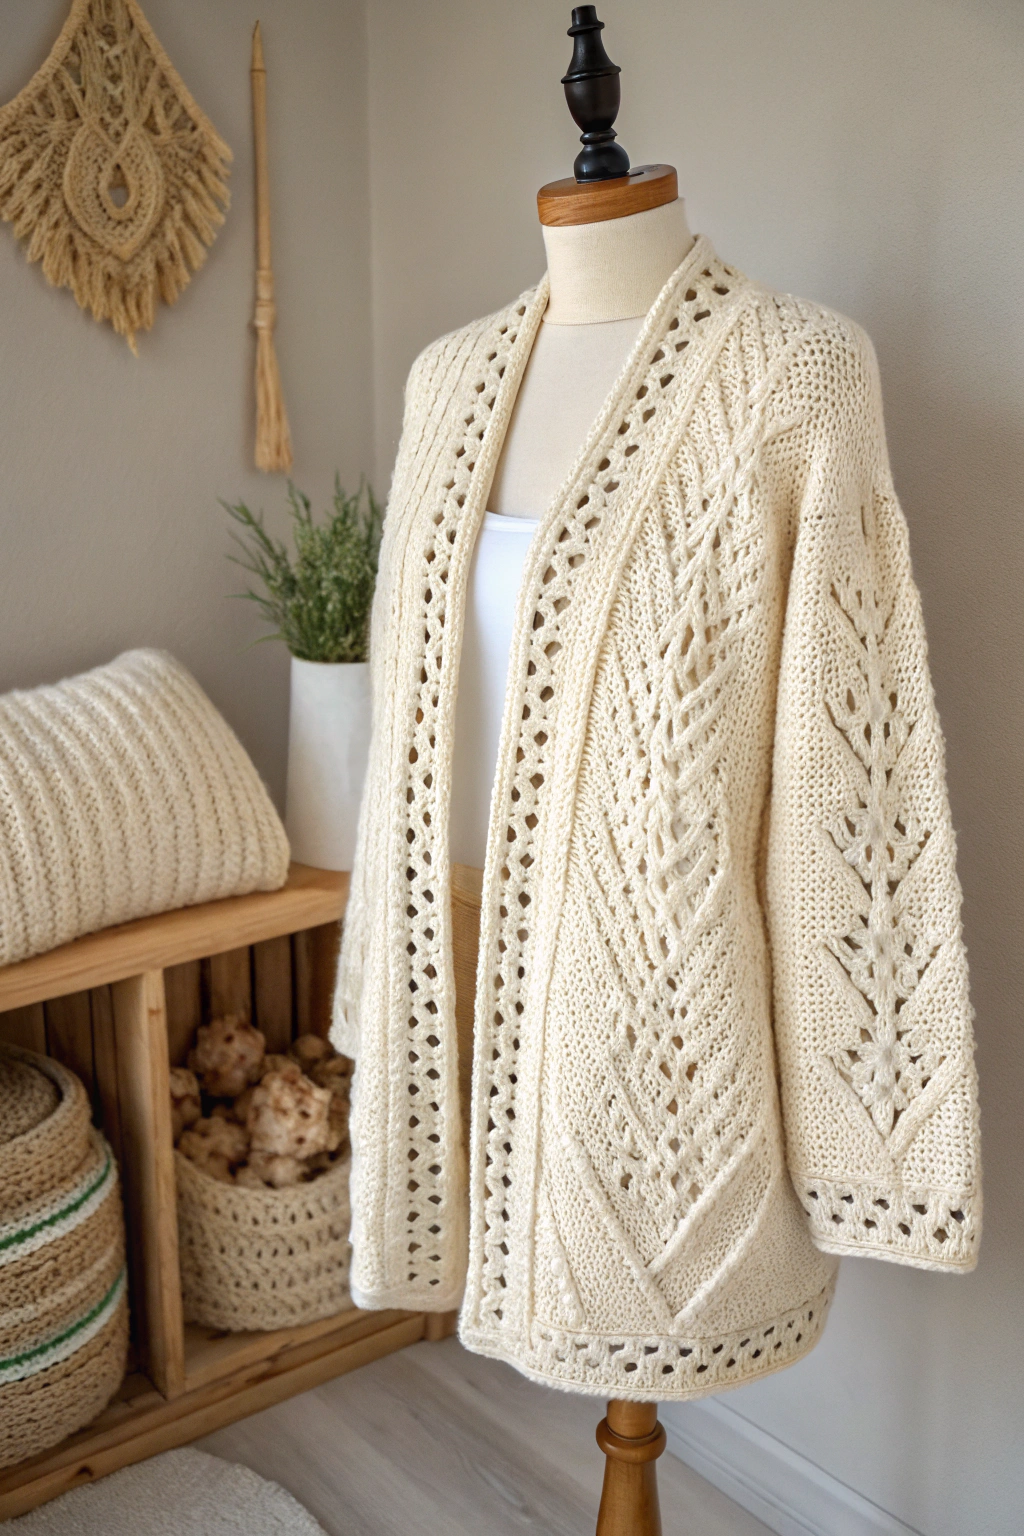
Hello, lovely knitters! Feast your eyes on the stunning knitted cardigan pictured here. Isn’t it just breathtaking? With its cozy look and those incredibly pretty textured details, it’s the kind of sweater you’ll want to live in. Now, you might be thinking, “Wow, that looks complicated!” Especially if you’re just starting your knitting adventures. But guess what? You absolutely can make this! We’re here to be your friendly guide, breaking down every part so you can fashion this beauty yourself. Let’s get those needles clicking!
What You’ll Need to Get Started
First things first, let’s gather our supplies. Having everything ready makes the whole process feel like a breeze!
- 🧶 Yarn: Grab about 1000-1500 yards (915-1370 meters) of DK or light worsted weight yarn. The cardigan in the image uses a soft, creamy white, but feel free to choose your favorite color! A wool or wool-blend yarn will give great stitch definition for those patterns.
- Knitting Needles: You’ll likely need two sizes. Based on the look, try US 6 (4.0 mm) for the borders and US 8 (5.0 mm) for the main fabric. Circular needles are super helpful for managing all the stitches, even when knitting back and forth in rows. Important: Use the needle size that helps you match the pattern’s gauge!
- ✂️ Scissors: A sharp pair for trimming yarn tails.
- Tapestry Needle: For weaving in ends and sewing seams.
- Stitch Markers: These little helpers are great for keeping track of pattern sections.
- 📏 Measuring Tape: To check your sizing as you go.
Super Important Tip: The Gauge Swatch! Before you dive into the cardigan itself, please make a sample square (about 4×4 inches or 10×10 cm) using your main yarn and larger needles. Try knitting it in Stockinette stitch (knit one row, purl one row) and maybe include a small section of the lace pattern if you feel up to it. Wash and dry this swatch just like you plan to care for your finished cardigan. Then, measure how many stitches and rows fit into 4 inches. If your numbers don’t match the pattern’s recommendation (or your desired fit), adjust your needle size. Too many stitches? Use bigger needles. Too few? Use smaller needles. This step is the secret to building a cardigan that fits perfectly!
Understanding How It’s Built
Let’s take a closer look at the cardigan in the image. It’s typically constructed in several flat pieces:
- Back Panel: The largest piece, forming the back.
- Two Front Panels: Mirror images that form the open front.
- Two Sleeves: To keep your arms cozy.
- Front Bands: Added along the opening edges later.
You can see in the image the lovely border pattern along the bottom hem, cuffs, and front opening. The main body and sleeves showcase beautiful vertical panels of lace (those delicate leafy shapes) set against a smoother background stitch (Stockinette stitch, which looks like little ‘V’s). We’ll assemble these pieces at the end.
Let’s Knit Step-by-Step!
Take a deep breath, grab your yarn, and let’s begin. Remember to refer to the image often!
Part 1: The Hem Border (Used on Back, Fronts, Cuffs)
This pretty border adds a lovely finishing touch. We’ll start the back panel with this.
Using your smaller needles:
- Cast on the number of stitches needed for the width of your back panel (based on your gauge and desired size).
- Row 1 (RS – Right Side): Knit all stitches.
- Row 2 (WS – Wrong Side): Purl all stitches.
- Row 3 (Eyelet Row): Repeat the following pair across the row: Knit 2 stitches together (k2tog), yarn over (yo). If you have one stitch left at the end, knit it.
- Friendly Explanation:
k2togis a simple decrease – just knit the next two stitches together as if they were one.yomeans bringing the yarn forward between the needles, then over the right needle to the back before knitting the next stitch. This forms a little hole or eyelet!
- Friendly Explanation:
- Row 4: Purl all stitches.
- Row 5: Knit all stitches.
- Row 6: Purl all stitches. Repeat these 6 rows once more, or until the border measures about 1-1.5 inches (2.5-4 cm). Finish after completing a Row 6 (a WS row).
Part 2: The Back Panel
Time for the main event on the back!
- Switch to your larger needles.
- Establish Pattern Sections: Plan how your stitches will be divided. Looking at the image, the back likely has a central section featuring the textured lace pattern, with plain Stockinette stitch on either side towards the seams.
- For example: Work 20 stitches in Stockinette (Knit on RS, Purl on WS), place a marker, work 50 stitches in the Lace Pattern (see below), place a marker, work the final 20 stitches in Stockinette. Adjust these numbers based on your size and gauge.
- Working the Lace Pattern: This is where the magic happens! Observe in the image the vertical patterns. These are usually produced using a combination of:
- Yarn Overs (yo): Create the holes for the lacy look.
- Decreases (like k2tog and ssk):
ssk(slip, slip, knit) is another common decrease that leans to the left. These shape the lace, often forming leaf or chevron patterns when combined with yarn overs over multiple rows. - Textured Stitches: Between the lace, there might be small cable twists or textured stitches like moss stitch for definition.
- Beginner Tip: Find a charted or written instruction for a “leaf lace panel” or similar stitch pattern online or in a knitting book that looks like the one in the image. Practice it on your swatch first! If it feels too much, choose a simpler vertical lace or cable pattern for your first go.
- Knit Upwards: Continue working in your established pattern sections (Stockinette, Lace, Stockinette) row after row. Keep your pattern instructions handy! Work straight until the back panel measures from the cast-on edge up to where your underarm should start.
- Shape Armholes: To make space for the sleeves, you’ll decrease stitches at the start of the armhole edge.
- Step 1: Bind off (cast off) a few stitches (e.g., 4 stitches) at the beginning of the next 2 rows (one RS, one WS).
- Step 2: Decrease 1 stitch at each end of the next few RS rows (e.g., k2tog at the start, ssk at the end) to create a slight curve.
- Continue to Shoulders: After armhole shaping, work straight in pattern without further shaping until the panel reaches your desired shoulder height.
- Shape Shoulders & Neck: Bind off the shoulder stitches, often in stages over a few rows for a sloped edge. Bind off the central stitches for the back of the neck.
Part 3: The Front Panels (Make 2 – Mirrored)
These form the lovely open front.
- Using smaller needles, cast on stitches for one front panel (roughly half the back panel’s width, plus stitches for the front band).
- Work the same Hem Border as the back panel across all stitches.
- Switch to larger needles.
- Establish Pattern Sections: This time, one edge is the side seam, and the other is the center front opening.
- Front Band Edge: Notice in the image the continuous border running up the front opening. You’ll work a specific border pattern (maybe 10-12 stitches wide) along this edge on every row. This could be a mix of ribbing (like K1, P1) and the eyelet pattern (k2tog, yo). Keep this consistent!
- Main Pattern: Next to the border, arrange your Lace Pattern and Stockinette sections to match the back panel, adjusted for the narrower width.
- Side Seam Edge: Work this edge straight in pattern.
- Shape Armhole: When the front panel matches the back panel’s height up to the underarm, shape the armhole at the Side Seam Edge exactly like you did for the back panel.
- Shape V-Neck: At the same time you start the armhole shaping, begin decreasing for the V-neck at the Front Band Edge. Usually, this means decreasing 1 stitch just inside the border pattern (e.g., work the border, then k2tog or ssk) on RS rows, perhaps every 2nd or 4th row. Continue until you have the correct number of stitches left for the shoulder.
- Shape Shoulder: At the Side Seam Edge, shape the shoulder to match the back shoulder shaping.
- Make the Second Front Panel: Fashion the second panel exactly the same, but as a mirror image! Ensure armhole and neck shaping are on the opposite sides.
Part 4: The Sleeves (Make 2)
Almost there! Let’s make those cozy sleeves.
- Using smaller needles, cast on stitches for your wrist circumference. Work the same Hem Border (cuff) for about 2-3 inches (5-7.5 cm).
- Switch to larger needles. On the first row with larger needles (usually a RS row), increase stitches evenly across to get the width needed for the upper sleeve. (E.g., Knit 2, make one increase (m1); repeat across).
- Friendly Explanation:
m1(make one) is an increase worked between stitches – pick up the bar between the last stitch worked and the next one, and knit into the back of it.
- Friendly Explanation:
- Establish Pattern: Center the Lace Pattern panel(s) on the sleeve, with Stockinette stitch on either side towards the edges, similar to the body panels seen in the image.
- Shape Sleeve: To make the sleeve gradually wider from cuff to underarm, increase 1 stitch at each end of the row every few rows (e.g., every 4th or 6th row). Continue working in pattern and increasing until the sleeve reaches the desired width and length to the underarm.
- Shape Sleeve Cap: This is the curved top that fits into the armhole.
- Step 1: Bind off a few stitches (matching the armhole bind-off) at the beginning of the next 2 rows.
- Step 2: Decrease 1 stitch at each end of every RS row (or sometimes every row) until only a few stitches remain. Sleeve cap shaping is usually steeper than armhole shaping.
- Step 3: Bind off the remaining stitches.
- Make the Second Sleeve: Repeat for the other sleeve.
Part 5: Finishing Touches – Assembly!
This is where your pieces magically become a cardigan!
- Weave in Ends: Before sewing, use your tapestry needle to neatly weave in all the starting and ending yarn tails on the wrong side of each piece.
- Blocking (Highly Recommended!): Gently wash or wet your knitted pieces according to the yarn instructions. Squeeze out water (don’t twist!). Lay them flat on towels, carefully pinning them to the correct finished measurements. Let them dry completely. Blocking helps even out stitches and makes seaming much easier.
- Seaming: Using your tapestry needle and matching yarn, sew the pieces together.
- Sew the shoulder seams first.
- Align the center top of the sleeve cap with the shoulder seam and carefully sew the sleeve cap into the armhole opening (this is called setting in the sleeve).
- Sew the side seams (from underarm down to hem) and the sleeve seams (from underarm down to cuff). Mattress stitch is a great choice for invisible vertical seams.
You Did It! Admire Your Work!
Take a step back and look at the beautiful cardigan you just produced! Feel the soft yarn, admire those lovely patterns, and give yourself a huge pat on the back. Making something wearable with your own hands is an incredible feeling. Every stitch tells a story of your learning and dedication.
Wear your new cardigan with pride! It might not be identical to a store-bought item, but it holds something much more valuable – your time, effort, and personal touch. That’s the true joy of handmade items.
Ready to show off your amazing accomplishment? We’d absolutely love to see your finished cardigan! Share a picture on your favorite social media or crafting platform. Happy knitting!