Knit a Sweet Fox Sweater for Little Ones
Hello fellow crafters! Are you ready to embark on a super fun and rewarding knitting adventure? Today, we’re going to fashion the most adorable fox sweater, perfect for keeping your little loved ones warm and looking absolutely charming. This project is designed to be beginner-friendly in its explanation, so even if you’ve never picked up knitting needles before, don’t worry! We’ll guide you through every step to make this delightful sweater. Get ready to experience the joy of making something beautiful with your own hands!
Materials You’ll Need
Before we begin, let’s gather all the supplies we’ll need. Having everything ready will make the process smooth and enjoyable.
- 🧶 Yarn: You’ll need two colors of yarn in a soft, baby-friendly material like merino wool or a soft acrylic blend. Looking at the image, we see a lovely creamy white and a warm, pumpkin orange. Choose yarn that is labeled as DK weight or light worsted weight. For the main orange color, you’ll need approximately 300-400 yards, and for the white, about 150-200 yards. It’s always a good idea to get a little extra, just in case!
- 🪡 Knitting Needles: You’ll need a pair of knitting needles in size US 6 (4.0 mm) for the main part of the sweater and a set of double-pointed needles or a circular needle of the same size for the ribbing and neckline – whichever you find easier to work with in the round.
- ✂️ Scissors: For snipping yarn.
- 📍 Stitch Markers: These little rings are super helpful for marking places in your knitting, especially when we start shaping the yoke. You’ll need about 4-6 stitch markers.
- 📏 Measuring Tape: To check your gauge and the size of the sweater as you make it.
- 🧵 Tapestry Needle (or Yarn Needle): A large-eyed blunt needle for weaving in the yarn ends and sewing on the fox features.
- 🦊 Felt or Yarn Scraps for Fox Details: Small amounts of black, pink, and white felt or yarn scraps to fashion the fox’s eyes, nose, and cheeks.
Let’s Get Knitting: Step-by-Step Guide
Now for the exciting part – let’s start building our fox sweater! We’ll break it down into manageable sections, so it’s easy to follow along. Remember, take your time, enjoy the process, and don’t be afraid to rewind and re-read if you need to.
Getting Started: Gauge and Basics
Before we jump into the sweater itself, it’s important to talk about gauge. Gauge is simply how many stitches and rows you make per inch or centimeter. It’s crucial because if your gauge is different from what the pattern intends, your finished sweater might be too big or too small.
To check your gauge, knit a small square (about 4 inches by 4 inches) using the orange yarn and the US 6 needles in stockinette stitch. Stockinette stitch is a very basic stitch pattern where you knit every stitch on one side (the right side) and purl every stitch on the other side (the wrong side). Think of knit stitches as little ‘v’ shapes and purl stitches as little bumps. Once you’ve knitted your square, gently lay it flat and measure how many stitches and rows are in a 1-inch square. For this sweater, aim for approximately 22 stitches and 30 rows per 4 inches in stockinette stitch. If you have more stitches, your knitting is tighter, so you might need to use larger needles. If you have fewer stitches, your knitting is looser, and you might need smaller needles.
Let’s also quickly go over some basic knitting terms we’ll be using:
- Cast on: This is how you get the yarn onto your needles to begin knitting – it forms the first row of stitches. Think of it as setting up the foundation for your knitted fabric.
- Knit (k): The most basic stitch in knitting. You insert the needle into a loop and pull yarn through to form a new loop. It looks like a ‘v’ on the front of your work.
- Purl (p): Another basic stitch, the opposite of knit. It looks like a little bump on the front of your work.
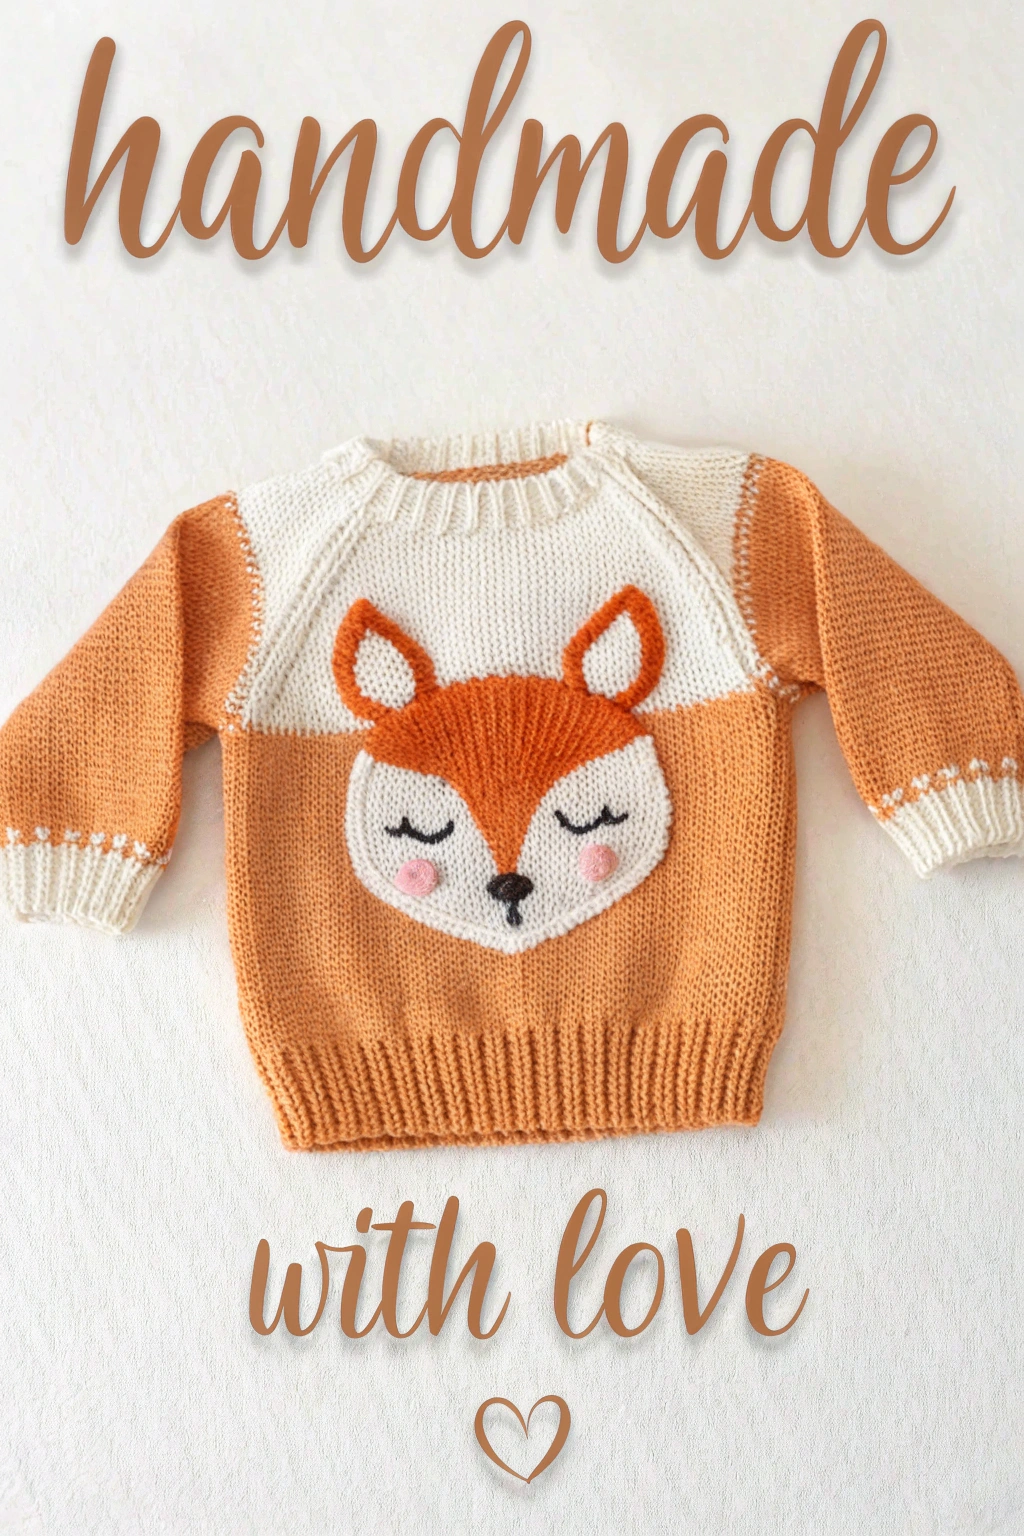
- Stockinette stitch (st st): Alternating rows of knit and purl (knit on the right side, purl on the wrong side). This is the smooth, classic fabric you see in the image for the main part of the sweater.
- Ribbing: A stretchy edge often used at cuffs, hems, and necklines. In the image, we see a 1×1 rib, which means alternating knit and purl stitches (k1, p1). This forms vertical lines of knit and purl, making the fabric elastic.
- Bind off: This is how you finish your knitting and take it off the needles, securing the last row of stitches so they don’t unravel. Think of it as tying off the end of your knitted fabric.
- Yarn over (yo): A technique to add a stitch and form a small hole, often used for increasing or decorative purposes.
- Knit two together (k2tog): A decrease technique where you knit two stitches together as one, reducing the number of stitches.
- Purl two together (p2tog): A decrease technique where you purl two stitches together as one.
- Right side (RS): The front or outside of your work, usually the knit side in stockinette stitch.
- Wrong side (WS): The back or inside of your work, usually the purl side in stockinette stitch.
Knitting the Body
We’ll start by fashioning the main body of the sweater in orange.
Round 1: Cast on 120 stitches using the orange yarn and your US 6 needles. If you’re using circular needles, join in the round carefully, making sure not to twist the stitches. If using straight needles, you’ll be knitting flat for now and we’ll seam it later. For beginner-friendliness, let’s assume we are working flat with straight needles first. Round 2: Work in 1×1 ribbing (k1, p1) for 8 rows. This means you knit one stitch, then purl the next, and repeat this pattern across the row. This will be the bottom ribbed edge of the sweater, as seen in the image. Round 3: Switch to stockinette stitch (knit on the right side, purl on the wrong side). Continue in stockinette stitch for approximately 8 inches (or adjust to your desired length). Refer to the image to see the length of the orange section. Remember to count your rows or measure as you go to ensure both the front and back pieces will be the same length.
Round 4: Once you’ve knitted the body to the desired length, bind off all stitches. This completes the front and back panels of the body. Make two identical pieces – one for the front and one for the back.
Knitting the Sleeves
Now, let’s develop the sleeves, also in orange with white details.
Round 1: Cast on 40 stitches using the orange yarn and US 6 needles. Round 2: Work in 1×1 ribbing (k1, p1) for 8 rows, just like we did for the body hem. This forms the ribbed cuff of the sleeve. Round 3: Switch to stockinette stitch and knit in orange for about 2 inches. Round 4: Now, for the white detail. Refer to the image – you’ll see a band of white stitches just above the cuff. Change to white yarn and knit 4 rows in stockinette stitch. Round 5: Switch back to orange yarn and continue in stockinette stitch, increasing 1 stitch at each end of the needle every 6 rows, 6 times in total. To increase, you can use a “make one” increase (m1) which is a nearly invisible increase. This will gently widen the sleeve as you knit upwards. Keep knitting until the sleeve measures approximately 9 inches from the cuff (or adjust to your desired sleeve length). Round 6: Bind off all stitches. Make two identical sleeves.
Knitting the Yoke and Neck
The yoke is the top part of the sweater that joins the sleeves and body together. In the image, the yoke is white and has a rounded shape. We’ll assemble this part now.
Round 1: We’ll now join the front, back, and sleeves. If you knitted flat pieces, it’s time to seam the shoulder seams. Place the front and back body pieces right sides together and seam the top edges together for about 4 inches from each outer edge, leaving the center open for the neck. Then, seam the top edges of the sleeves to the armholes you’ve just formed on the body pieces. Round 2: With the white yarn and using circular needles or double-pointed needles (if you prefer to work in the round), pick up stitches around the neckline edge. Aim to pick up approximately 80-90 stitches evenly around the neck opening. This might seem a bit tricky, but take your time and try to pick up one stitch for roughly each row along the edge. Round 3: Work in 1×1 ribbing (k1, p1) using the white yarn for about 6 rounds to fashion the neckline. Round 4: Bind off all stitches loosely. This completes the neck ribbing.
Round 5: Now, seam up the side seams of the body and the underarm seams of the sleeves using the orange yarn and tapestry needle. Weave in all loose yarn ends neatly to give your sweater a polished finish.
Crafting the Fox Appliqué
The fox appliqué is what truly brings this sweater to life! Let’s fashion this adorable detail. Refer closely to the image to guide you as you make each piece.
Round 1: Fox Head: Using orange yarn and smaller needles (like US 4 or 3.5mm), cast on about 20 stitches (adjust based on your gauge and desired size of the fox face). Knit in stockinette stitch, shaping the head by decreasing stitches at the edges to form the pointed chin and rounded top of the fox head. You can decrease by knitting two together (k2tog) at the beginning and end of some rows to taper the shape. Look at the image to see the fox head shape and try to mimic it as you knit. It should be roughly heart-shaped, but with more pointed ears and chin. Bind off when you are happy with the size and shape.
Round 2: White Face Patch: Using white yarn and the same needles, knit a smaller, slightly rounded triangle shape that will fit inside the orange fox head for the face patch. Refer to the image for the shape and size. Bind off.
Round 3: Ears (x2): Using orange yarn, knit two small triangles for the fox ears. These should be pointed at the top and slightly wider at the base. A very simple way to make these is to cast on about 6 stitches, then decrease one stitch at each edge every row until you have just 2 stitches left, then bind off.
Round 4: Eyes (x2): Using black felt or black yarn, fashion two small, almond-shaped eyes. You can cut these from felt or embroider them with black yarn.
Round 5: Nose: Using black felt or black yarn, make a small, inverted triangle for the nose.
Round 6: Cheeks (x2): Using pink felt or pink yarn, make two small circles or ovals for the cheeks.
Round 7: Assembly and Attachment: Now it’s time to assemble the fox face! First, sew the white face patch onto the orange fox head. Then, position and sew the eyes, nose, and cheeks onto the white patch, referring to the image for placement. Finally, sew the two ears to the top corners of the fox head. Once the fox face is assembled, carefully position it in the center front of the sweater and sew it securely in place using the tapestry needle and matching yarn.
Finishing Touches and Sharing Your Creation
Congratulations! You’ve successfully fashioned your very own adorable fox sweater! Give it a gentle block by lightly steaming or dampening it and laying it flat to dry. This will help even out your stitches and give it a professional finish.
The joy of making something with your own hands is truly special. Imagine the smiles when your little one wears this cozy and cute sweater, crafted with love by you. We encourage you to share your finished fox sweater! Snap a picture and share it with fellow crafters online. It’s wonderful to see everyone’s unique creations and inspire others to try this fulfilling hobby.
Happy knitting, and we can’t wait to see your foxy sweaters!