How to Create a DIY Mudroom Bench
Are you tired of tripping over shoes in your entryway or struggling to find a place for your kids’ backpacks? A DIY mudroom bench might be the perfect solution to bring order to your home’s chaos. In this comprehensive guide, we’ll walk you through every step of creating your own custom mudroom bench, from planning to execution and beyond. Get ready to transform your entryway into a functional and stylish space that will make your daily comings and goings a breeze!
Understanding the Importance of a Mudroom Bench
Before we dive into the nitty-gritty of building your DIY mudroom bench, let’s take a moment to appreciate why this project is worth your time and effort.
A mudroom is more than just a fancy name for an entryway. It’s a dedicated space designed to be the buffer between the outside world and your clean, organized home. At the heart of any well-designed mudroom is the bench – a multifunctional piece of furniture that serves as a seat, storage unit, and organizational hub all in one.
Here’s why a mudroom bench is a game-changer for home organization:
- Clutter control: Say goodbye to shoes scattered across the floor and coats draped over chairs. A mudroom bench provides a designated spot for everything.
- Time-saver: No more frantic searches for keys or gloves when you’re rushing out the door. Everything has its place, making your morning routine smoother.
- Dirt barrier: By providing a spot to remove dirty shoes and hang wet coats, a mudroom bench helps keep the rest of your home clean.
- Family-friendly: From toddlers learning to put on their own shoes to teens dropping their sports gear, a mudroom bench accommodates the whole family’s needs.
By taking the DIY approach, you’re not just saving money – you’re creating a custom solution tailored to your unique space and needs. Whether you have a sprawling entryway or a tight corner to work with, a DIY mudroom bench can be designed to fit perfectly and include all the features you’ve always wanted.
Planning Your DIY Mudroom Bench Project
The key to any successful DIY project is thorough planning. Before you pick up a saw or open a can of paint, take some time to think through your mudroom bench project.
Assessing Your Space and Needs
Start by measuring your available space. Consider not just the floor area but also the height of the walls and any obstacles like electrical outlets or vents. Think about how many people will be using the mudroom bench and what items you need to store.
Determining Size and Features
Based on your assessment, decide on the dimensions of your bench. A typical mudroom bench is about 18-20 inches deep and 16-20 inches high for comfortable seating. The length will depend on your available space and needs.
Consider which features are must-haves for your family:
- Cubbies for shoes?
- Hooks for coats and bags?
- Drawers for small items?
- A lift-top bench for hidden storage?
Choosing a Style
Your mudroom bench should be functional, but it can also be a stylish addition to your home. Consider the existing decor in your entryway and adjacent rooms. Do you prefer a rustic farmhouse look, a sleek modern design, or something in between? This will guide your choices for materials and finishes.
Budgeting
Create a detailed list of materials and tools you’ll need. Price these out at your local hardware store or online. Don’t forget to factor in extras like sandpaper, wood filler, and brushes. If you’re new to DIY, you might need to invest in some basic tools – consider these a long-term investment for future projects.
Materials and Tools Needed
Now that you have a plan, it’s time to gather your supplies. Here’s a basic list to get you started:
Materials:
- Wood (type depends on your design, but common choices include pine, oak, or plywood)
- Wood screws
- Wood glue
- Sandpaper (various grits)
- Primer
- Paint or wood stain
- Clear coat (for protection)
- Hardware (hooks, drawer pulls, hinges if needed)
- Optional: cushion materials, fabric, baskets for storage
Tools:
- Measuring tape
- Pencil
- Circular saw or miter saw
- Drill and drill bits
- Screwdriver
- Sander (electric sander will save time, but hand sanding works too)
- Paintbrushes and/or foam rollers
- Safety gear (goggles, dust mask, work gloves)
Pro tip: If you’re new to woodworking, many hardware stores offer wood cutting services. This can be a great way to ensure straight, accurate cuts if you’re not confident using a saw.
Step-by-Step Guide to Building Your Mudroom Bench
Now comes the exciting part – building your mudroom bench! Follow these steps carefully, and soon you’ll have a beautiful, functional piece of furniture to enjoy.
1. Measuring and Cutting the Wood
Double-check your measurements before making any cuts. Remember the old carpenter’s adage: “Measure twice, cut once.” Cut your wood pieces according to your plan, including:
- Bench top
- Legs
- Support beams
- Shelves or cubbies (if included in your design)
2. Assembling the Frame
Start by creating the basic frame of your bench:
- Attach the legs to the front and back support beams.
- Add cross supports for stability.
- If your design includes cubbies or shelves, install the vertical dividers.
Use wood glue at each joint for extra strength, and secure with screws.
3. Adding the Seat
Once your frame is sturdy, it’s time to add the seat:
- Place the bench top onto the frame.
- Secure it with screws from underneath, countersinking the screws for a smooth finish.
- If you’re creating a lift-top bench, attach hinges according to the manufacturer’s instructions.
4. Installing Storage Compartments or Shelves
If your design includes storage features:
- Install any shelves or cubby dividers.
- Add a back panel if desired for a more finished look.
- If you’re including drawers, assemble and install the drawer boxes.
5. Sanding and Finishing
Proper sanding is crucial for a professional-looking finish:
- Start with a coarse-grit sandpaper to smooth any rough spots.
- Progress to finer grits for a smooth surface.
- Wipe away all dust with a tack cloth.
6. Painting or Staining
Now it’s time to add color:
- If painting, apply a coat of primer and let it dry completely.
- Apply your chosen paint color in thin, even coats. Multiple thin coats are better than one thick coat.
- If staining, apply the stain according to the product instructions, wiping away excess for an even finish.
- Once your paint or stain is completely dry, apply a clear protective coat for durability.
7. Adding Final Touches
The last step is to add the finishing touches that will make your mudroom bench both functional and beautiful:
- Install hooks for coats and bags.
- Add any drawer pulls or knobs.
- If desired, create a cushion for the bench top and secure it in place.
Congratulations! You’ve just built your very own mudroom bench. Take a step back and admire your handiwork – you’ve created a custom piece of furniture that will serve your family for years to come.
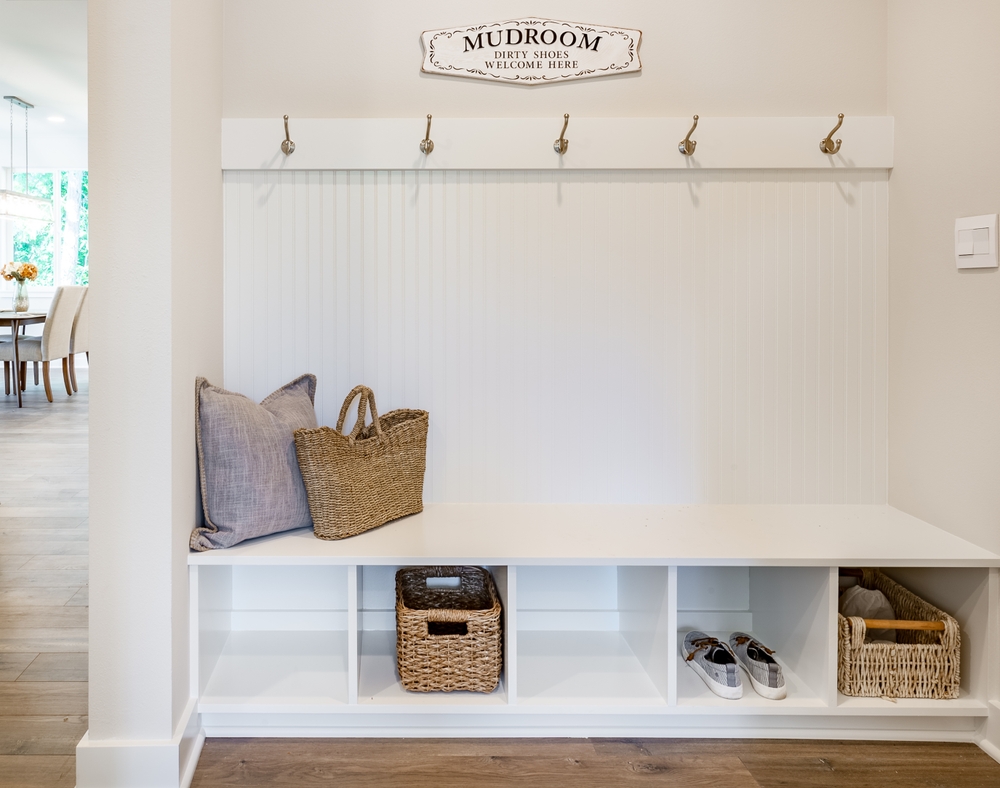
Tips for Maximizing Storage in Your Mudroom Bench
Now that your bench is built, let’s explore some ways to maximize its storage potential:
- Use vertical space: Install hooks or a pegboard above the bench for hanging coats, bags, and accessories.
- Incorporate baskets: Use matching baskets in cubbies for a cohesive look and easy organization of smaller items.
- Label, label, label: Especially useful for families, labels can help ensure everything has a designated spot.
- Utilize under-bench space: If you didn’t build in under-bench storage, consider adding rolling bins that can slide underneath.
- Seasonal rotation: Store off-season items in less accessible areas, keeping current necessities within easy reach.
Personalizing Your Mudroom Bench
Your DIY mudroom bench is more than just a functional piece – it’s an opportunity to express your style. Here are some ideas for making it uniquely yours:
- Bold color choices: Don’t be afraid to use a vibrant paint color that complements your home’s decor.
- Stenciled designs: Add visual interest with a stenciled pattern on the bench top or sides.
- Mixed materials: Combine wood with metal accents for an industrial-chic look.
- Personalized touches: Add family names to cubbies or hooks for a custom feel.
- Changeable elements: Use removable wallpaper on the back panel for easy updates.
Remember, the beauty of a DIY project is that you can always make changes. If your needs or tastes change over time, your mudroom bench can evolve too.
Maintaining Your DIY Mudroom Bench
To keep your mudroom bench looking great and functioning well for years to come, follow these maintenance tips:
- Regular cleaning: Wipe down surfaces weekly with a damp cloth, and address spills immediately.
- Seasonal deep clean: Twice a year, empty all storage and give everything a thorough cleaning.
- Touch-up paint: Keep a small amount of your paint or stain for quick touch-ups of scratches or dings.
- Tighten hardware: Periodically check and tighten any loose screws or hardware.
- Refresh cushions: If your bench has cushions, wash or replace covers as needed to keep them fresh.
Styling Your Mudroom Around the Bench
Your new mudroom bench is the star of the show, but the supporting cast is important too. Here are some ideas for styling the rest of your mudroom:
- Cohesive color scheme: Choose a color palette that complements your bench and carries through to other elements in the space.
- Wall organization: Install a mail sorter or key hooks to keep small items organized.
- Mirror: A mirror not only adds light but gives you a chance for a final appearance check before heading out.
- Lighting: Good lighting is crucial in a mudroom. Consider a statement light fixture that adds both function and style.
- Plants: A small plant or two can add life to the space and help purify the air.
- Artwork: Don’t forget the walls! A piece of art or a family photo gallery can personalize the space.
Real-Life Examples and Inspiration
Nothing beats seeing real-life examples to get your creative juices flowing. Here are a few scenarios to inspire you:
- The Compact Solution: Sarah from Minneapolis maximized her small entryway with a narrow bench featuring vertical cubbies and a row of hooks above. The crisp white paint brightens her space and makes it feel larger.
- Family-Friendly Functionality: The Johnson family in suburban Chicago built a expansive mudroom bench with individual cubbies for each family member, complete with charging stations for devices. They chose a durable, dark stain to hide inevitable scuffs and marks.
- Farmhouse Chic: Emily in rural Vermont created a charming mudroom bench using reclaimed barn wood. She added vintage coat hooks and wire baskets for a rustic touch that’s both stylish and practical.
Remember, these are just starting points. Your mudroom bench should be as unique as your home and family!
Troubleshooting Common DIY Challenges
Even the most carefully planned DIY projects can hit snags. Here are solutions to common challenges:
- Uneven floors: Use adjustable furniture feet to level your bench, or add shims under the legs as needed.
- Tight spaces: Consider a corner design or a floating bench to maximize space in small areas.
- Mistakes during building: Wood filler can hide small errors. For larger issues, don’t be afraid to disassemble and rebuild – it’s all part of the learning process!
Cost Analysis: DIY vs. Store-Bought
One of the biggest advantages of a DIY mudroom bench is the potential for cost savings. Let’s break it down:
- DIY Mudroom Bench: Depending on your choice of materials and complexity of design, you might spend anywhere from $100 to $300.
- Store-Bought Equivalent: A comparable pre-made mudroom bench could cost $500 to $1000 or more.
Beyond the initial cost savings, your DIY bench offers long-term value through its customization and the pride of having built it yourself.
Environmental Considerations
As you embark on your DIY journey, keep the environment in mind:
- Eco-friendly materials: Look for sustainably sourced wood or consider using reclaimed materials.
- Low-VOC finishes: Choose paints and stains with low volatile organic compounds for better indoor air quality.
- Upcycling: Can you repurpose any existing furniture into your mudroom bench design?
- Responsible disposal: If your project generates waste, dispose of it properly. Many materials can be recycled or donated.
Safety Considerations
Safety should always be your top priority when working on DIY projects:
- Proper tool use: Always read and follow tool instructions carefully.
- Protective gear: Wear safety goggles, a dust mask, and work gloves when appropriate.
- Workspace safety: Ensure your work area is well-ventilated and free from tripping hazards.
- Child and pet safety: Keep tools and materials out of reach when not in use.
- Secure installation: Make sure your finished bench is stable and securely attached to the wall if necessary.
Conclusion
Congratulations! You’ve now got all the knowledge you need to create your very own DIY mudroom bench. From planning and building to styling and maintaining, you’re well-equipped to tackle this project and transform your entryway into an organized, functional, and beautiful space.
Remember, the joy of DIY isn’t just in the finished product, but in the process of creating something with your own hands. Each time you use your mudroom bench, you’ll have the satisfaction of knowing you built it yourself.
We’d love to see your creations! Share photos of your DIY mudroom bench on social media with the hashtag #MyDIYMudroomBench. Your project could inspire others to organize their homes and try their hand at DIY.
Now, roll up your sleeves, gather your materials, and get ready to build the mudroom bench of your dreams. Happy DIYing!
FAQs
Q: How long does it take to build a DIY mudroom bench? A: The time can vary depending on your skill level and the complexity of your design. A simple bench might take a weekend, while a more elaborate design could take several days to a week.
Q: Do I need advanced woodworking skills to build a mudroom bench? A: Not necessarily. With careful planning and patience, even beginners can successfully complete this project. If you’re unsure about certain steps, consider watching online tutorials or asking for help at your local hardware store.
Q: Can I build a mudroom bench if I don’t have a dedicated mudroom? A: Absolutely! A mudroom bench can be a great addition to any entryway, hallway, or even a corner of your living room. Adapt the size and design to fit your available space.
Q: How do I ensure my mudroom bench is strong enough to sit on? A: Use sturdy materials, ensure all joints are secure with both glue and screws, and consider adding extra support beams if needed. If in doubt, overbuilding is better than underbuilding.
Q: Can I customize this project for specific storage needs? A: Definitely! That’s one of the biggest advantages of a DIY project. Adjust the design to include specific features like a shoe rack, hidden compartments, or specialized storage for sports equipment.