How to Clean Your Iron with Salt
Did you know that the average household iron harbors more bacteria than a toilet seat? It’s a startling fact that underscores the importance of regular iron maintenance. Whether you’re a seasoned home laundry expert or just starting to tackle your own ironing, knowing how to clean your iron properly is crucial. In this comprehensive guide, we’ll explore an effective, eco-friendly, and cost-efficient method to keep your iron in top shape: cleaning it with salt.
The Importance of a Clean Iron
Before we dive into the cleaning process, let’s understand why maintaining a clean iron is so vital:
- Clothing Quality: A dirty iron can transfer grime, rust, or mineral deposits onto your clothes, potentially ruining your favorite garments.
- Longevity: Regular cleaning prolongs your iron’s lifespan, saving you money in the long run.
- Optimal Performance: A clean iron glides smoothly, distributes heat evenly, and produces steam efficiently, making your ironing tasks quicker and more effective.
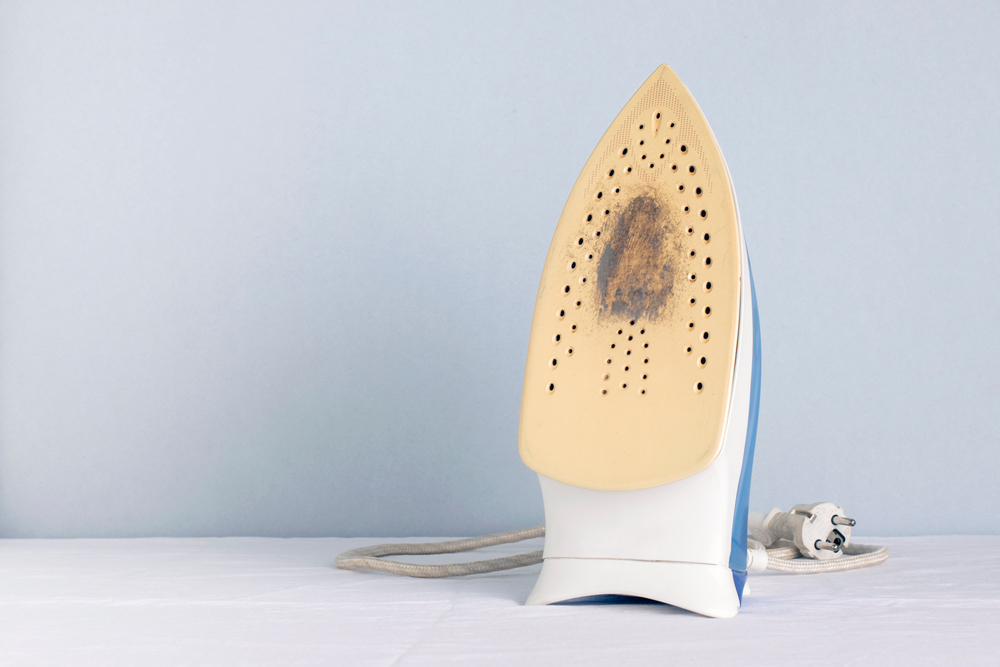
Signs Your Iron Needs Cleaning
How do you know when it’s time to give your iron some TLC? Look out for these telltale signs:
- Visual Indicators:
- Brown or white mineral deposits on the soleplate
- Rust spots
- Sticky residue from synthetic fabrics
- Performance Issues:
- Iron sticking to fabrics
- Uneven heat distribution
- Reduced steam output
- Frequency of Use: As a rule of thumb, clean your iron every 1-3 months, depending on how often you use it.
Materials Needed for Salt Cleaning Method
One of the beauties of the salt cleaning method is its simplicity. You’ll need:
- Table salt (coarse salt works best)
- A clean, soft cloth or rag
- Water
- A heat-resistant surface (like an old towel or ironing board)
- Distilled white vinegar (optional, for stubborn stains)
Don’t have salt on hand? In a pinch, you can use baking soda as an alternative, though the process might differ slightly.
Step-by-Step Guide to Cleaning Your Iron with Salt
Now, let’s get down to business. Follow these steps to restore your iron to its former glory:
- Preparation:
- Unplug your iron and let it cool completely.
- Lay out your heat-resistant surface.
- The Salt Cleaning Process:
- Sprinkle a generous amount of salt onto your heat-resistant surface.
- Set your iron to its highest heat setting (no steam).
- Once hot, gently glide the iron over the salt in circular motions.
- The abrasive nature of the salt will help remove buildup and stains.
- Continue this process for 2-3 minutes.
- Post-Cleaning Care:
- Turn off and unplug the iron, allowing it to cool.
- Wipe the soleplate with a damp cloth to remove any salt residue.
- For the steam vents, use a cotton swab dipped in distilled water.
- Finally, run the iron on an old cloth to ensure all residue is gone.
Safety Precautions: Always ensure the iron is unplugged when not in use during cleaning. Be cautious of the hot soleplate, and never submerge your iron in water.
Why Salt is Effective for Cleaning Irons
You might wonder, “Why salt?” The answer lies in its unique properties:
- Abrasiveness: Salt crystals act as a gentle abrasive, scrubbing away buildup without scratching the soleplate.
- Heat Resistance: Salt can withstand high temperatures, making it perfect for use with a hot iron.
- Desiccant Properties: Salt absorbs moisture, helping to draw out water-based stains.
Compared to commercial cleaners, salt is non-toxic, readily available, and cost-effective. It’s a win-win for both your iron and the environment!
Additional Iron Cleaning Methods
While salt is our star player, it’s worth knowing about other cleaning techniques:
- Vinegar and Water Solution: Effective for mineral deposits but may not tackle tough stains.
- Baking Soda Paste: Good for general cleaning but can be messy.
- Commercial Iron Cleaners: Powerful but often contain harsh chemicals.
The salt method stands out for its simplicity, effectiveness, and eco-friendliness.
Preventive Measures to Keep Your Iron Clean
An ounce of prevention is worth a pound of cure. Here are some tips to keep your iron in top shape:
- Use the Right Water:
- Opt for distilled water in your iron to prevent mineral buildup.
- Avoid tap water, especially in hard water areas.
- Empty After Use:
- Always empty the water reservoir after ironing to prevent mineral deposits.
- Clean Regularly:
- Wipe down the soleplate after each use with a damp cloth.
- Perform a deep clean every 1-3 months.
- Proper Storage:
- Store your iron upright to prevent water leakage and residue buildup.
- Keep it in a dry place to avoid rust formation.
Troubleshooting Common Iron Cleaning Issues
Even with the best care, you might encounter some challenges. Here’s how to address them:
- Stubborn Stains:
- For persistent buildup, create a paste with salt and vinegar.
- Apply to the cool soleplate, let sit for 15 minutes, then wipe clean.
- Salt Method Not Working:
- Try increasing the heat setting on your iron.
- If issues persist, consider a commercial iron cleaner as a last resort.
- When to Seek Professional Help:
- If you notice electrical issues or significant damage to the soleplate, it’s time to consult a professional or consider a replacement.
Environmental and Economic Benefits of Salt Cleaning
Choosing salt as your go-to iron cleaner isn’t just good for your clothes; it’s great for the planet and your wallet too:
- Eco-Friendly:
- Salt is a natural, biodegradable substance.
- No harmful chemicals are released into the environment.
- Cost-Effective:
- A box of salt costs a fraction of commercial iron cleaners.
- Extends the life of your iron, saving money on replacements.
- Reduced Plastic Waste:
- No need for plastic bottles or packaging associated with commercial cleaners.
Conclusion
Maintaining a clean iron doesn’t have to be a chore or an expense. With the simple salt cleaning method, you can keep your iron in pristine condition, ensuring crisp, clean clothes and a longer-lasting appliance. Remember, a well-maintained iron is key to achieving that perfect, professional look in your garments.
We encourage you to try this salt cleaning method and experience the difference for yourself. Your clothes (and your wallet) will thank you!
Have you tried cleaning your iron with salt? We’d love to hear about your experience! Share your thoughts in the comments below, and don’t forget to subscribe for more eco-friendly cleaning tips and household hacks.
FAQs
Q1: How often should I clean my iron? A: For regular use, aim to clean your iron every 1-3 months. However, if you notice any signs of buildup or performance issues, clean it immediately.
Q2: Can I use any type of salt to clean my iron? A: While table salt works fine, coarse salt or sea salt can be more effective due to their larger crystals. Avoid using iodized salt as it may leave residue.
Q3: Is it safe to clean a steam iron with salt? A: Yes, it’s safe to clean the soleplate of a steam iron with salt. Just ensure you’re not getting salt into the steam vents. For the vents, use a damp cotton swab.
Q4: What should I do if my iron is leaking water? A: Water leakage often indicates a buildup in the steam vents. Try cleaning the vents with a vinegar solution. If the problem persists, consult the manufacturer’s guide or a professional.
Q5: Can I use the salt method on non-stick irons? A: While the salt method is generally safe, always check your iron’s manual first. For non-stick soleplates, you might want to use a gentler method like a damp cloth with mild soap.
Q6: How can I prevent my iron from getting dirty in the first place? A: Use distilled water, empty the reservoir after each use, clean the soleplate regularly with a damp cloth, and avoid ironing over zippers, buttons, or prints that might leave residue.
Q7: Is there any risk of scratching my iron’s soleplate with salt? A: When used correctly, salt shouldn’t scratch your iron’s soleplate. The heat of the iron helps to dissolve the salt slightly, turning it into a gentle abrasive. However, always test on a small area first if you’re concerned.
Remember, a clean iron is a happy iron! With these tips and tricks, you’ll be well on your way to perfectly pressed clothes and a long-lasting appliance.