Fashion Your Own Floppy-Eared Pup
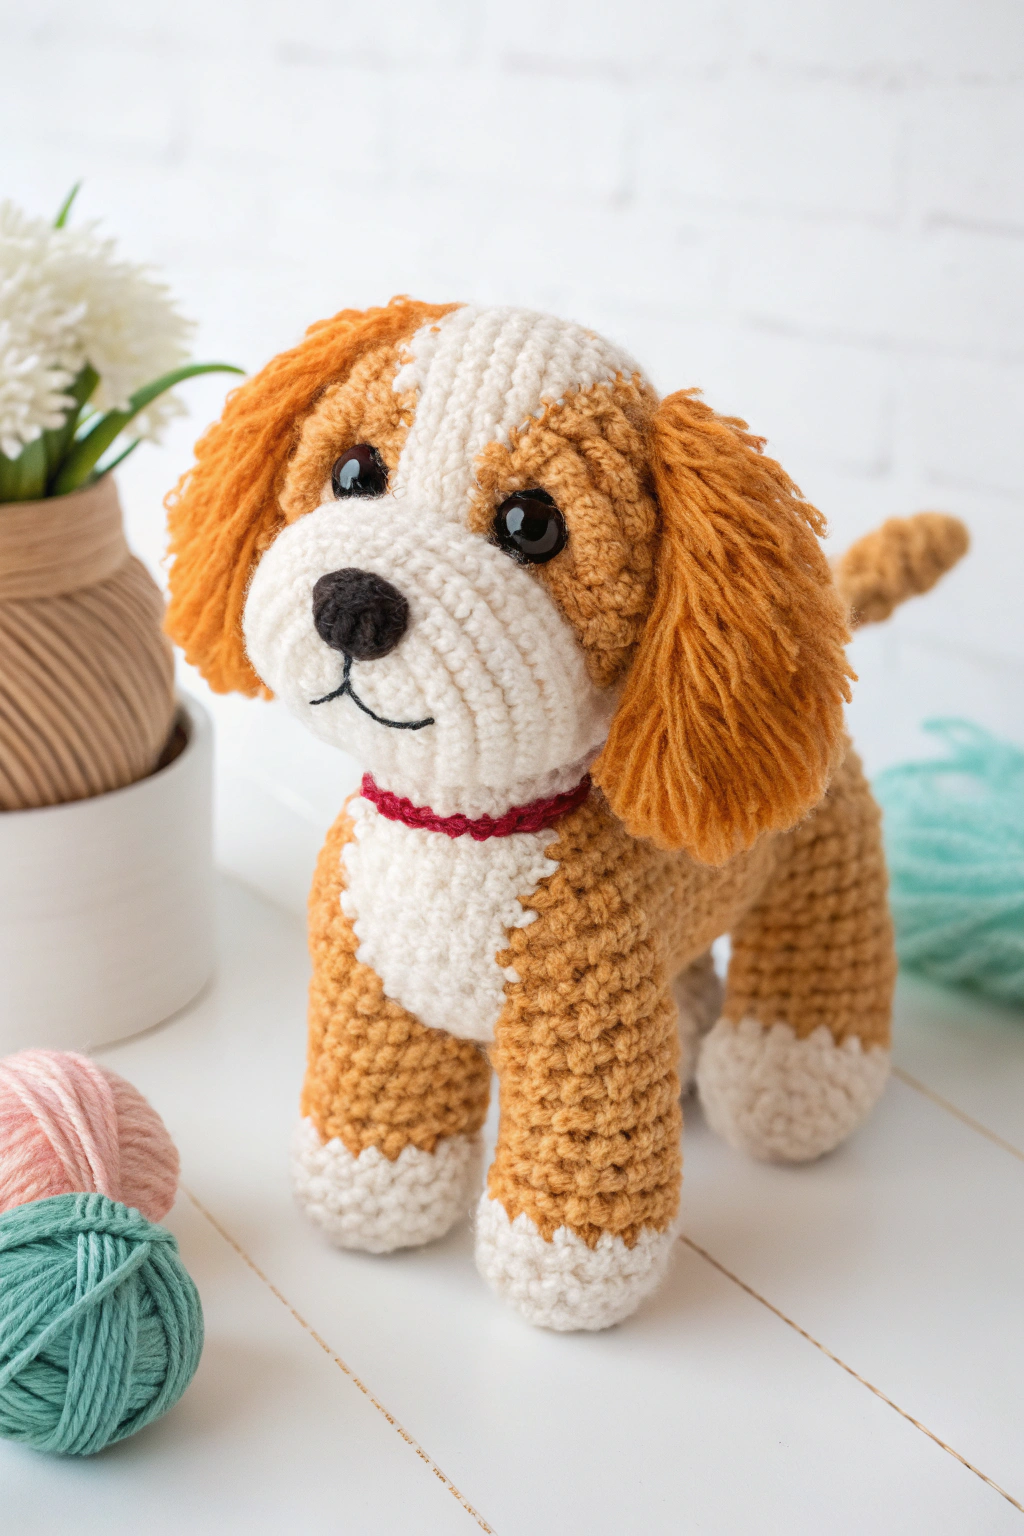
Isn’t this little crocheted dog utterly charming? That sweet face, those wonderfully floppy ears – it’s the kind of handmade treasure that often makes us sigh, “If only I could make that!” Well, guess what? You absolutely can, and today’s the day to start! Follow along as we guide you through every single step needed to assemble this exact delightful pup from the picture.
Making something with your own hands brings a special kind of joy, and this little pup is the perfect project to start your amigurumi adventure (that’s the Japanese art of knitting or crocheting small, stuffed yarn figures). Even if you’ve never held a crochet hook before, don’t worry. We’ll guide you through everything, explaining all the basics along the way. Get ready to turn some simple yarn into a delightful new friend!
Gather Your Supplies
First things first, let’s get our tools and materials ready. Having everything on hand makes the process smooth and enjoyable.
- 🧶 Worsted weight yarn in Brown/Tan (main body/head color)
- 🧶 Worsted weight yarn in White (muzzle, chest, paws, head stripe)
- 🧶 Worsted weight yarn in Orange/Ginger (for the fuzzy ears)
- 🧶 Small amount of Red yarn (for the collar)
- 🧶 Small amount of Black embroidery floss or thin yarn (for nose and mouth)
- 🪝 3.5mm Crochet Hook (or size recommended for your yarn)
- 🧸 Pair of Black Safety Eyes (approx. 9-10mm diameter, based on the image proportions)
- ☁️ Polyester Fiberfill Stuffing
- 🧵 Yarn Needle (for sewing parts together and weaving ends)
- ✂️ Scissors
Understanding the Basics (For Absolute Beginners)
This pup is mostly put together using a few fundamental crochet techniques. Let’s break them down:
- Amigurumi: As mentioned, this is the style we’re using. It involves working in continuous spiral rounds (not joining each round) to form 3D shapes.
- Magic Ring (or Magic Circle): This is the typical starting point for amigurumi. It allows you to pull the starting hole completely closed, which is perfect for toys. (To make it: Loop yarn around your fingers, insert hook into the loop, pull up a yarn loop, chain 1, then work your first round’s stitches into the main loop. Pull the tail end tight to close the hole after finishing the first round).
- Single Crochet (sc): This is the primary stitch used. To work a single crochet: Insert your hook into the indicated stitch, yarn over (wrap yarn around the hook), pull up a loop (you’ll have 2 loops on your hook), yarn over again, and pull through both loops on the hook. That’s one single crochet! Simple!
- Increase (inc): To make parts wider (like shaping the head), you’ll need to increase. This just means working two single crochet stitches into the same stitch from the round below.
- Decrease (dec): To make parts narrower (like closing shapes), you’ll decrease. We’ll use the invisible decrease which looks neatest: Insert your hook into the front loop only of the next stitch, then immediately insert your hook into the front loop only of the following stitch. Yarn over and pull through those first two loops on the hook. Yarn over again and pull through the remaining two loops. This counts as one stitch.
- Working in Rounds: We’ll be working in a spiral. Use a stitch marker (a small safety pin or different colored yarn piece works) to mark the beginning of each round so you don’t lose your place. Move the marker up each time you start a new round.
- Color Changes: To get the pup’s distinct markings (white muzzle, chest, paws), you’ll change yarn colors. Do this on the last step of the stitch before the new color begins. So, when completing the final yarn over and pull-through of that stitch, use the new color yarn instead of the old one. Drop the old color (you can carry it along the back or cut it, leaving a tail to weave in later).
- Stuffing: Add fiberfill stuffing firmly but carefully as you work, usually just before closing up a piece (like the head or body). Use small amounts at a time to avoid lumpiness.
Let’s Begin Making Your Pup!
Remember to read each step carefully. We’ll build this dog piece by piece. (Note: Rnd = Round, st(s) = stitch(es)). Assume continuous rounds unless stated otherwise.
Head
(Starts with the white muzzle)
- Rnd 1: Using White yarn, start 6 sc in a magic ring. (6 sts)
- Rnd 2: Inc in each st around. (12 sts)
- Rnd 3: [Sc in next st, inc in next st] repeat 6 times. (18 sts)
- Rnd 4: [Sc in next 2 sts, inc in next st] repeat 6 times. (24 sts)
- Rnd 5: Sc in each st around. (24 sts)
- Rnd 6: Change to Brown/Tan yarn. Sc in each st around. (24 sts)
- Tip: Make the color change on the last step of the last white stitch.
- Rnd 7: [Sc in next 3 sts, inc in next st] repeat 6 times. (30 sts)
- Rnd 8: [Sc in next 4 sts, inc in next st] repeat 6 times. (36 sts)
- Rnd 9: [Sc in next 5 sts, inc in next st] repeat 6 times. (42 sts)
- Rnds 10-14: Sc in each st around. (42 sts for 5 rounds)
- Head Stripe: On Rnds 10-14, looking at the image, a White stripe runs down the center top of the head. You will need to incorporate this using color changes. Estimate the width (perhaps 5-6 stitches wide) and center it above the muzzle. Change to white for these stitches in each relevant round, then back to brown/tan. Carry the unused color yarn along the inside.
- Rnd 15: [Sc in next 5 sts, dec] repeat 6 times. (36 sts)
- Pause Here: Attach the Safety Eyes. Based on the image, place them on either side of the muzzle section, around Rnd 7 or 8, approximately 6-7 stitches apart. Ensure the backs are secured firmly inside the head.
- Embroider Face: Using Black embroidery floss/yarn and your yarn needle, embroider the nose onto the white muzzle section, centered between the eyes. The image shows a filled-in triangular shape nose. Then, embroider a small smile line curving downwards from the center base of the nose.
- Rnd 16: [Sc in next 4 sts, dec] repeat 6 times. (30 sts)
- Rnd 17: [Sc in next 3 sts, dec] repeat 6 times. (24 sts)
- Start Stuffing: Begin adding fiberfill, shaping the head as you go.
- Rnd 18: [Sc in next 2 sts, dec] repeat 6 times. (18 sts)
- Rnd 19: [Sc in next st, dec] repeat 6 times. (12 sts)
- Finish Stuffing: Add the last bits of stuffing to make it firm.
- Rnd 20: Dec in each st around. (6 sts)
- Cut yarn, leaving a long tail. Thread the tail onto the yarn needle and weave it through the front loops of the remaining 6 stitches. Pull tight to close the hole. Weave in the end securely.
Body
(Starts at the neck area)
- Using Brown/Tan yarn:
- Rnd 1: Start 6 sc in a magic ring. (6 sts)
- Rnd 2: Inc in each st around. (12 sts)
- Rnd 3: [Sc in next st, inc in next st] repeat 6 times. (18 sts)
- Rnd 4: [Sc in next 2 sts, inc in next st] repeat 6 times. (24 sts)
- Rnd 5: [Sc in next 3 sts, inc in next st] repeat 6 times. (30 sts)
- Rnds 6-8: Sc in each st around. (30 sts for 3 rounds)
- White Chest: Similar to the head stripe, observe the image. A White section forms the chest. Starting around Rnd 7 or 8 and continuing down, incorporate a section of white stitches at the front center (estimate maybe 8-10 stitches wide). Change colors accordingly in each round.
- Rnds 9-16: Continue working sc in each st around, maintaining the white chest panel at the front and brown/tan for the rest. (30 sts for 8 rounds)
- Rnd 17: [Sc in next 3 sts, dec] repeat 6 times. (Remember to maintain color sections). (24 sts)
- Rnd 18: Sc in each st around. (Maintain colors). (24 sts)
- Start Stuffing: Begin adding fiberfill to the body.
- Rnd 19: [Sc in next 2 sts, dec] repeat 6 times. (Maintain colors). (18 sts)
- Rnd 20: [Sc in next st, dec] repeat 6 times. (Maintain colors). (12 sts)
- Finish Stuffing: Add final stuffing, ensuring a firm shape.
- Rnd 21: Dec in each st around. (6 sts)
- Cut yarn, leaving a long tail for sewing later. Close the hole like you did for the head.
Legs (Make 4)
(Start with white paws)
- Using White yarn:
- Rnd 1: Start 6 sc in a magic ring. (6 sts)
- Rnd 2: Inc in each st around. (12 sts)
- Rnd 3: [Sc in next st, inc in next st] repeat 6 times. (18 sts)
- Rnds 4-5: Sc in each st around. (18 sts for 2 rounds)
- Rnd 6: Change to Brown/Tan yarn. Sc in each st around. (18 sts)
- Rnds 7-10: Sc in each st around. (18 sts for 4 rounds)
- Stuffing: Lightly stuff the paw end of the leg. You don’t need to stuff the entire leg firmly; just enough to hold shape at the bottom.
- Rnd 11: [Sc in next st, dec] repeat 6 times. (12 sts)
- Rnd 12: Sc in each st around. (12 sts)
- Fasten off, leaving a long tail for sewing. Make three more legs exactly the same way.
Ears (Make 2)
- Using Orange/Ginger yarn:
- Rnd 1: Start 6 sc in a magic ring. (6 sts)
- Rnd 2: Inc in each st around. (12 sts)
- Rnd 3: [Sc in next st, inc in next st] repeat 6 times. (18 sts)
- Rnds 4-8: Sc in each st around. (18 sts for 5 rounds)
- Rnd 9: [Sc in next st, dec] repeat 6 times. (12 sts)
- Rnds 10-12: Sc in each st around. (12 sts for 3 rounds)
- Fasten off, leaving a long tail for sewing. Do not stuff the ears.
- Adding Fringe: Cut multiple strands of the Orange/Ginger yarn, about 2-3 inches long. Take one strand, fold it in half. Insert your hook into a stitch along the bottom edge of the ear, grab the folded loop of the yarn strand, and pull it partway through. Then, pull the two loose ends of the strand through the loop and tighten. Repeat this process all along the bottom edge (and maybe slightly up the sides) of both ears to get the fluffy, fringed look shown in the image. Trim the fringe evenly if needed.
Tail
- Using Brown/Tan yarn:
- Rnd 1: Start 5 sc in a magic ring. (5 sts)
- Rnds 2-7: Sc in each st around. (5 sts for 6 rounds)
- Fasten off, leaving a long tail for sewing. Do not stuff the tail.
Collar
- Using Red yarn:
- Chain stitch a length that fits comfortably around the dog’s neck (where the head joins the body). Measure against your pup!
- Row 1: Starting in the second chain from the hook, work 1 sc in each chain across.
- Fasten off, leaving tails at both ends for sewing the collar closed around the neck.
Assembling Your Dog
This is where your pup really comes together! Use the yarn tails and your yarn needle.
- Head to Body: Position the head on top of the body opening. Use the yarn tail from the body (or head) to sew them securely together using a whip stitch (going through stitches on both the head and body edges). Make sure it’s centered and straight.
- Legs to Body: Pin the four legs to the underside of the body, ensuring they are evenly spaced so the dog can stand. The white paws should face forward/down. Sew each leg firmly in place.
- Ears to Head: Position the floppy ears on the sides of the head. Look closely at the image – they are attached fairly high up, near the top edge where the brown/tan meets the white stripe, and hang down. Sew the top edge of each ear securely to the head.
- Tail to Body: Sew the tail to the back end of the body, centered and pointing slightly upwards as seen in the picture.
- Collar: Wrap the red collar around the neck seam. Use the yarn tails to sew the ends of the collar together at the back or side. Trim any excess yarn.
- Weave in Ends: Carefully weave in any remaining loose yarn ends to hide them inside the pieces.
Finishing Touches
Gently shape your dog, making sure the stuffing is distributed well. Check that all parts are attached securely. Stand back and admire the adorable floppy-eared pup you’ve skillfully fashioned! This pup has distinct brown and white markings, warm orange fuzzy ears, a perky tail, and a smart red collar – all put together by you.
What a wonderful companion you’ve brought into being! Taking yarn and hook and forming something so charming is incredibly rewarding. We hope you enjoyed this process. Why not try making another one for a friend? We would absolutely love to see the darling dog you’ve produced – feel free to share pictures of your finished piece! Happy stitching on your next project!