Elegant Zebra Layer Cake Recipe
This guide walks beginners through preparing a visually stunning Zebra Stripe Layer Cake, just like the one pictured. The cake features distinct alternating layers of light vanilla and rich chocolate sponge, sandwiched with a smooth chocolate filling, and finished with a glossy, eye-catching zebra-patterned chocolate ganache. Following these steps helps anyone achieve this beautiful dessert using readily available halal ingredients. It’s a rewarding baking project that yields impressive results.
Getting Ready: Equipment
Before embarking on this baking adventure, gather the necessary kitchen tools. Having everything ready makes the process smoother.
- 🥣 Large Mixing Bowls (at least 3)
- 🥄 Measuring Cups & Spoons
- ⚖️ Kitchen Scale (Recommended for accuracy)
- 🔌 Electric Mixer (Handheld or Stand Mixer)
- 🧱 Rubber Spatula
- 🎂 Two 8-inch (20cm) Round Cake Pans
- 📄 Parchment Paper
- 🍳 Whisk
- 🥘 Small Saucepan
- 🌡️ Candy Thermometer (Optional, for ganache)
- 🔪 Serrated Knife (for leveling cakes)
- 🥅️ Wire Rack
- 🍽️ Offset Spatula or Palette Knife
- 🍦 Piping Bag with small round tip (Optional, for chocolate stripes) or a small plastic bag
- 🍢 Wooden Skewer or Toothpick
Gathering Your Halal Ingredients
Ensure all ingredients meet halal requirements. Using quality components is key to a delicious outcome.
- 🧈 1 cup (226g) Unsalted Butter, softened (ensure halal source if applicable, e.g., vegetable-based fats or certified butter)
- 🍚 2 cups (400g) Granulated Sugar
- 🥚 4 Large Eggs (ensure halal source if concerned about feed, check local certifications)
- 🍦 1 teaspoon alcohol free Vanilla Extract
- 🥛 1 cup (240ml) Milk (ensure halal if using specific types like cultured buttermilk)
- 🌾 3 cups (375g) All-Purpose Flour (ensure halal processing if applicable)
- 🥄 1 tablespoon Baking Powder (ensure halal, free from non-halal processing aids)
- 🧂 ½ teaspoon Salt
- 🍫 ¼ cup (25g) Unsweetened Cocoa Powder (ensure halal)
For the Chocolate Filling:
- 🧈 ½ cup (113g) Unsalted Butter, softened (ensure halal as above)
- ✨ 2 cups (240g) Powdered Sugar, sifted
- 🍫 ¼ cup (25g) Unsweetened Cocoa Powder (ensure halal)
- 🥛 2-3 tablespoons Milk (ensure halal as above)
- 🍦 ½ teaspoon alcohol free Vanilla Extract
For the Zebra Ganache:
- 🤍 8 oz (225g) White Chocolate, chopped (ensure halal, free from alcohol derivatives or non-halal emulsifiers)
- 🥛 ½ cup (120ml) Heavy Cream (ensure halal)
- 🍫 4 oz (115g) Dark or Semisweet Chocolate, chopped (ensure halal, free from alcohol derivatives or non-halal emulsifiers)
- 🥛 ¼ cup (60ml) Heavy Cream (ensure halal)
Step-by-Step Cake Preparation
Follow these instructions carefully to assemble the Zebra Stripe Layer Cake exactly as shown in the image.
Preparing the Cake Batters
- Preheat & Prep Pans: Set the oven to 350°F (175°C). Grease two 8-inch round cake pans and line the bottoms with parchment paper. Grease the parchment paper as well. This prevents sticking.
- Combine Dry Ingredients: In a medium bowl, whisk together the flour, baking powder, and salt. Whisking helps distribute the baking powder evenly for a consistent rise. Set aside.
- Cream Butter & Sugar: In a large bowl, using an electric mixer, beat the softened butter and granulated sugar together on medium-high speed until the mixture is pale and fluffy. This process, called creaming, incorporates air, which makes the cake light. This usually takes about 3-5 minutes.
- Add Eggs & Vanilla: Add the eggs one at a time, beating well after each addition until fully incorporated. Scrape down the sides of the bowl occasionally with a rubber spatula to ensure everything mixes evenly. Beat in the vanilla extract.
- Alternate Wet & Dry: Reduce the mixer speed to low. Add about one-third of the flour mixture to the butter mixture, followed by half of the milk. Mix until just combined. Repeat, adding another third of the flour, the remaining milk, and finally the last third of the flour mixture. Be careful not to overmix; mix only until the flour streaks disappear. Overmixing develops gluten, leading to a tough cake.
- Divide Batter: Transfer roughly half of the prepared batter to a separate medium bowl.
- Make Chocolate Batter: Add the unsweetened cocoa powder to one of the bowls of batter. Gently fold it in using a rubber spatula until evenly combined and no streaks remain. Folding means using the spatula to gently lift the batter from the bottom, bring it up over the top, and turn the bowl slightly. Repeat this gentle motion until just combined, preserving the air incorporated earlier. Now there are two batters: one vanilla (light yellow) and one chocolate (dark brown).
Baking the Layers
- Fill Pans: Pour the vanilla batter evenly into one prepared cake pan. Pour the chocolate batter evenly into the second prepared cake pan. Spread the batters level using an offset spatula or the back of a spoon.
- Bake: Place both pans in the preheated oven. Bake for 30-35 minutes, or until a wooden skewer inserted into the center of each cake comes out clean.
- Cool Cakes: Let the cakes cool in their pans on a wire rack for about 10-15 minutes. Then, carefully invert the cakes onto the wire rack, remove the pans and parchment paper, and let them cool completely before proceeding. This is crucial; warm cakes are fragile and can cause the filling to melt.
Making the Chocolate Filling
- Cream Butter: In a medium bowl, beat the softened butter with an electric mixer until smooth and creamy.
- Add Sugar & Cocoa: Gradually add the sifted powdered sugar and cocoa powder, mixing on low speed until combined. Increase speed to medium-high and beat for 2-3 minutes until light and fluffy.
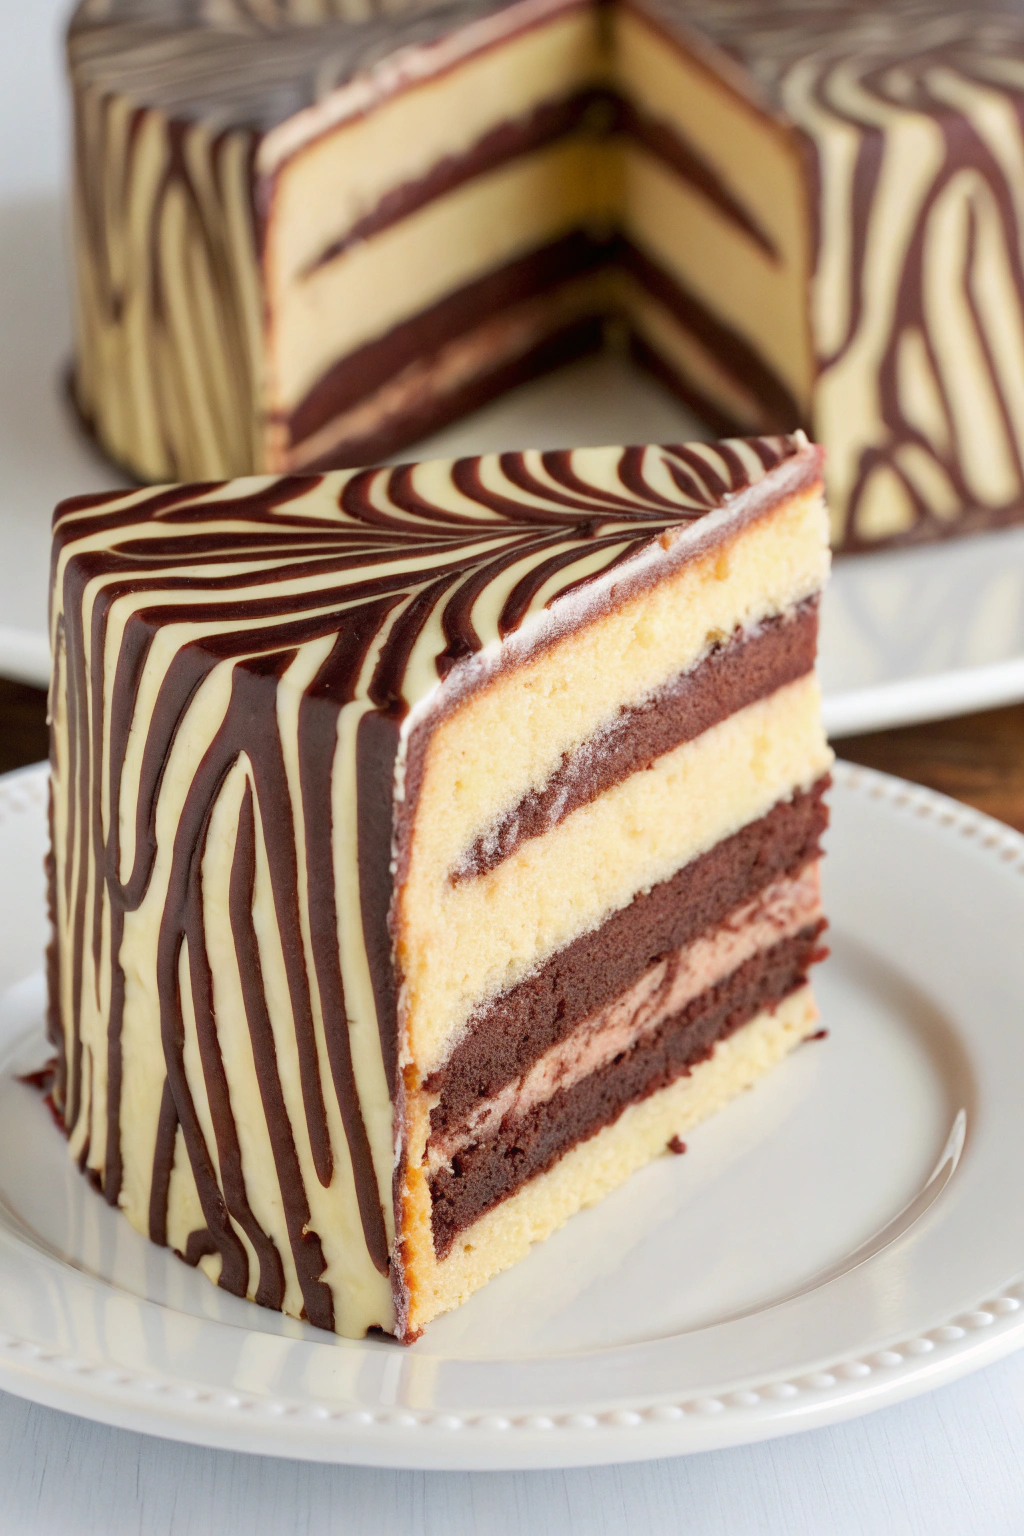
- Adjust Consistency: Add vanilla extract and 2 tablespoons of milk. Beat until smooth. If the filling is too thick, add the remaining tablespoon of milk until it reaches a spreadable consistency, similar to the light brown filling visible between the cake layers in the image.
Assembling the Layer Cake
- Level and Split Layers: Once the cakes are completely cool, use a long serrated knife to level the tops if they are domed. Then, carefully slice each cake horizontally through the middle, resulting in two vanilla layers (light colored) and two chocolate layers (dark colored), four layers total, matching the image.
- First Layer: Place one vanilla (light colored) layer onto a serving plate or cake stand. This matches the bottom layer visible in the image. Spread about one-third of the chocolate filling evenly over the top.
- Second Layer: Carefully place a chocolate (dark colored) layer on top of the filling. Spread another one-third of the chocolate filling over it.
- Third Layer: Add the second vanilla (light colored) layer and spread the remaining filling evenly on top.
- Fourth Layer: Place the final chocolate (dark colored) layer on top. This sequence precisely replicates the layer order shown in the photograph. Ensure the cake is level. If desired, apply a very thin layer of filling around the sides (a crumb coat) to trap loose crumbs. Chill the assembled cake in the refrigerator for about 30 minutes to firm up before applying the ganache. This makes ganache application cleaner.
Preparing the Zebra Ganache
- Make White Ganache: Place the chopped white chocolate in a heatproof bowl. Heat ½ cup of heavy cream in a small saucepan over medium heat until it just begins to simmer (do not boil). Pour the hot cream over the white chocolate. Let it sit for 5 minutes without stirring, then gently whisk until smooth and glossy. Let it cool slightly, until it’s thick enough to coat the cake but still pourable (around 95-100°F or 35-38°C is often a good range).
- Make Dark Ganache: While the white ganache cools a bit, repeat the process for the dark chocolate. Place chopped dark chocolate in a small heatproof bowl. Heat ¼ cup of heavy cream until simmering, then pour over the dark chocolate. Let sit for 5 minutes, then whisk until smooth. Let this cool slightly as well, aiming for a similar consistency to the white ganache. Transfer the dark ganache to a piping bag with a small round tip, or a small zip-top bag with a tiny corner snipped off.
Decorating with the Zebra Pattern
- Apply White Ganache Base: Place the chilled cake (still on its wire rack if possible, with parchment paper underneath to catch drips) over a baking sheet. Pour the slightly cooled white chocolate ganache over the top center of the cake, allowing it to flow down the sides. Use an offset spatula to gently smooth the top and help guide the ganache evenly down the sides for full coverage, replicating the smooth white base seen in the image. Work quickly before the ganache sets.
- Pipe Dark Chocolate Stripes: Immediately, while the white ganache is still wet, pipe the dark chocolate ganache in lines across the top of the cake. For the pattern shown in the image, pipe concentric circles starting from the center, or pipe parallel lines across the top. For the sides, pipe vertical lines of dark chocolate down the cake.
- Develop the Pattern: To get the feathered “zebra” effect on top, quickly drag the tip of a wooden skewer or toothpick through the piped lines. Start from the center and drag outwards towards the edge, then drag from the edge inwards between those lines, repeating around the cake. For the sides, simply let the piped vertical dark chocolate lines remain as they are, producing the distinct stripe pattern shown dripping down the sides in the photo.
- Set: Let the cake sit at room temperature for about an hour or two, or in the refrigerator for about 30 minutes, until the ganache is fully set and firm. The final result is a glossy, patterned finish as depicted.
Serving Your Masterpiece
Slice the finished Zebra Stripe Layer Cake using a sharp knife, wiping the blade clean between cuts for neat slices that show off the beautiful interior layers exactly as seen in the image. The contrast between the light and dark sponge, the chocolate filling, and the striking exterior makes this cake a true showstopper.
Preparing this cake is a journey in precision and patience, especially for beginners. Enjoy the process and the delightful results. Feel encouraged to attempt this recipe and share the outcome of your beautiful, homemade halal Zebra Stripe Layer Cake!