Elegant Lace Bookmark Journey
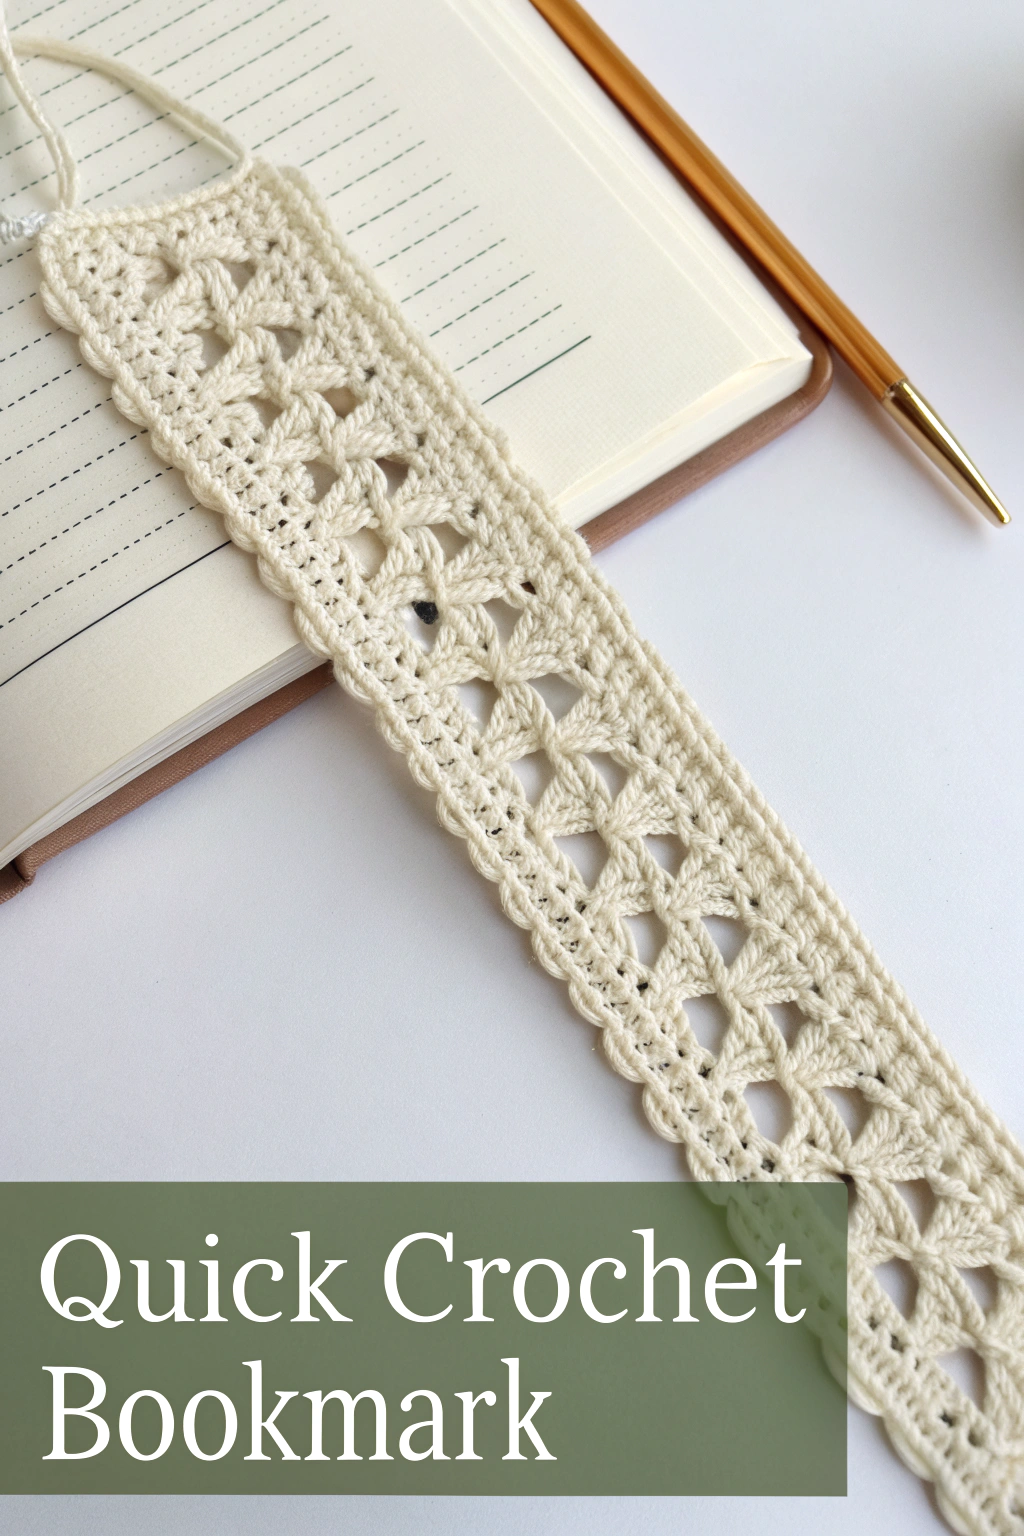
Have you ever admired a delicate piece of crochet and wished you could fashion something similar? Well, get ready to do just that! Look at this beautiful, intricate bookmark nestled in the pages of a notebook. Its lovely off-white lace pattern is wonderfully detailed, and the scalloped edge adds a perfect finishing touch. It might look complex, but trust me, with a little patience, even if you’re just starting your crochet adventure, you can make this exact lovely piece. Let’s dive in together and bring this elegant bookmark into being, step by simple step. It’s a wonderfully satisfying project, perfect for gifting or keeping your place in your favourite story.
Gathering Your Treasures
Before we begin, let’s gather the few bits and pieces needed to assemble your bookmark. Having everything ready makes the process smooth and enjoyable!
- 🧶 Yarn: One ball of light-weight cotton yarn (like Fingering/4-ply or Sport weight). The image shows a classic off-white or cream colour, which is perfect for showing off the lace detail.
- 🪝 Crochet Hook: A size suitable for your yarn – perhaps a 3.0mm or 3.5mm hook. Check the yarn label for recommendations.
- ✂️ Scissors: For snipping the yarn.
- 🪡 Yarn Needle: (Also called a tapestry needle) This has a large eye and blunt tip, essential for weaving in ends neatly.
Your First Stitches Explained
If you’re brand new, welcome! Don’t worry, we’ll cover the basics needed for this project right here. Practice these a few times until they feel comfortable.
- Slip Knot: This is how you get the yarn onto your hook to start. Make a loop, cross the yarn tail under the working yarn (the one going to the ball), push your hook through the loop, grab the working yarn, and pull it through. Gently tighten the knot onto the hook.
- Chain Stitch (ch): This forms the foundation and creates spaces in the lace. Yarn over your hook (wrap the yarn from back to front) and pull the hook through the loop already on it. That’s one chain! Repeat for the number needed.
- Single Crochet (sc): A basic, short stitch. Insert your hook into the indicated stitch or space, yarn over, pull up a loop (you’ll have two loops on your hook), yarn over again, and pull through both loops on the hook.
- Double Crochet (dc): A taller stitch, crucial for the lacy pattern. Yarn over before inserting your hook. Insert hook into the stitch/space, yarn over, pull up a loop (three loops on hook). Yarn over, pull through the first two loops (two loops left on hook). Yarn over again, pull through the remaining two loops. That’s one dc!
- Slip Stitch (sl st): Used to join work or move across stitches without adding height. Insert hook into stitch/space, yarn over, and pull the yarn through both the stitch and the loop already on your hook in one smooth motion.
- Cluster (Specific for this pattern): We’ll make groups of stitches worked together. For this bookmark, the pattern utilizes clusters that look like two double crochets worked partially and then joined at the top, often separated by a chain. We’ll call it a “2-dc Cluster”: Yarn over, insert hook, pull up a loop, yarn over, pull through 2 loops (leave 2 loops on hook). Yarn over, insert hook into the same stitch/space, pull up a loop, yarn over, pull through 2 loops (leave 3 loops on hook). Yarn over, pull through all 3 loops on hook.
A Quick Tip: Try to keep your stitches relaxed but consistent. If they’re too tight, it’s hard to insert the hook; too loose, and the pattern might look floppy. Find a comfortable rhythm!
Making Your Lace Bookmark: Step-by-Step
We are aiming to replicate the exact lace pattern seen in the image, with its characteristic diamond-shaped openings and textured stitches.
Foundation:
- Start with a slip knot on your hook.
- Chain 17. This number forms the width of the bookmark, including edge stitches. (This is an interpretation based on the visual proportions of the lace repeat).
Main Body (Repeating Lace Pattern):
Row 1:
- Single crochet (sc) in the 2nd chain from the hook (the turning chain doesn’t count as a stitch here).
- Sc in each remaining chain across. You should have 16 sc stitches.
- Chain 3 (this counts as your first double crochet of the next row), turn your work.
Row 2 (Pattern Row):
- Skip the first sc (the one right below your turning chain).
- Work a 2-dc Cluster (as defined above) in the next sc stitch.
- Chain 2, skip the next 2 sc stitches, work a 2-dc Cluster in the next sc.
- Repeat the sequence from * to * two more times across the row.
- After the last cluster, chain 1 (instead of 2), skip the next sc stitch.
- Work 1 double crochet (dc) into the very last sc stitch of the row.
- Chain 1, turn your work.
Row 3 (Connecting Row):
- Single crochet (sc) in the first dc (the top of the stitch you just finished).
- Sc in the next chain-1 space.
- Chain 2. Work 1 sc into the top of the next 2-dc Cluster. (Aim for the single loop where the cluster was joined).
- Work 2 sc into the next chain-2 space.
- Repeat the sequence from * to * two more times across the row.
- After the last sc in a cluster top, chain 2.
- Work 1 sc into the space between the last cluster and the turning chain.
- Work 1 sc into the top of the starting chain-3 from the previous row (it might feel a bit tight, find the 3rd chain). You should have 16 stitches/chain spaces effectively accounted for across this row.
- Chain 3 (counts as first dc), turn your work.
Repeating the Pattern:
- Repeat Rows 2 and 3 until your bookmark reaches the desired length. The image shows a bookmark that is fairly long, perhaps 6-7 inches (15-18 cm) before the border. Remember to end after completing a Row 3. Do not fasten off yet!
Troubleshooting Tip: If your edges are pulling inwards or ruffling out, double-check your stitch count on each row and ensure you’re working into the correct stitches/spaces, especially the turning chains at the beginning/end of rows.
Adding the Finishing Touches
Now, let’s give your bookmark its lovely scalloped edge and top loop, just like the one pictured.
Border:
We’ll work around the entire bookmark. Don’t turn after your final Row 3.
- First Side: Chain 1 (does not count as a stitch). Work sc stitches evenly down the long raw edge of the bookmark. Aim for about 2 sc stitches per row-end (one in the dc-row end, one in the sc-row end). There’s no exact science; just make them look neat and evenly spaced without pulling or buckling the edge.
- Bottom Edge: When you reach the starting foundation chain edge, work 3 sc into the corner stitch/space. Then work 1 sc into each stitch across the bottom edge. Work 3 sc into the other corner stitch/space.
- Second Side: Work sc stitches evenly up the second long raw edge, mirroring the first side.
- Top Edge & Loop: When you reach the top edge (your last completed row), work 3 sc in the corner stitch. Work 1 sc in each stitch across the top edge.
- The Loop: When you reach the final corner (where you started the border), instead of working 3 sc, chain 12 (or desired length for your loop). Slip stitch (sl st) back into the same corner stitch where you started the border round. This forms the hanging loop.
Scalloped Edge (Picot or Shell): The edge in the image has a gentle scallop. Let’s produce this with a simple shell. (Continue from the sl st that formed the loop).
- Skip the next sc stitch along the top edge. Work 4 double crochet (dc) stitches all into the next sc stitch. Skip the next sc stitch. Slip stitch (sl st) into the next sc stitch.
- Repeat this sequence (*) all the way around the entire bookmark (down the side, across the bottom, up the other side, and back across the top until you reach the base of the loop). Adjust spacing slightly if needed (e.g., skip 1 or 2 stitches) to make the shells fit evenly, especially around corners.
- When you get back to the base of the loop, make one final slip stitch into the very first stitch of the border round (or the base of the loop’s sl st) to join neatly.
Finishing Off:
- Cut the yarn, leaving about a 6-inch tail.
- Pull the tail through the final loop on your hook and tighten gently to secure it.
- Thread the yarn tail onto your yarn needle. Weave the end back and forth through the stitches on the wrong side of your bookmark for an inch or two. Change direction a couple of times to make sure it’s secure. Snip off any remaining excess yarn.
- Weave in the starting tail from your foundation chain in the same way.
Your Hand-Fashioned Treasure
And there you have it! Take a moment to admire the beautiful lace bookmark you’ve just fashioned with your own hands. Feel the texture of the cotton, see the lovely diamond pattern you brought forth. Tuck it into your current read, gift it to a book-loving friend, or simply enjoy the satisfaction of having completed this lovely project.
Isn’t it wonderful how a strand of yarn and a hook can result in something so pretty and practical? We hope you enjoyed this little crochet journey. Feel free to share photos of your finished bookmarks – seeing your unique pieces is always a joy! Keep practicing, keep exploring, and happy hooking!