Easy DIY Crochet Bag For Beginners And Beyond
Time to embark on a delightful journey with this stunning crocheted tote bag project! Whether you’re new to crochet or seeking a beautiful yet practical design, this pattern is just what you need. There’s nothing quite like the satisfaction of transforming simple yarn into something both gorgeous and useful with your own two hands.
What You’ll Need to Get Started
Before we begin building our beautiful tote, let’s gather all the materials you’ll need. Having everything ready will make the process smooth and enjoyable!
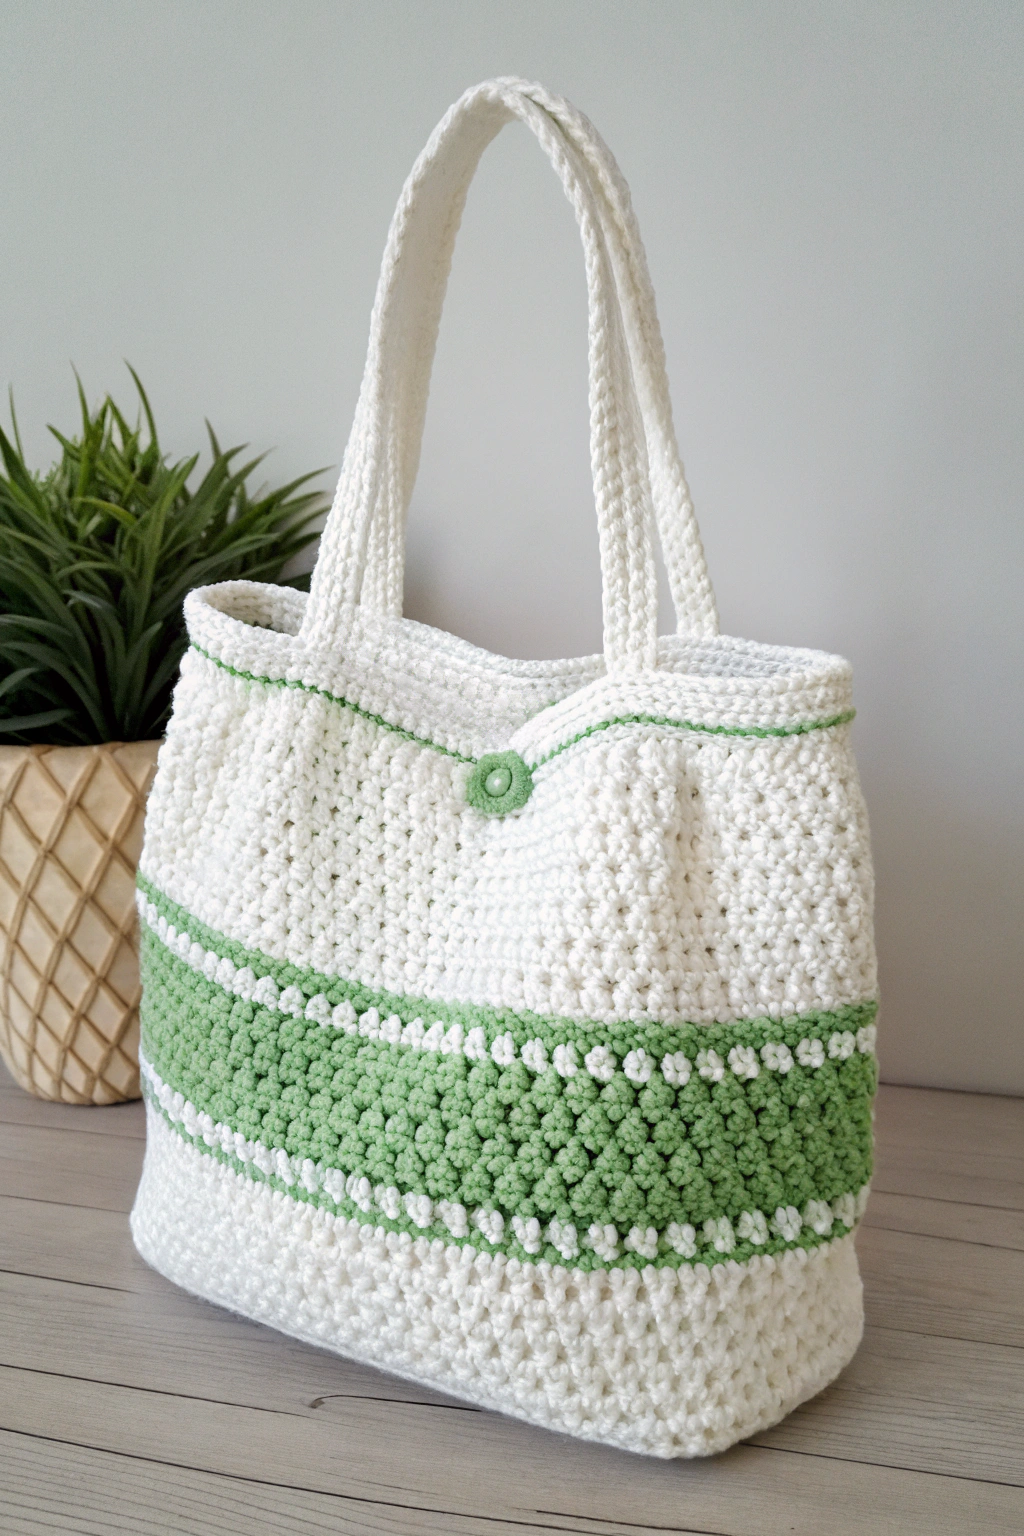
- 🧶 Yarn: You’ll need a good amount of bulky or chunky cotton yarn in white and a contrasting color like light green, similar to what you see in the image. Cotton yarn is great for bags because it’s strong and washable.
- 🪡 Crochet Hook: Grab a crochet hook that matches your yarn weight. Usually, the yarn label will suggest a hook size. For bulky cotton yarn, an 8mm or 9mm hook (US size L/11 or M/13) would be a good starting point.
- ✂️ Scissors: For snipping yarn ends.
- 🔘 Button: One decorative button, about 20-25mm in diameter, in a matching green color to complement the stripe.
- 📍 Yarn Needle (or Tapestry Needle): For weaving in loose ends and attaching the button.
- 📏 Measuring Tape: To check your bag size as you develop it.
Let’s Learn Some Basic Crochet: Your First Steps
If you’re completely new to crochet, don’t worry at all! It’s like learning to draw with yarn and a hook. We’ll start with the very basics.
The Slip Knot: The Magic Beginning
Every crochet project starts with a slip knot. Think of it as the anchor that holds your first stitch.
- Hold the yarn and form a loop, like you’re making a pretzel, but don’t tighten it.
- Reach your hook under the front part of the loop (the part closest to you), grab the yarn coming from the ball (this is called the “working yarn”), and pull it through the loop.
- Tighten the knot gently on your hook. You’ve just fashioned your first slip knot!
Chain Stitch (ch): The Foundation Row
The chain stitch is the most basic stitch and it’s like the foundation row for many crochet projects. It’s like building the first line of bricks in a wall.
- Hold your hook with the slip knot. Yarn over (yo): this means wrap the working yarn over your hook from back to front.
- Pull the yarn through the loop on your hook. That’s one chain stitch!
- Repeat step 2 to make a chain of the desired length. Each time you pull the yarn through, you’re producing another chain stitch.
Single Crochet (sc): The Solid Stitch
Single crochet is a short, tight stitch that forms a dense fabric. It’s like assembling solid, short bricks for a sturdy wall.
- Insert your hook into the second chain from your hook (skip the chain closest to the hook).
- Yarn over (yo).
- Pull the yarn through the chain stitch (you’ll have two loops on your hook).
- Yarn over again (yo).
- Pull the yarn through both loops on your hook. That’s one single crochet!
Double Crochet (dc): The Taller Stitch
Double crochet is a taller stitch than single crochet, and it makes a fabric that’s a bit more open and has more drape. Think of it as building slightly taller bricks in your wall, constructing a bit more space.
- Yarn over (yo) before inserting your hook into the stitch.
- Insert your hook into the stitch.
- Yarn over (yo).
- Pull the yarn through the stitch (you’ll have three loops on your hook).
- Yarn over again (yo).
- Pull the yarn through the first two loops on your hook (you’ll have two loops left).
- Yarn over again (yo).
- Pull the yarn through the last two loops on your hook. That’s one double crochet!
Slip Stitch (sl st): Joining and Finishing
The slip stitch is a very short stitch, often used to join rounds together or to finish off a piece neatly. It’s like assembling the final, almost invisible join in your work.
- Insert your hook into the stitch.
- Yarn over (yo).
- Pull the yarn through the stitch AND through the loop already on your hook in one smooth motion.
Making the Tote Bag: Step-by-Step Guide
Now for the exciting part – fashioning our tote bag! We’ll construct it in rounds, starting from the base and working our way up. Refer to the image to see how the bag takes shape as we go.
Crafting the Base
We’ll start with a flat circle for the base of the bag.
Round 1: Make a slip knot and chain 2. Work 6 single crochet (sc) stitches into the second chain from your hook. Join with a slip stitch (sl st) to the first sc. (You’ll have 6 stitches.)
- Joining with a slip stitch means you bring the end of the round together neatly to start the next round in a continuous circle.
Round 2: Chain 1 (this doesn’t count as a stitch), then work 2 single crochet (sc) in each stitch around. Join with a slip stitch to the first sc. (You’ll have 12 stitches.)
- Working 2 sc in each stitch is called an increase. It makes your circle get bigger.
Round 3: Chain 1, then sc in the next stitch, 2 sc in the next stitch; repeat from * to * around. Join with a slip stitch to the first sc. (You’ll have 18 stitches.)
Round 4: Chain 1, then sc in the next 2 stitches, 2 sc in the next stitch; repeat from * to * around. Join with a slip stitch to the first sc. (You’ll have 24 stitches.)
Round 5: Chain 1, then sc in the next 3 stitches, 2 sc in the next stitch; repeat from * to * around. Join with a slip stitch to the first sc. (You’ll have 30 stitches.)
Continue increasing in this way, adding one more single crochet stitch before each increase in every round, until your base is the desired diameter – about 8 inches (20 cm) should be a good size, but you can adjust based on how big you want your tote. For example:
Round 6: sc in the next 4 stitches, 2 sc in the next stitch; repeat around (36 stitches).
Round 7: sc in the next 5 stitches, 2 sc in the next stitch; repeat around (42 stitches).
Round 8: sc in the next 6 stitches, 2 sc in the next stitch; repeat around (48 stitches). …and so on, until you reach your desired base size.
Developing the Body of the Bag in White
Now we’ll start working upwards to craft the sides of the tote. We will switch to working in double crochet to form the main body.
Round 1 (Body Round 1): Chain 2 (this counts as the first double crochet), then double crochet (dc) in each stitch around. Join with a slip stitch to the top of the chain 2.
- Chain 2 counts as the first double crochet – this is a common way to start a double crochet round and it helps to keep the seam less visible.
Rounds 2 – 40 (or desired height): Chain 2 (counts as first dc), then double crochet (dc) in each stitch around. Join with a slip stitch to the top of the chain 2. Repeat this round until the white part of your bag is the height you want, roughly 40 rounds or about 10-12 inches (25-30 cm) tall, or as seen in the image.
Adding the Green Stripe
Let’s introduce the green yarn to fashion the stripe around the bag!
Round 41: Change to green yarn. Chain 2 (counts as first dc), then double crochet (dc) in each stitch around with the green yarn. Join with a slip stitch to the top of the chain 2. Fasten off white yarn and weave in the ends using your yarn needle.
- Fasten off yarn means to secure the yarn so it doesn’t unravel. To do this, cut the yarn, pull the loop on your hook wider to pull the end through, and then tighten the knot.
Round 42 – 45: Chain 2 (counts as first dc), then double crochet (dc) in each stitch around with the green yarn. Join with a slip stitch to the top of the chain 2. Repeat for a total of 5 rounds of green, or adjust to match the stripe width in the image.
Continuing the Body in White Again
We’re going back to white yarn to finish the top part of the bag.
Round 46: Change back to white yarn. Chain 2 (counts as first dc), then double crochet (dc) in each stitch around with white yarn. Join with a slip stitch to the top of the chain 2. Fasten off green yarn and weave in the ends.
Rounds 47 – 50: Chain 2 (counts as first dc), then double crochet (dc) in each stitch around with white yarn. Join with a slip stitch to the top of the chain 2. Repeat for 4 rounds, or adjust to your preference for the top white section above the green stripe.
Shaping the Top Edge
To give the top edge a nice finish, like in the picture, we’ll add a round of slip stitches and a decorative edging.
Round 51: Chain 1, then slip stitch (sl st) in each stitch around. Join with a slip stitch to the first sl st.
Round 52 (Edging): Chain 1, then single crochet (sc) in the next stitch, chain 1, skip the next stitch; repeat from * to * around. Join with a slip stitch to the first sc. Fasten off white yarn and weave in all loose ends securely.
- This chain 1, skip 1 edging gives a pretty, slightly scalloped look to the top edge, mirroring the image.
Fashioning the Handles
Now let’s make the sturdy handles for our tote. We will construct two identical handles.
- With white yarn, make a chain of about 60 chains (or adjust to your desired handle length – hold it up to your bag to check).
- Row 1: Single crochet (sc) in the second chain from your hook and in each chain across. Chain 1 and turn.
- Rows 2 – 6: Single crochet (sc) in each stitch across. Chain 1 and turn. Repeat until your handle is about 6 rows wide, or to your preferred handle width. Fasten off and weave in ends.
- Repeat steps 1-3 to make a second handle.
Assembling the Handles to the Bag
Now we need to attach the handles securely to the bag. Refer to the image for placement.
- Position one handle on the inside of the bag opening. Make sure it’s evenly spaced from the sides.
- Using your yarn needle and white yarn, sew the handle firmly to the bag. Sew across each end of the handle multiple times for strength.
- Repeat steps 1-2 to attach the second handle, ensuring it’s positioned symmetrically opposite the first handle on the other side of the bag opening.
Attaching the Button
Finally, let’s add the decorative button! Look at the image to see where the button is placed. It’s centered at the top front of the bag, just below the top edge.
- Position the button in the center front, about 2-3 rounds down from the top edge.
- Using your yarn needle and green yarn, sew the button securely to the bag. Weave in the yarn ends on the inside of the bag.
Finishing Touches
Give your beautiful new tote bag a final check. Make sure all yarn ends are woven in securely. Give it a gentle shaping with your hands if needed.
Share Your Handmade Tote!
Congratulations! You’ve just assembled a fantastic and stylish crochet tote bag! Isn’t it satisfying to see something so lovely that you’ve fashioned with your own hands? This bag is perfect for market trips, library visits, or just adding a handmade touch to your everyday style. Happy crocheting, and enjoy making more wonderful things!