Dreamy Cloud Mobile Crochet Project
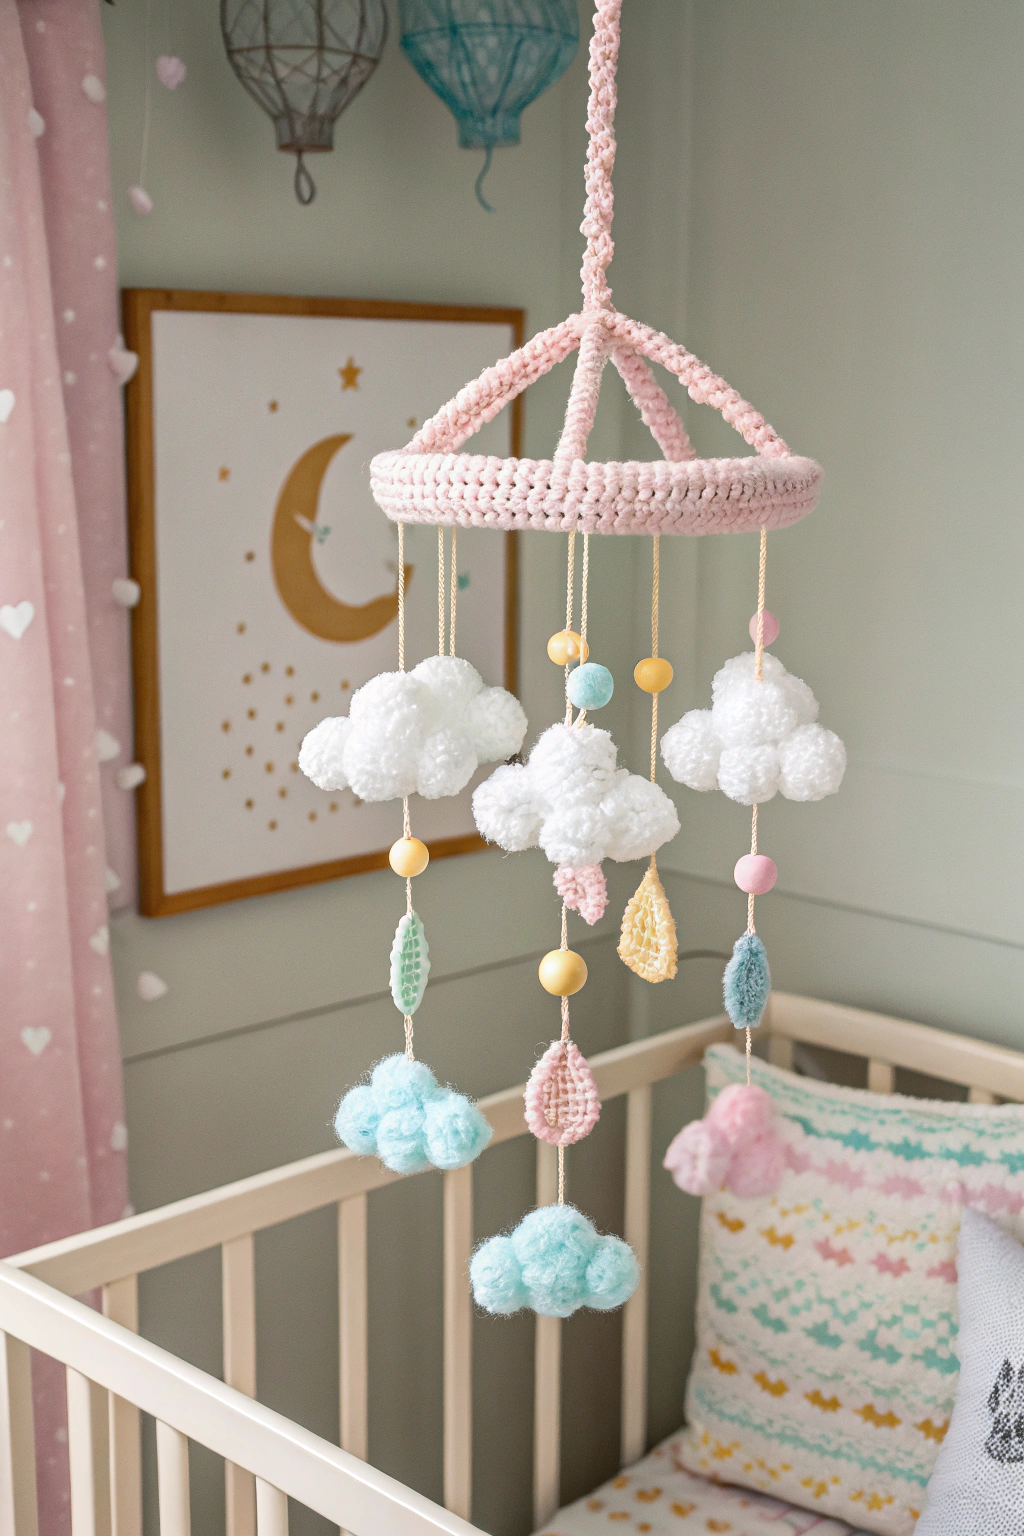
Ready to create something truly magical? Let’s crochet an adorable cloud mobile, just like the one you see in the picture! This project is perfect for adding a touch of handmade charm to a nursery or as a sweet gift for a new baby. Don’t worry if you’ve never picked up a crochet hook before! We’ll guide you through every step, making it fun and easy to learn. Get ready to discover the joy of crochet and create your very own dreamy cloud mobile!
Materials You’ll Need
Before we begin, let’s gather everything we need. Having all your materials ready will make the crocheting process much smoother and more enjoyable. Here’s what you will need:
- 🧶 Chunky Yarn in Pink: This soft, chunky yarn will be used for the main ring of the mobile. It should be a nice, pastel pink, just like in the picture.
- 🧶 Soft White Yarn: We’ll use this fluffy white yarn to create the puffy clouds. Choose a yarn that feels gentle and baby-soft.
- 🧶 Light Blue Yarn: This yarn is for making the cute blue clouds at the bottom of the mobile. A soft, pastel blue will look lovely.
- 🧶 Light Green Yarn: For crocheting the little leaf shapes. A gentle, spring green will work beautifully.
- 🧶 Pale Yellow Yarn: We will also use this for more leaf shapes, adding a touch of sunshine to our mobile.
- 🧶 Pale Pink Yarn: And finally, a soft pink yarn for the last set of leaf shapes to keep the colors coordinated.
- 🪡 Crochet Hook – Size 5mm: This is the size of the crochet hook you’ll use for all parts of this project. If you’re not sure what a crochet hook is, it’s like a little hook that helps you pull loops of yarn through other loops to create fabric!
- 🪩 Wooden Beads: You’ll need a few wooden beads in different colors like yellow, light blue, and pink to add some extra charm and weight to the mobile. Just like you see in the picture!
- ✂️ Scissors: For cutting the yarn. Sharp scissors will make this easier.
- 🧵 Tapestry Needle (or Yarn Needle): This is a large needle with a big eye, used for weaving in the yarn ends to make your work neat and tidy. It’s not sharp like a sewing needle, so it’s safe to use with yarn.
Let’s Get Crocheting! Step-by-Step Guide
Now for the fun part – let’s start crocheting our dreamy cloud mobile! We’ll break it down into easy steps. Remember, take your time and don’t be afraid to undo and try again if you need to. Crocheting is all about practice and enjoying the process.
Making the Crochet Ring
First, we’re going to make the pink ring at the top of the mobile. This will be the base that everything hangs from. We’ll use the pink chunky yarn for this part.
Round 1: Let’s start with something called a slip knot. This is how you get the yarn onto your hook to begin crocheting. To make a slip knot, first make a loop with your yarn, like you’re going to tie a knot, but don’t tighten it yet. Hold the loop so the yarn coming from the ball is behind the loop. Then, reach through the loop with your hook, grab the yarn coming from the ball, and pull it through the loop. Now you have a slip knot on your hook! Make sure it’s snug but not too tight.
Next, we’re going to make something called chain stitches, often shortened to ‘ch’. Think of chain stitches as the foundation of your crochet. To make a chain stitch, hold the slip knot with your fingers, then wrap the yarn around your hook from back to front – this is called yarn over (yo). Now, pull the hook with the yarn through the loop that’s already on your hook. That’s one chain stitch! Repeat this to make 60 chain stitches. Count them as you go to make sure you have the right number. These chain stitches will form a long chain.
Once you have 60 chain stitches, we need to join them into a circle to make the ring. Carefully bring the beginning of your chain to the end, making sure the chain is not twisted. Now, we’re going to do a slip stitch (sl st) to join them. Insert your hook into the very first chain stitch you made. Yarn over and pull the yarn through both the loop on your hook and the chain stitch. This joins the chain into a ring! You’ve finished your first round and created a ring shape!
Round 2: Now we’re going to make the ring thicker and sturdier using single crochet stitches, shortened to ‘sc’. Single crochet is a basic stitch that makes a nice, solid fabric. For the first single crochet, we need to start by making one chain stitch (ch 1). This chain stitch doesn’t count as a stitch itself, it’s just to bring the yarn up to the right height for single crochet. Now, we’re going to work single crochet stitches all the way around the ring we just made.
To make a single crochet, insert your hook into the next stitch in the ring (the stitch right next to where you joined). Yarn over and pull up a loop – you’ll have two loops on your hook. Yarn over again and pull through both loops on your hook. That’s one single crochet! Do this in every stitch all the way around the ring. When you get back to the beginning of the round, join with a slip stitch into the very first single crochet you made, just like we did to close the chain ring.
Round 3: We’re going to repeat Round 2 to make the ring even thicker. Chain 1, and then work single crochet stitches all around in each stitch from the previous round. Join with a slip stitch to the first single crochet. Now you have a nice, sturdy pink ring for your mobile! If you look at the image, you can see the pink ring at the top is quite thick. We are creating that same look.
Finishing the Ring: To finish off, we need to fasten off the yarn. Cut the yarn, leaving a tail of about 6 inches. Yarn over and pull the loop on your hook all the way out, so you have a knot. Now, thread the yarn tail onto your tapestry needle. Weave the needle under and over a few stitches on the back of the ring to hide the tail. Then, trim off any extra yarn. This makes your work look neat and prevents the stitches from unraveling.
Crocheting the Clouds
Now let’s make the fluffy clouds! We’ll make some white clouds and some light blue clouds, just like in the picture. We’ll use the white and light blue yarn for these. The clouds are made in rounds, getting bigger and puffier as we go.
Making a White Cloud (Make 3):
Round 1: Start with a slip knot using your white yarn. Then, chain 2. Now we’re going to work in the first chain stitch you made. We’re going to make 6 single crochet stitches into that first chain stitch. This can feel a little fiddly because it’s small, but just try to get 6 single crochet stitches clustered together in that first chain. Join with a slip stitch to the first single crochet.
Round 2: Chain 1. Now, we’re going to do 2 single crochet stitches in each stitch around. This is called increasing. By putting two stitches in each stitch from the previous round, we make the circle get bigger. So, you’ll do 2 single crochet in the first stitch, 2 single crochet in the next stitch, and repeat all the way around. You should have 12 stitches at the end of this round. Join with a slip stitch to the first single crochet.
Round 3: Chain 1. Now we’re going to do an increase round, but this time we’ll increase every other stitch. So, do 1 single crochet in the first stitch, and then 2 single crochet in the next stitch. Repeat this pattern of 1 single crochet, 2 single crochet all the way around. You should have 18 stitches at the end of this round. Join with a slip stitch to the first single crochet.
Round 4: Chain 1. Repeat the increase pattern again, but this time we’ll increase every third stitch. Do 1 single crochet in each of the first two stitches, and then 2 single crochet in the next stitch. Repeat this pattern of 1 single crochet, 1 single crochet, 2 single crochet all the way around. You should have 24 stitches at the end of this round. Join with a slip stitch to the first single crochet.
Round 5: Chain 1. Repeat the increase pattern again, this time increasing every fourth stitch. Do 1 single crochet in each of the first three stitches, and then 2 single crochet in the next stitch. Repeat this pattern of 1 single crochet, 1 single crochet, 1 single crochet, 2 single crochet all the way around. You should have 30 stitches at the end of this round. Join with a slip stitch to the first single crochet.
Round 6: Chain 1. Now we want to start making the cloud a bit wavy and cloud-like! We’re going to work a row of half double crochet stitches, shortened to ‘hdc’. Half double crochet is a stitch that’s a bit taller than single crochet and gives a slightly different texture. To make a half double crochet, yarn over, insert your hook into the next stitch, yarn over and pull up a loop (you’ll have three loops on your hook). Yarn over again, and pull through all three loops on your hook. That’s a half double crochet! Do half double crochet stitches all the way around in each stitch. Join with a slip stitch to the first half double crochet.
Round 7: Chain 1. Now, we’re going to make the wavy edges even more pronounced using double crochet stitches, shortened to ‘dc’. Double crochet is taller than half double crochet, creating more open fabric and more wavy edges. To make a double crochet, yarn over, insert your hook into the next stitch, yarn over and pull up a loop (you’ll have three loops on your hook). Yarn over again, pull through the first two loops on your hook (you’ll have two loops left). Yarn over again, and pull through the last two loops on your hook. That’s a double crochet! Do double crochet stitches all the way around in each stitch. Join with a slip stitch to the first double crochet.
Round 8: Chain 1. For the final round, we’ll use slip stitches to create a neat edge. Work slip stitch in each stitch all the way around. Join with a slip stitch to the first slip stitch. Fasten off and weave in the ends just like we did for the ring.
Repeat these steps to make 3 white clouds.
Making a Light Blue Cloud (Make 2):
Follow exactly the same instructions as for the white clouds, but use the light blue yarn instead of white. Make 2 light blue clouds. You can see in the picture that there are fewer blue clouds than white clouds.
Creating the Leaves
Now we’ll make the little leaf shapes that hang below the clouds. We’ll make them in light green, pale yellow, and pale pink yarn, just like in the picture. These are made in rows, not rounds, and are quite simple.
Making a Leaf (Make 5 in each color – Green, Yellow, Pink):
Row 1: Start with a slip knot using your chosen color yarn (green, yellow, or pink). Chain 10.
Row 2: We’re going to work back down the chain to create the leaf shape. Skip the first chain stitch (the one closest to your hook). In the next stitch, make a slip stitch. In the next stitch, make a single crochet. In the next stitch, make a half double crochet. In each of the next three stitches, make a double crochet. In the next stitch, make a half double crochet. In the next stitch, make a single crochet. In the last stitch, make a slip stitch. You’ve created one side of the leaf!
Row 3: Now we’re going to work back up the other side of the chain to complete the leaf shape. Chain 1. Now, work in the stitches down the other side of the chain, mirroring what we did on the first side. In the first stitch, make a slip stitch. In the next stitch, make a single crochet. In the next stitch, make a half double crochet. In each of the next three stitches, make a double crochet. In the next stitch, make a half double crochet. In the next stitch, make a single crochet. In the last stitch, make a slip stitch. Join with a slip stitch to the first stitch. Fasten off and weave in the ends.
Repeat these steps to make 5 leaves in light green, 5 in pale yellow, and 5 in pale pink – that’s 15 leaves in total. You can see in the image that the leaves are delicate and pointy. We are creating that same shape.
Assembling the Mobile
We have all our pieces ready! Now let’s put it all together to create our beautiful cloud mobile.
- Cut Yarn Strands: Cut 5 strands of yarn, each about 15 inches long. You can use the pink yarn or a similar color for these strands.
- Attach Clouds and Leaves: For each strand of yarn, we will attach a cloud and a leaf, and a wooden bead. Refer to the image to see how they are arranged.
- Take one yarn strand. Thread one end through the top of a white cloud and tie a knot to secure it.
- Slide a wooden bead onto the yarn strand below the cloud. You can choose any color bead you like.
- Thread the end of the yarn strand through the top of a leaf (choose any color leaf) and tie a knot to secure it below the bead.
Repeat this for the other yarn strands, attaching the clouds and leaves in the order you like, mixing up the colors and types of clouds and leaves. Look at the image to guide you on the arrangement. You’ll have 5 hanging pieces in total.
- Attach Hanging Strands to the Ring: Now, we need to attach these hanging pieces to the pink ring we made earlier.
- Space the 5 hanging strands evenly around the pink ring. Look at the image to see how they are spaced.
- For each strand, thread the top end through a stitch on the pink ring and tie a knot to secure it. Make sure all the strands are attached securely so the mobile is safe.
- Create the Top Hanger: To hang your mobile, cut another piece of pink yarn about 20 inches long. Tie one end of this yarn securely to one side of the pink ring. Then, tie the other end to the opposite side of the pink ring, creating a loop for hanging. You can adjust the length of this loop to suit where you want to hang your mobile.
You did it! You’ve now crocheted your very own dreamy cloud mobile! Step back and admire your beautiful handmade creation. Isn’t it wonderful to see something you made with your own hands?
Remember, practice makes perfect. If your first attempt isn’t exactly like the picture, don’t worry! Each time you crochet, you’ll get better and better. The most important thing is to enjoy the process and have fun creating.
We hope you loved making this project! We would absolutely love to see your cloud mobiles! Please share pictures of your creations online and tag us – we can’t wait to see your dreamy, handmade mobiles floating in their new homes. Happy crocheting!