DIY Crochet Dahlia Flower & Pot
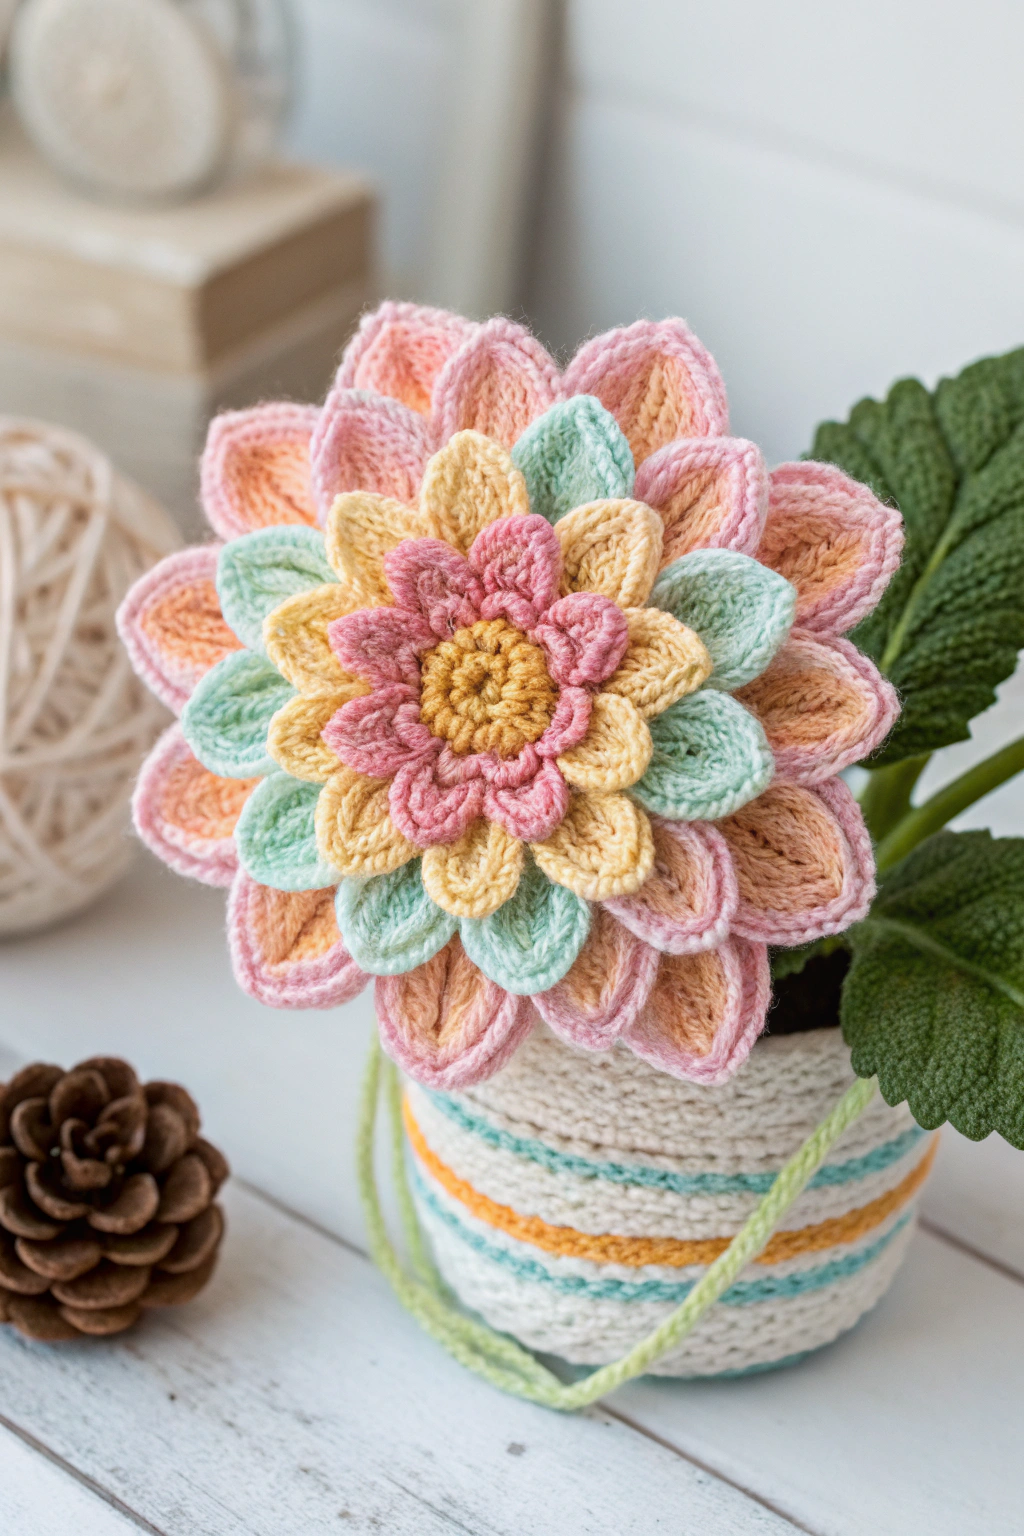
Are you looking for a delightful and colorful project to brighten your space? Let’s make a charming Crocheted Dahlia Flower Pot just like the one you see in the image! This project is perfect for beginners who want to learn new skills and fashion something beautiful with their own hands. Don’t worry if you’re just starting out – we’ll guide you every step of the way! Get ready to grab your yarn and hook, and let’s dive into this fun and rewarding crafting adventure!
What You’ll Need to Fashion Your Dahlia Flower Pot
Before we begin, let’s gather all the materials you’ll need. This project is a wonderful way to use up yarn scraps, so feel free to get artistic with your color choices!
- Worsted weight yarn in the following colors:
- Peach/Orange-Pink 🍑
- Mint Green 🌿
- Mustard Yellow 🌼
- Light Pink 🌸
- Cream/Beige for the pot 🥛
- Green for the pot hanger 🟢
- Crochet hook size 4.0 mm (US size G/6) 🪡
- Yarn needle for weaving in ends
- Scissors ✂️
- Stitch markers (optional, but helpful for beginners) 📍
Step-by-Step Guide to Making Your Crocheted Dahlia
Let’s start by fashioning the beautiful dahlia flower. Refer to the image to see the different layers and colors of the petals as we go.
Part 1: Crafting the Flower Center
- Start with the Mustard Yellow yarn. We’ll begin with the very center of the flower.
- Make a magic ring: This is a fantastic way to start crocheting in the round without a hole in the center. To do this, wrap the yarn around your fingers to form a loop, then insert your hook into the loop, yarn over, and pull through. Chain 1 to secure the loop. (Don’t worry if this sounds tricky at first, there are many helpful video tutorials online if you search for “magic ring crochet”!).
- Round 1: Work single crochet (sc) stitches into the magic ring. Aim for about 6 single crochet stitches inside the ring. Pull the tail of the magic ring tight to close the center. Join with a slip stitch (sl st) to the first sc. (A single crochet stitch is made by inserting your hook into a stitch, yarn over, pull through a loop, yarn over again, and pull through both loops on your hook. A slip stitch is made by inserting your hook, yarn over, and pulling directly through the loop on your hook and the loop on your hook).
- Round 2: Work 2 single crochet stitches in each stitch around. This is called increasing. You’ll now have double the stitches you had in the previous round. Join with a sl st to the first sc.
- Round 3-4: Continue working in single crochet stitches in each stitch around, without increasing. This will start to build up the center of your flower. Fasten off the yellow yarn and weave in the ends. Observe in the image the tight, textured look of the flower center. This is achieved by using tight single crochet stitches.
Part 2: Fashioning the Petals
We’ll now fashion the petals in layers, moving from the center outwards.
Inner Pink Petals
- Switch to Light Pink yarn.
- To start a petal: Chain 9. This means wrapping the yarn around your hook and pulling it through the loop on your hook nine times. This chain forms the base of your petal.
- Row 1: Starting in the second chain from the hook, work 1 single crochet, 1 half double crochet (hdc), 5 double crochet (dc), and 1 hdc in the last chain. (A half double crochet is made by yarn over, insert hook, yarn over, pull through a loop, yarn over, pull through all three loops on hook. A double crochet is made by yarn over, insert hook, yarn over, pull through a loop, yarn over, pull through two loops, yarn over, pull through remaining two loops).
- Fasten off leaving a tail for sewing. This is your first pink petal!
- Make 7 more pink petals, for a total of 8 inner pink petals. Refer to the image – you can see there are several of these small pink petals clustered around the center.
Yellow Petals
- Switch back to Mustard Yellow yarn.
- To start a petal: Chain 11.
- Row 1: Starting in the second chain from the hook, work 1 single crochet, 1 hdc, 7 dc, and 1 hdc in the last chain.
- Fasten off leaving a tail for sewing.
- Make 10 yellow petals. Notice these are slightly larger than the pink petals.
Mint Green Petals
- Switch to Mint Green yarn.
- To start a petal: Chain 13.
- Row 1: Starting in the second chain from the hook, work 1 single crochet, 1 hdc, 9 dc, and 1 hdc in the last chain.
- Fasten off leaving a tail for sewing.
- Make 12 mint green petals. These petals are getting even larger, forming the next layer of the dahlia.
Outer Peach/Orange-Pink Petals
- Switch to Peach/Orange-Pink yarn.
- To start a petal: Chain 15.
- Row 1: Starting in the second chain from the hook, work 1 single crochet, 1 hdc, 11 dc, and 1 hdc in the last chain.
- Fasten off leaving a tail for sewing.
- Make 14 peach/orange-pink petals. These are the largest and outermost petals, giving the dahlia its full, blooming shape.
Part 3: Assembling the Dahlia Flower
- Start with the Flower Center you fashioned earlier.
- Arrange the Inner Pink Petals around the flower center. Using the yarn tails and your yarn needle, sew the base of each pink petal to the back of the flower center, spacing them evenly.
- Next, arrange the Yellow Petals around the pink petals, slightly overlapping them. Sew the base of each yellow petal behind the pink petal layer.
- Continue with the Mint Green Petals, positioning them around the yellow petals and sewing them in place.
- Finally, add the Peach/Orange-Pink Petals as the outermost layer, arranging them beautifully around the mint green petals and sewing them to the back. Refer to the image to guide your petal placement and ensure a full, dahlia-like appearance.
Step-by-Step Guide to Making the Crocheted Pot
Now, let’s fashion the adorable little pot for our dahlia!
Part 1: Crafting the Pot Base and Body
- Start with Cream/Beige yarn.
- Make a magic ring just like you did for the flower center.
- Round 1: Work 6 single crochet stitches into the magic ring. Pull the tail tight and join with a sl st to the first sc.
- Round 2: Work 2 single crochet stitches in each stitch around (increase). Join with a sl st.
- Round 3: Work 1 sc in the next stitch, 2 sc in the next stitch. Repeat from * to * around. Join with a sl st.
- Round 4: Work 1 sc in the next 2 stitches, 2 sc in the next stitch. Repeat from * to * around. Join with a sl st.
- Continue increasing in this way (increasing the number of single crochet stitches between increases each round) for a few more rounds until the base of your pot is the desired size. Observe in the image the width of the pot base in relation to the flower.
- Once your base is wide enough, stop increasing. Now, work single crochet stitches in each stitch around for several rounds to build up the height of the pot.
Part 2: Adding the Stripes
- After crocheting a few rounds in cream, switch to Orange yarn. Work 2 rounds of single crochet in orange.
- Switch back to Cream yarn for a few rounds.
- Then, switch to Mint Green yarn for 2 rounds.
- Switch back to Cream yarn.
- Next, switch to Blue yarn (or a similar light blue if you have it) for 2 rounds.
- Finish with Cream yarn for the remaining rounds to the top of the pot. Refer to the image to see the order and spacing of the stripes. You can adjust the number of rounds in each color to match the image or to your liking.
Part 3: Finishing the Pot and Adding Hangers
- Top Edge: For the last round at the top of the pot, you can simply work single crochet stitches, or for a slightly neater edge, try working reverse single crochet (also called crab stitch). This is just single crochet worked backward – it gives a nice textured edge.
- Fasten off the cream yarn and weave in all ends neatly.
- Making the Hangers: Cut two long strands of Green yarn. For each hanger, fold a strand in half. Using your crochet hook, pull the folded loop through a stitch on one side of the pot’s top edge. Then, thread the yarn ends through the loop and pull tight to secure. Repeat on the opposite side of the pot for the second hanger. You can see in the image how the green yarn is used to fashion these simple hanging loops.
Final Assembly and Enjoy Your Handmade Dahlia!
- Place your Crocheted Dahlia Flower into the Crocheted Pot. It should sit snugly inside. You can add a little bit of stuffing or yarn scraps at the bottom of the pot if needed to raise the flower to the desired height.
- Adjust the petals to shape your dahlia beautifully.
- Find the perfect spot to display your handmade Crocheted Dahlia Flower Pot! It will surely bring a touch of handmade charm and cheer to any room.
Congratulations! You’ve just fashioned a beautiful Crocheted Dahlia Flower Pot! This project is a testament to the joy of crafting with your own two hands. Don’t be afraid to experiment with different colors and yarn types in future projects.
Happy crafting! 🧶🌸