Delicious Homemade Halal Red Velvet Cake
This red velvet cake recipe is perfect for beginner bakers and guarantees a moist, flavorful, and visually stunning dessert. This recipe is completely halal, ensuring everyone can enjoy a slice of homemade goodness. Let’s embark on this baking adventure together!
Halal Ingredients You’ll Need
Before starting, gather all the necessary ingredients. Having everything measured and ready will make the baking process smooth and enjoyable.
- 🌾 2 ½ cups all-purpose flour (make sure it’s halal certified)
- 🥄 1 teaspoon baking soda
- 🥄 1 teaspoon baking powder
- 🧂 ½ teaspoon salt
- 🍫 2 tablespoons unsweetened cocoa powder (halal certified)
- 🥛 1 cup buttermilk (or see tip below for a halal substitute)
- 🔴 1 tablespoon red food coloring (halal certified, gel food coloring is recommended for vibrant color)
- ☕ 1 teaspoon white vinegar
- 🥄 1 teaspoon alcohol free vanilla extract
- 🧈 1 cup (2 sticks) unsalted butter, softened
- 🍚 1 ¾ cups granulated sugar
- 🥚 2 large eggs
For the Cream Cheese Frosting:
- 🧀 8 ounces cream cheese, softened (halal certified)
- 🧈 ½ cup (1 stick) unsalted butter, softened
- 🍬 3 cups powdered sugar
- 🥄 1 teaspoon alcohol free vanilla extract
Halal Buttermilk Substitute Tip: If you don’t have buttermilk or prefer a halal alternative, you can easily make a substitute. For 1 cup of buttermilk, simply put 1 tablespoon of white vinegar or lemon juice in a liquid measuring cup. Then, add enough milk (halal certified) to reach the 1-cup mark. Stir it gently and let it sit for 5 minutes. This mixture will slightly thicken and become a great substitute for buttermilk in this recipe.
Kitchen Equipment
Make sure you have these basic kitchen tools ready. Baking is much easier when you are well-equipped!
- 🥣 Large mixing bowls (you’ll need at least two)
- 🥄 Measuring spoons
- 🥛 Measuring cups (both liquid and dry)
- 🥢 Spatula or wooden spoon for mixing
- Whisk
- Electric mixer (hand mixer or stand mixer)
- Two 9-inch round cake pans
- Parchment paper
- Cooling rack
- Offset spatula or knife for frosting
Let’s Learn Basic Kitchen Techniques
If you are new to baking, don’t worry! These are some very simple techniques that are easy to learn.
Softening Butter: “Softened butter” means butter that is at room temperature, making it easy to mix with other ingredients. It should be soft enough that you can easily press a finger into it, but not melted or oily. To soften butter quickly, you can leave it at room temperature for about 30-60 minutes, depending on how warm your room is. Avoid microwaving butter to soften it, as it can easily melt.
Creaming Butter and Sugar: This is a very important step in many baking recipes. “Creaming” means mixing softened butter and sugar together until the mixture becomes light, fluffy, and pale in color. This process incorporates air into the batter, which helps make the cake light and tender. Use an electric mixer for this step, mixing on medium speed for 2-3 minutes.
Sifting Dry Ingredients: “Sifting” dry ingredients like flour, baking soda, baking powder, cocoa powder, and salt means passing them through a fine-mesh sieve or sifter. This removes any lumps and makes the ingredients lighter and airier, which helps in achieving a smoother cake batter. If you don’t have a sifter, you can use a whisk to gently stir the dry ingredients together in a bowl to break up any clumps.
Folding Ingredients: “Folding” is a gentle way to mix ingredients, especially when adding dry ingredients to wet ingredients or when incorporating whipped egg whites or cream into a batter. To fold, use a spatula and gently cut down into the mixture, then bring the spatula across the bottom of the bowl and up the side, turning the bowl as you go. This technique helps to keep the batter light and airy by not overmixing.
Step-by-Step Instructions: Making Red Velvet Cake
Now, let’s get to the exciting part – making the red velvet cake! Follow these simple steps, and you’ll be amazed at what you can bake.
Step 1: Prepare the Cake Batter
- Preheat the oven: First things first, turn on your oven and set the temperature to 350°F (175°C). This is called “preheating” the oven and it is very important to do before you start baking. Preheating ensures that the oven is at the right temperature when you put the cake batter in, which helps the cake bake evenly.
- Prepare the cake pans: Take your two 9-inch round cake pans. Grease the bottom and sides of each pan with butter or cooking spray. Then, cut out circles of parchment paper that fit the bottom of the pans and place them inside. This will prevent the cake from sticking to the pans, making it easy to remove after baking.
- Combine dry ingredients: In a large mixing bowl, put in the flour, baking soda, baking powder, salt, and cocoa powder. Remember to sift these dry ingredients together or whisk them well to ensure they are evenly mixed and lump-free. Set this bowl aside for now.
- Combine wet ingredients: In a separate small bowl, whisk together the buttermilk, red food coloring, vinegar, and vanilla extract. The vinegar might seem unusual, but it helps to activate the baking soda and gives red velvet cake its unique tangy flavor and moist texture. The red food coloring is what gives the cake its beautiful red color.
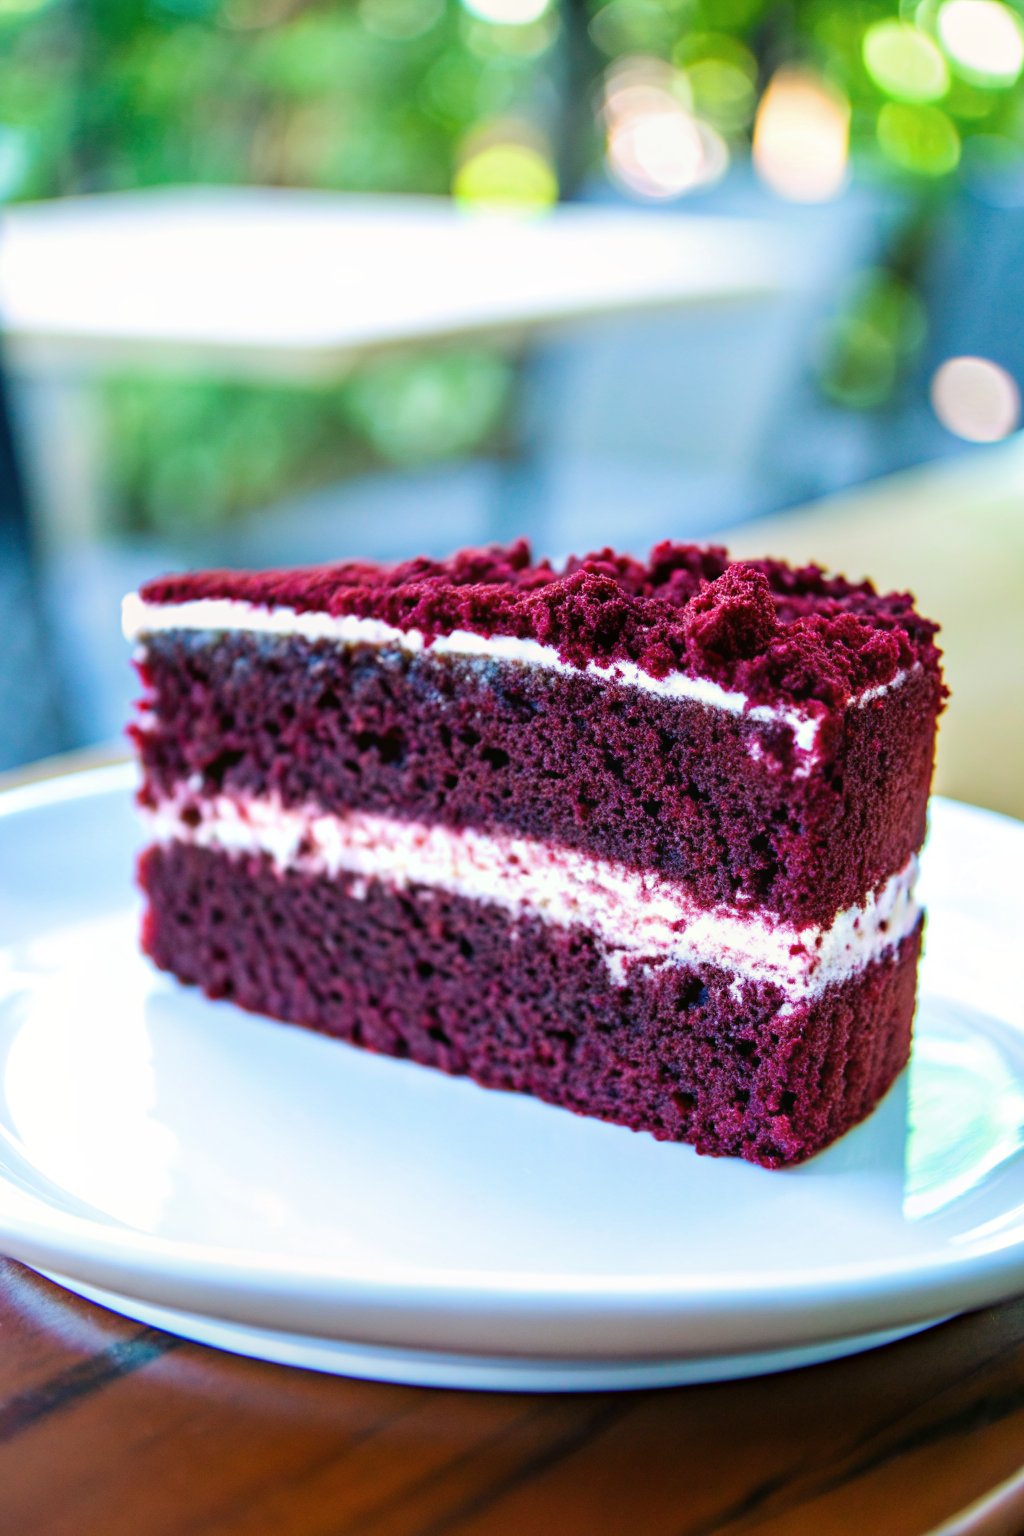
- Cream butter and sugar: In a large mixing bowl (or the bowl of your stand mixer), put the softened butter and granulated sugar. Use an electric mixer to cream them together on medium speed for 2-3 minutes, until the mixture is light and fluffy. You can observe in the image that the cake layers are light and airy, which starts with properly creaming butter and sugar.
- Add eggs: Add the eggs, one at a time, to the creamed butter and sugar mixture. Mix well after each addition until each egg is fully incorporated. “Incorporated” means completely mixed in.
- Alternate adding dry and wet ingredients: Now, gradually add the dry ingredients to the wet ingredients in the large mixing bowl. Add about one-third of the dry ingredient mixture to the butter-sugar-egg mixture and mix on low speed until just combined. Then, add half of the wet ingredient mixture and mix until just combined. Repeat this process, alternating between dry and wet ingredients, ending with the remaining dry ingredients. Mix until the batter is smooth and just combined. Be careful not to overmix the batter once you add the flour, as overmixing can make the cake tough.
- Divide batter: Divide the cake batter evenly between the two prepared cake pans. You can use a kitchen scale to ensure the batter is evenly divided, or simply eyeball it as best as you can.
Step 2: Bake the Cake Layers
- Bake: Place the cake pans in the preheated oven. Bake for 25-30 minutes, or until a wooden skewer or toothpick inserted into the center of a cake comes out clean. “Comes out clean” means no wet batter sticks to the skewer when you pull it out. This is how you know the cake is baked through.
- Cool in pans: Once baked, take the cake pans out of the oven and let them cool in the pans for about 10-15 minutes. This allows the cake to set slightly and become easier to handle.
- Invert onto cooling rack: After cooling in the pans for a bit, gently loosen the edges of the cakes with a knife or spatula. Invert each cake pan onto a cooling rack to remove the cakes from the pans. “Invert” means to turn the pan upside down. Remove the parchment paper from the bottom of each cake layer. Let the cake layers cool completely on the cooling rack before frosting. It is very important to let the cakes cool completely before frosting, otherwise the frosting will melt.
Step 3: Make the Cream Cheese Frosting
- Soften cream cheese and butter: Make sure the cream cheese and butter for the frosting are softened, just like the butter for the cake.
- Cream cream cheese and butter: In a large mixing bowl, put the softened cream cheese and butter. Use an electric mixer to cream them together until smooth and creamy.
- Add powdered sugar and vanilla: Gradually add the powdered sugar, one cup at a time, to the cream cheese and butter mixture. Mix on low speed until the powdered sugar is incorporated, then increase the speed to medium and beat until the frosting is smooth and fluffy. Add the vanilla extract and mix until combined. The frosting should be thick and spreadable. If it seems too thick, you can add a tiny bit of milk (one teaspoon at a time) to thin it out, but be careful not to add too much.
Step 4: Assemble and Frost the Cake
- Level cake layers (optional): Once the cake layers are completely cooled, use a long serrated knife to level the tops of the cakes if they are uneven. This is optional, but it will make your cake look more professional and even when frosted. To level, gently trim off any domed tops to create flat surfaces.
- Frost the first layer: Place one cake layer on a serving plate or cake stand. Spread a generous amount of cream cheese frosting evenly over the top of the first cake layer. You can see in the image that the frosting layer is thick and creamy.
- Add second layer: Carefully place the second cake layer on top of the frosting, aligning it with the bottom layer.
- Frost the entire cake: Frost the top and sides of the cake with the remaining cream cheese frosting. You can make it smooth or create swirls and decorative patterns with your spatula, as seen in the image.
- Optional decoration: For an extra touch, you can crumble some of the cake trimmings (if you leveled the cakes) or some extra red velvet cake and sprinkle them around the base or on top of the cake, as shown in the image. This adds a beautiful finishing touch and enhances the red velvet look.
Enjoy Your Red Velvet Cake!
Congratulations! You have just made a beautiful and delicious red velvet cake from scratch. Take a moment to admire your cake. The process of making food with your own hands is incredibly rewarding, and sharing it with family and friends makes it even more special.
This red velvet cake is perfect for celebrations, gatherings, or simply as a delightful treat any day of the week. It’s moist, flavorful, and the cream cheese frosting adds the perfect tangy sweetness.
Don’t be afraid to try this recipe again and again! Baking becomes easier and more enjoyable with practice. Feel free to share pictures of your red velvet cake bakes with friends and family – they’ll be so impressed! Happy baking!