Deep Chocolate Delight Cake
Isn’t there something special about pulling a beautiful, homemade cake from the oven? This guide is here to help anyone, especially baking newcomers, prepare a truly wonderful Deep Chocolate Delight Cake, exactly like the gorgeous one in the picture. It’s all about having fun in the kitchen and ending up with a delicious, halal treat to share with family and friends. Let’s get started!
What We’re Aiming For
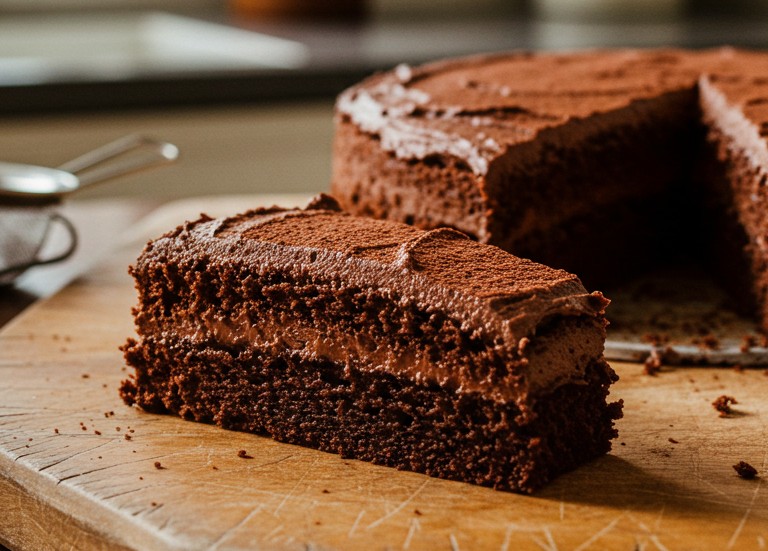
Take a peek at the photo – that’s our delicious goal! We see a fantastic two-layer chocolate cake. Each layer is dark, looks super moist, and is generously hugged by a thick, dreamy chocolate frosting, both in the middle and all over the top. A lovely dusting of cocoa powder finishes the top, making it look extra rich and inviting. The slice sitting proudly on the wooden board shows off those perfect layers and the creamy frosting inside. This guide helps bakers achieve this very look and taste!
Gathering Your Goodies
Getting everything ready beforehand makes baking feel smooth and easy. It’s like setting the stage for a delicious performance!
Halal Ingredients You’ll Need:
- 🎂 2 ¼ cups (280g) All-purpose flour
- 🍚 2 cups (400g) Granulated sugar
- 🍫 ¾ cup (65g) Unsweetened cocoa powder (the better the cocoa, the richer the taste!)
- 🥄 2 tsp Baking soda
- 🥄 1 tsp Baking powder
- 🧂 1 tsp Salt
- 🥛 1 cup (240ml) Halal buttermilk (Easy substitute: Put 1 tbsp white vinegar in a measuring cup, then fill to the 1 cup mark with milk. Let it sit 5 mins!)
- 🌱 ½ cup (120ml) Vegetable oil
- 🥚 2 Large eggs (let them hang out on the counter for a bit to reach room temperature)
- 🍦 1 tsp alcohol free Vanilla extract
- ☕ 1 cup (240ml) Hot water or freshly brewed hot coffee (coffee really deepens the chocolate flavor!)
For That Dreamy Chocolate Frosting:
- 🧈 1 ½ cups (340g) Halal unsalted butter (nicely softened, but not melted)
- 🍫 1 cup (85g) Unsweetened cocoa powder
- 🍬 4-5 cups (480-600g) Powdered sugar (sifting makes it lump-free!)
- 🥛 ½ cup (120ml) Halal milk
- 🍦 2 tsp alcohol free Vanilla extract
- 🧂 Just a little pinch of salt
- ✨ Extra cocoa powder for that final pretty dusting
Kitchen Tools:
- 🥣 2 Large mixing bowls (one for dry, one for wet helps stay organized!)
- ✨ Whisk (great for combining dry ingredients)
- 🥄 Rubber spatula or a large spoon (for scraping the bowl – don’t want to waste any batter!)
- ⚡️ Electric mixer (handheld or stand mixer makes things quicker)
- 📏 Measuring cups and spoons (accuracy is key in baking!)
- 🎂 Two 9-inch round cake pans
- 📜 Parchment paper (your best friend for non-stick cakes)
- 🥅 Wire cooling rack (essential for cooling cakes properly)
- 🔪 Offset spatula or a regular flat knife works for frosting
- ❄️ Sifter or a small fine-mesh sieve (for the cocoa dusting)
Making the Rich Chocolate Cake Layers
Time for the fun part – mixing up the cake! Taking these steps ensures a lovely, moist cake.
- Warm Up the Oven & Pans: Let’s get the oven heating up to 350°F (175°C). Give those two 9-inch cake pans a good greasing with butter or spray. Pop a circle of parchment paper on the bottom of each pan – this little trick makes removing the cakes a breeze! Give the pans a light dusting of flour too, tapping out the extra. This triple-prep ensures the cakes slide out beautifully.
- Mix the Dry Ingredients: In a big bowl, whisk together the flour, sugar, cocoa powder, baking soda, baking powder, and salt. Giving them a good whisk helps mix everything evenly, so the cake rises nicely and tastes great all the way through.
- Combine the Wet Ingredients: Grab another medium bowl for the buttermilk, oil, those room-temperature eggs, and vanilla extract. Whisk them just until they’re blended. Room temperature eggs are happier campers; they mix in smoothly for a better cake texture!
- Bring Them Together: Gently pour the wet mixture into the dry ingredients bowl. Using an electric mixer on a low setting (or a whisk if doing it by hand), mix just until you don’t see big streaks of flour anymore. A rubber spatula is handy for scraping the sides and bottom of the bowl. Remember, gentle mixing is key here! Overdoing it can make the cake a bit tough, and nobody wants that.
- Add the Hot Magic: Now, carefully pour in the hot water or coffee. The batter will look quite thin – that’s totally normal! Mix on low speed just until it’s smooth. That hot liquid wakes up the cocoa powder, making the chocolate flavor really pop and giving the cake amazing moisture.
- Fill the Pans: Pour the batter evenly into the two prepared pans. If aiming for perfection, a kitchen scale helps get the layers the same size, but eyeballing it works fine too!
- Bake Time! Pop those pans into the cozy, preheated oven. Let them bake for about 30-35 minutes. The best way to check if they’re done? Poke the center of each cake with a wooden skewer or toothpick. If it comes out clean (no wet batter), they’re ready!
- Cooling Down: Carefully take the pans out of the oven and let them cool on a wire rack for about 15-20 minutes. This lets them firm up slightly. Then, run a thin knife around the edges if needed, and flip them out onto the wire rack. Peel off the parchment paper. Now, the hardest part: let the cakes cool down completely. Trying to frost warm cakes leads to a melty mess, so patience is golden!
Whipping Up That Luscious Frosting
This frosting is rich, smooth, and tastes as good as it looks in the picture!
- Cream That Butter: In a large bowl with an electric mixer, beat the softened butter on medium speed for 2-3 minutes until it looks pale and fluffy.
- Cocoa Time: Sift the cocoa powder right into the butter. Start mixing on low (to avoid a cocoa cloud!) until it’s all mixed in. Sifting ensures no surprise lumps in the smooth frosting.
- Sweeten It Up: Now, add the powdered sugar, about a cup at a time, alternating with pouring in a little milk. Mix on low speed first after each addition, then bump it up to medium. Scrape down the bowl sides often.
- Flavor Boost: Once the sugar and milk are playing nicely together, mix in the vanilla extract and that tiny pinch of salt. Salt might seem odd, but it really makes the chocolate flavor sing!
- Get It Fluffy: Keep beating on medium-high speed for another 2-3 minutes. The frosting should become light, airy, and wonderfully smooth. If it seems too stiff, add a tiny bit more milk (a teaspoon at a time). If it looks too soft, add a little more powdered sugar. It should be thick but spreadable, just like the frosting holding the cake layers together in the photo.
Putting Your Cake Together
The moment has arrived! Let’s assemble this beauty.
- Level Heads (Optional but helpful): If the cakes baked up with rounded tops (which happens!), a long serrated knife can gently trim them flat. This helps the layers sit neatly on top of each other.
- Bottom Layer: Place one cooled cake layer, flat-side-up, onto the plate or stand where it will live.
- Fill the Middle: Spoon a nice big dollop of frosting (around 1 to 1.5 cups) onto the center of this layer. Use an offset spatula or the back of a spoon to spread it evenly almost to the edge. This creates that yummy thick filling we saw in the picture.
- Top Layer On: Gently place the second cake layer on top, this time with the flat bottom side facing up. This gives a perfectly level top surface for frosting! Give it a gentle press to settle it.
- Frost All Over: Now cover the top and sides with the rest of the frosting. Start on top, spreading it smoothly. Then frost the sides. Don’t stress about perfection.
- The Final Flourish: Remember that lovely cocoa dusting in the picture? Grab a fine-mesh sieve, put a tablespoon or two of cocoa powder in it, and hold it over the cake. Gently tap the side of the sieve, letting the cocoa powder drift down evenly over the top like soft snow.
Time to Enjoy!
And there it is – a stunning homemade chocolate cake! To get those clean slices like in the photo, use a sharp knife. Dipping the blade in hot water and wiping it dry between cuts can work wonders. Seeing those neat layers and tasting that rich chocolate is such a treat.
Building this cake is a genuinely enjoyable process, turning simple pantry staples into something quite special. Hopefully, bakers feel inspired to give it a whirl! Sharing a photo of the finished cake is always fun – it’s wonderful to celebrate kitchen successes. Happy baking, and enjoy every delicious mouthful!