Cute Crochet Romper Two Ways
Today, we’re making that adorable baby romper and hat set from the picture, but with a twist! We’ll guide you through making it in two ways: a super easy version perfect for beginners, and a more detailed approach for those ready for a bit more challenge.
Whether you’re picking up a hook for the first time or looking to expand your skills, this project has something for you. Imagine creating a handmade treasure, either with simple stitches or with a more intricate design – both will be filled with love and perfect for a special little one! Let’s dive into the wonderful world of crochet and create something beautiful, no matter your skill level!
Materials You’ll Need
No matter which version you choose, you’ll need these materials. Gathering them first will make your crochet journey smoother and more enjoyable!
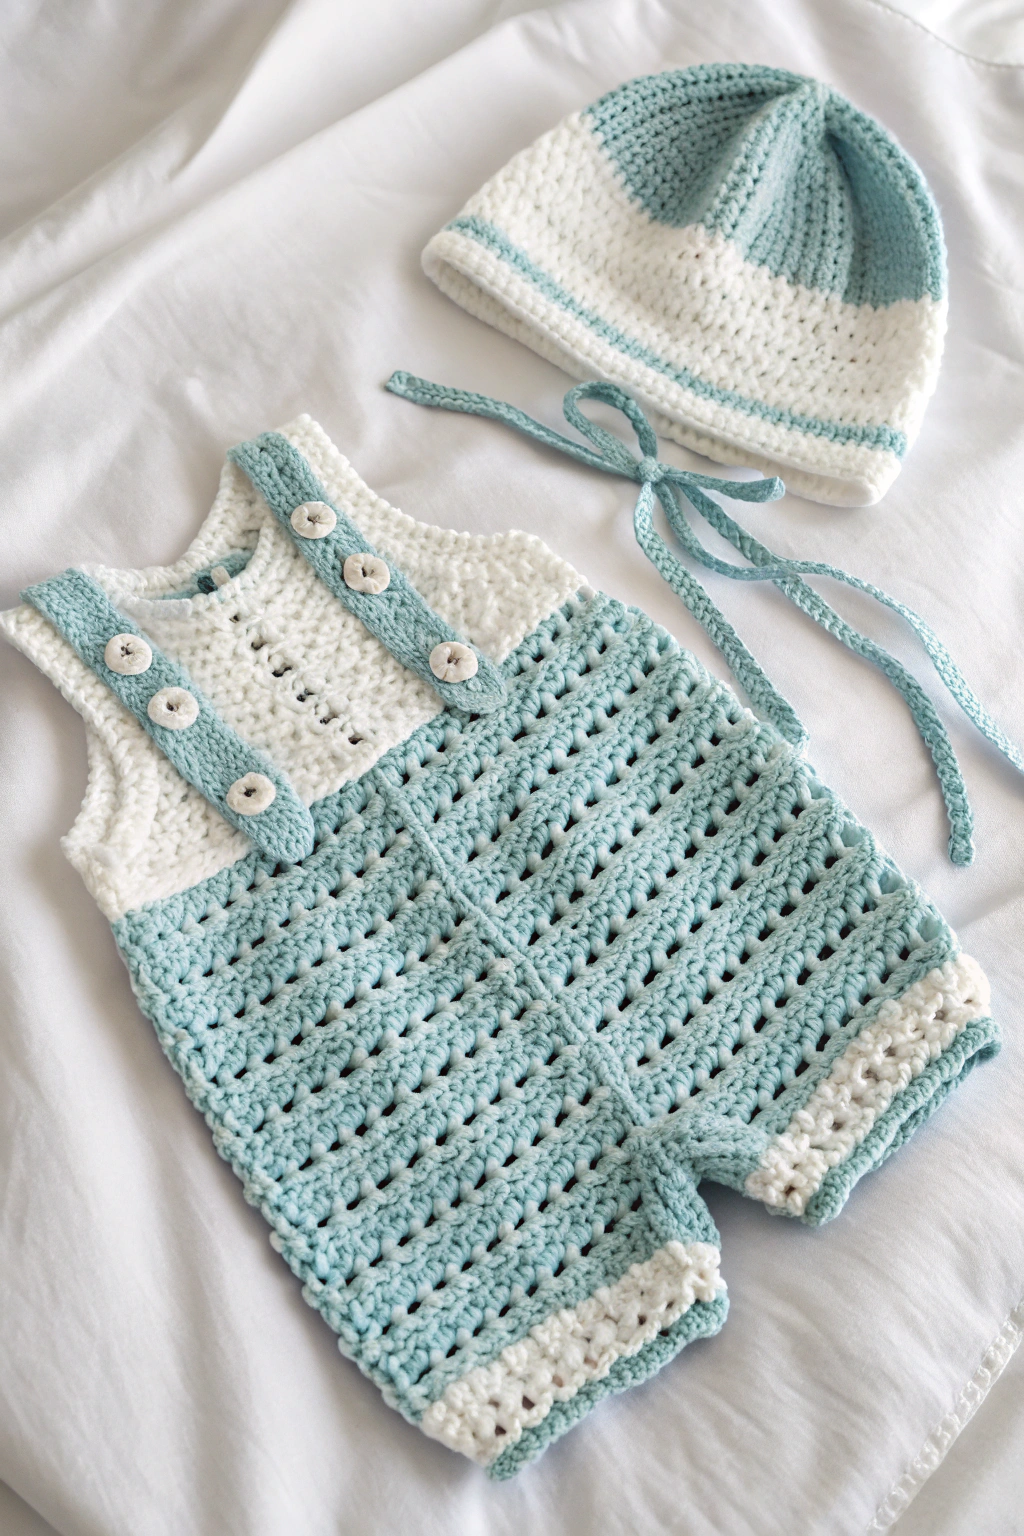
- 🧶 Yarn: Soft baby yarn in two colors – light blue and white, like in the image. Baby yarn is gentle on delicate skin. About 200g light blue, 100g white for newborn size. Worsted weight (medium thickness) is great for all levels.
- 🪡 Crochet Hook: 4.0 mm (G/6) hook works well with worsted weight yarn, creating a nice fabric density.
- ✂️ Scissors: For cutting yarn. Any scissors will do!
- 🔘 Buttons: Four small buttons (around 1.5 cm or 0.5 inch diameter) for the romper straps. Choose colors that match your yarn.
- 🧵 Yarn Needle (Tapestry Needle): Large eye, blunt tip – for weaving in yarn ends and attaching buttons neatly.
- 📏 Measuring Tape: To check the size as you crochet.
Part 1: The Basic Version – Beginner-Friendly Romper Guide
This first part is for absolute beginners! We’ll use simple stitches to create a charming romper set. It won’t be exactly like the intricate image, but it will be a beautiful handmade piece and a fantastic way to learn crochet basics.
Getting Started: Magic Knot and Chain (Basic Version)
- Make a Slip Knot: Create a loop, reach through, pull another loop through, tighten on your hook. Starting knot done!
- Making a Chain (ch): Yarn over (wrap yarn around hook), pull through the loop on hook. Repeat to make a chain – like a crochet braid!
Creating Romper Legs (Make Two – Basic Version)
We’ll start with the legs. Two identical pieces needed. Refer to the image for the blue leg parts.
- Chain for the Leg: With light blue yarn, chain 30. Leg width started!
- First Row of Double Crochet (dc): Skip first 3 chains (counts as 1st dc). Yarn over, insert hook into 4th chain. Yarn over, pull through (3 loops on hook). Yarn over, pull through 2 loops (2 loops left). Yarn over, pull through last 2 loops. That’s a double crochet! Double crochet in each chain to the end. 27 double crochet stitches total (first 3 chains count as one).
- Continuing the Leg (Rows 2-15): Chain 3 (counts as dc), turn your work. Double crochet in each stitch across. Repeat for 15 rows, or leg length about 12 cm (5 inches). Measure with tape.
- Finishing the First Leg: After 15 rows, cut yarn, leaving 15cm (6 inch) tail. Pull tail through last loop, tighten. “Fasten off” – secured! Weave in tail later.
- Make the Second Leg: Repeat steps 1-4 for a second leg, same as the first. Two legs ready!
Joining Legs & Romper Body (Basic Version)
Joining legs to form the body. See image for leg joining.
- Position Legs: Side-by-side, right side up, top edges facing each other.
- Join with Chain: Light blue yarn, slip knot on hook. Slip stitch into corner of one leg to join yarn. Chain 10 chains.
- Attach to Second Leg: Count 10 stitches from corner of second leg, slip stitch in 10th stitch. Legs joined with chain bridge!
- Continue in Rounds: Crochet in rounds for body. Working around joined legs and chain bridge. Chain 3 (counts as dc). Double crochet around first leg edge, all the way around. At chain bridge, double crochet 10 times into bridge (1 dc per chain). Double crochet around second leg. Join with slip stitch to first dc of round. First body round complete!
- Rounds 2-12 of Body: Chain 3 (counts as dc). Double crochet in each stitch around. Slip stitch to join. Repeat for 12 rounds, body part about 15cm (6 inches) long from join.
- Change to White Yarn: Switch to white yarn for top part. In last stitch of round 12, before final yarn over, drop blue yarn. Pick up white yarn, yarn over with white, pull through last 2 loops. Complete stitch with white. Cut blue yarn, leave small tail.
- White Rows (Rows 13-16): White yarn, chain 1 (doesn’t count as stitch). Single crochet (sc) for white part (shorter, tighter stitch). Single crochet: insert hook, yarn over, pull loop (2 loops on hook), yarn over, pull through both loops. Single crochet in each stitch around. Slip stitch to join. Chain 1, repeat for 3 more rows (4 white rows total).
- Fasten Off White Yarn: Fasten off white yarn like blue yarn.
Creating Straps (Make Two – Basic Version)
Shoulder straps with buttons, like the image.
- Chain for Strap: Light blue yarn, chain 6.
- Single Crochet Straps (Rows 1-20): Single crochet in 2nd chain from hook, and each chain across (5 sc stitches). Chain 1, turn. Repeat for 20 rows, strap about 15cm (6 inches) long.
- Fasten Off Strap: Fasten off blue yarn.
- Make Second Strap: Repeat steps 1-3 for second strap, same as first.
Attaching Straps & Buttons (Basic Version)
Attach straps and sew buttons.
- Position Straps: Romper flat, front up. Position one strap end at back top edge, 5cm (2 inches) from side. Other end to front. See image for placement.
- Sew Straps: Yarn needle, light blue yarn. Sew back strap ends to romper back securely. Repeat for other strap.
- Position Buttons: Buttons on front white part. Two buttons each side, evenly spaced. See image.
- Sew Buttons: Yarn needle, white thread/yarn. Sew buttons securely to romper front, aligned with straps for buttoning.
Optional Edging (Basic Version)
White single crochet edging for leg and top openings for a neat finish.
- Attach White Yarn: White yarn, slip knot, slip stitch to leg opening edge.
- Single Crochet Edging: Single crochet around entire leg opening edge. Slip stitch to join, fasten off. Repeat for other leg and top edge.
Part 2: Level Up! Achieving a Look Closer to the Image (More Advanced)
Ready to take it further? This part is for crocheters with some experience who want to create a romper set that more closely resembles the beautiful, intricate look in the image. We’ll explore stitch patterns and details to elevate your project!
Intricate Stitch Patterns for the Blue Sections (Advanced)
The basic version uses simple double crochet. For a look closer to the image, try these stitch patterns in the blue sections instead of double crochet:
- V-Stitch: Creates a lovely open, lacy look. Search online for “V-stitch crochet tutorial” to learn this stitch. It’s a step up from double crochet but still manageable.
- Filet Crochet Mesh: Forms square openings for a delicate, airy fabric. Look for “filet crochet mesh tutorial” to see how to create this grid-like pattern.
- Simple Mesh Pattern: Alternate double crochet and chain stitches (e.g., double crochet, chain 1, skip stitch, repeat). Search “easy crochet mesh pattern” for variations.
How to Use These Patterns:
When you reach the blue sections in the “Basic Version” instructions (legs and lower body), instead of double crochet, use your chosen stitch pattern. You’ll need to adapt slightly, but the basic construction (number of rows, joining legs) remains the same. Important: We won’t provide step-by-step instructions for these advanced stitches here, but many excellent tutorials are available online!
Decorative Edging Details (Advanced)
Instead of the simple single crochet edging, add more flair with these options:
- Picot Edge: Creates small points or “spikes” for a delicate, fancy edge. Search “picot edge crochet tutorial”.
- Shell Edge: Forms scalloped or shell-like shapes for a pretty, feminine finish. Look up “shell stitch crochet edging”.
- Contrasting Color Edge: Use a different color yarn (perhaps a slightly darker blue or a pastel shade) for the edging to make it pop.
How to Use Decorative Edging:
After finishing the romper and hat, instead of the basic single crochet edge, apply your chosen decorative edging around the leg openings and top edge. Again, online tutorials are your best resource for learning these techniques.
Elevating the Hat Design (Advanced)
The hat in the image is more than just a basic beanie! To create a similar hat:
- Search for “Crochet Baby Bonnet Pattern with Ties”: This will give you patterns for hats that tie under the chin, like the image.
- Look for “Two-Color Crochet Baby Bonnet Pattern”: Find patterns that incorporate two colors, allowing you to match the romper set perfectly.
These bonnet patterns will likely have more detailed shaping and construction than a simple hat.
Personalize and Experiment! (Advanced)
The beauty of handmade is making it your own!
- Combine Stitches: Mix and match stitch patterns for a unique texture.
- Color Play: Experiment with different color combinations.
- Add Embellishments: Consider adding small crochet flowers, ribbons, or other decorative elements.
Don’t be afraid to get creative and make this project truly yours!
Finishing Touches & Sharing Your Joy
No matter which version you made, the final steps are the same!
- Weave in Yarn Ends: Yarn needle, weave loose ends into the wrong side, snip excess. Neat and secure!
- Check Buttons & Straps: Ensure buttons are secure and straps button easily.
- Admire Your Creation! You made a beautiful baby romper set with your own hands. Feel proud!
Your handmade baby romper set is now ready to be gifted or worn! We hope you enjoyed this crochet project, whatever level you chose. Remember, every stitch grows your skills. Embrace the learning and the joy of creating.