Cute Crochet Baby Booties: Beginner Friendly
Welcome to the wonderful world of crochet! There’s a special joy in creating something beautiful and functional with your own hands, and what could be more delightful than crafting tiny, adorable booties for a little one? These easy crochet baby booties are the perfect project for beginners, offering a gentle introduction to crochet while resulting in a precious handmade gift. Imagine the satisfaction of gifting these soft, cozy booties to an expecting parent or watching a baby take their first steps in something you lovingly created. Let’s embark on this rewarding crochet journey together!
What You’ll Need to Get Started:
- 🧶 Yarn: Worsted weight yarn in three colors: white, pastel pink, and pastel blue (or colors of your choice). A soft acrylic or cotton blend is ideal for baby items.
- 🪡 Crochet Hook: Size H-8 (5.0 mm) crochet hook. Adjust hook size if needed to match your yarn and achieve a tight, even stitch.
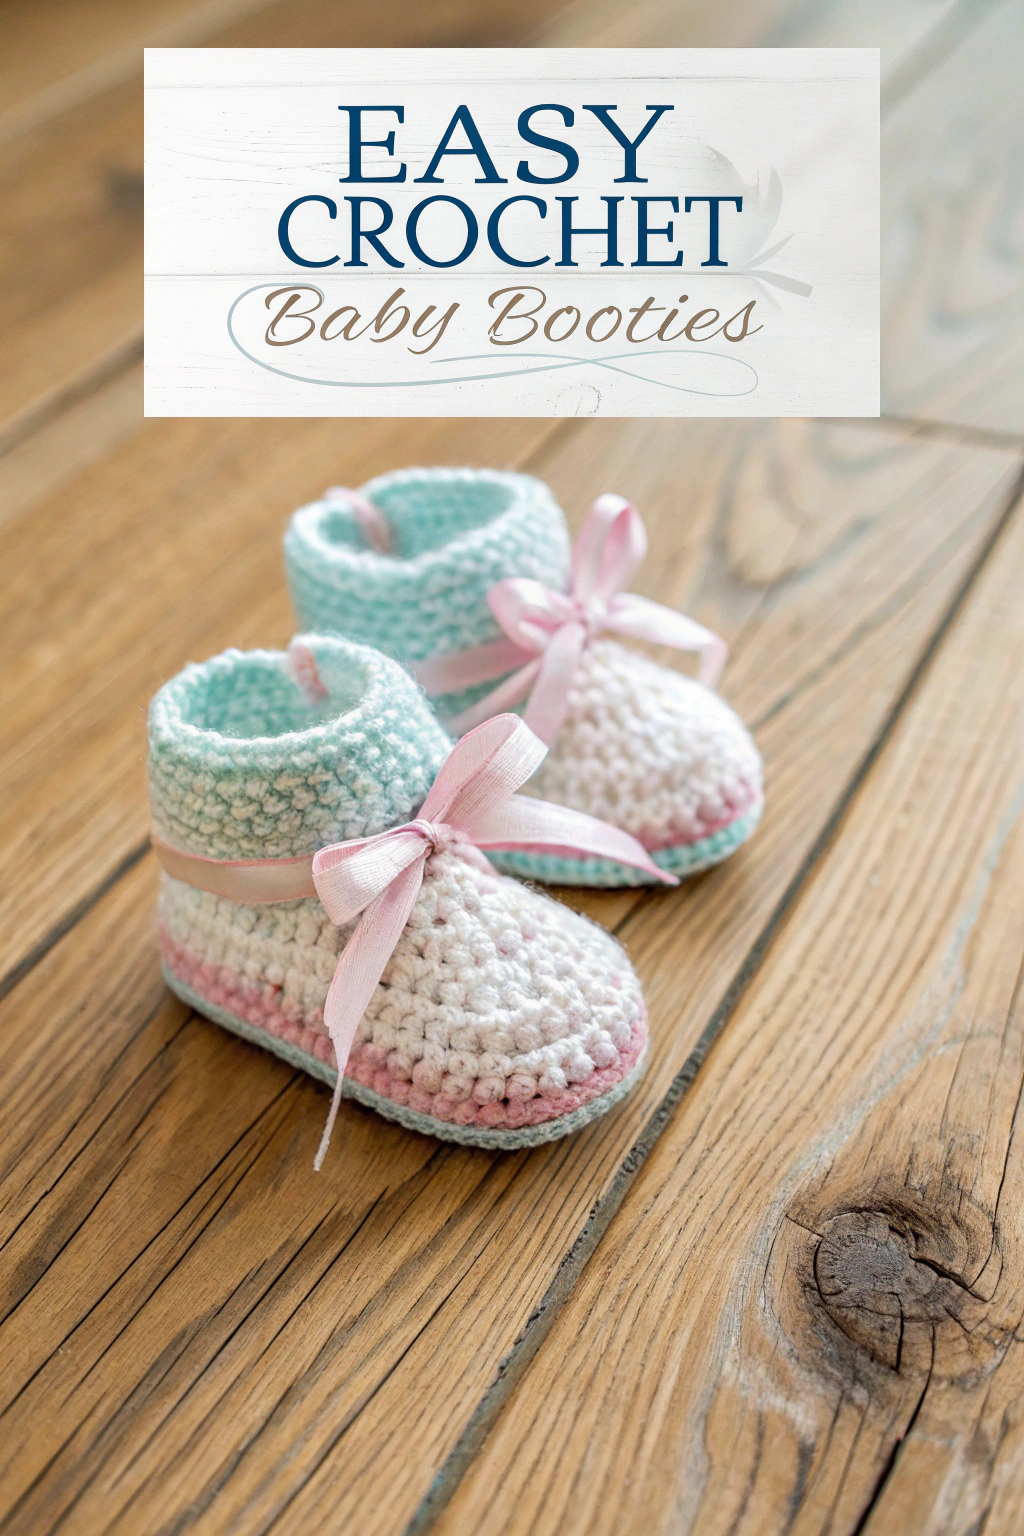
- 🎀 Ribbon: Approximately 1 yard of narrow satin ribbon in a coordinating color (light pink as seen in the image works beautifully).
- ✂️ Scissors: For cutting yarn and ribbon.
- 🧵 Yarn Needle: For weaving in yarn ends to create a neat finish.
Let’s Learn the Basic Crochet Stitches:
Before we begin crafting our baby booties, let’s familiarize ourselves with a few essential crochet stitches. Don’t worry if you’re completely new to crochet; we’ll guide you through each step with clear explanations. The stitches we’ll be using are chain stitch and single crochet, the building blocks of many crochet projects, and particularly perfect for these booties.
First, the chain stitch (ch) is the foundation of most crochet work. To make a chain stitch, create a slip knot on your hook, yarn over (wrap the yarn around your hook from back to front), and pull the yarn through the loop on your hook. This creates your first chain stitch. Repeat this process to create a chain of desired length. Practice making a chain until you feel comfortable with the movement.
Next, we’ll use the single crochet (sc) stitch, which creates a dense and sturdy fabric, perfect for baby booties. To make a single crochet, insert your hook into the designated stitch, yarn over, and pull up a loop (you will have two loops on your hook). Yarn over again and pull through both loops on your hook. This completes one single crochet stitch. Refer to online video tutorials if you need a visual demonstration of these stitches; seeing them in action can be incredibly helpful for beginners.
Step-by-Step Guide to Crocheting Baby Booties:
Now that we’ve covered the basic stitches, let’s begin crocheting our baby booties! We’ll start with the sole, then move onto the sides and cuff, and finally add the charming ribbon ties. Follow these steps carefully, and don’t hesitate to pause and re-read sections as needed. Remember, practice makes perfect, and the most important thing is to enjoy the process of creating.
Step 1: Creating the Sole. With your white yarn, begin by chaining 9 stitches. This chain will form the base of the sole. In the second chain from the hook, work 2 single crochet stitches. Then, work 1 single crochet in each of the next 6 chains. In the last chain, work 5 single crochet stitches. Now, working on the opposite side of the chain, work 1 single crochet in each of the next 6 chains, and finally, work 2 single crochet stitches in the last chain. Slip stitch to the first single crochet to join the round. You’ve completed the first round of the sole. Notice in the image the oval shape starting to form, this is the base of our bootie sole.
For the second round, chain 1 (this does not count as a stitch), then work 2 single crochet stitches in the first stitch. Work 1 single crochet in each of the next 8 stitches. Work 2 single crochet stitches in each of the next 5 stitches. Work 1 single crochet in each of the next 8 stitches. Work 2 single crochet stitches in each of the last 2 stitches. Slip stitch to the first single crochet to join. You should have a slightly larger oval shape now, forming a gently widening sole. These increases shape the sole and create space for the baby’s foot.
For the third round, chain 1, then work 2 single crochet stitches in the first stitch. Work 1 single crochet in each of the next 13 stitches. Work 2 single crochet stitches in each of the next 5 stitches. Work 1 single crochet in each of the next 13 stitches. Work 2 single crochet stitches in each of the last 2 stitches. Slip stitch to the first single crochet to join. Fasten off white yarn and weave in the ends. The sole of your baby bootie is now complete. Refer to the image to see the flat, slightly oval shape of the sole.
Step 2: Building the Sides. Now, let’s switch to the pastel pink yarn to create the sides of the bootie. Join the pink yarn with a slip stitch anywhere along the edge of the sole. Chain 1. Work 1 single crochet in the back loop only of each stitch around the entire sole. This technique of working in the back loop only creates a nice ridge and helps to define the sole from the sides. Slip stitch to the first single crochet to join. This round establishes the base of the bootie’s sides.
For the next 3 rounds, chain 1, and work 1 single crochet in both loops of each stitch around. Slip stitch to the first single crochet to join at the end of each round. These rounds will build up the height of the bootie sides. You can see in the image how the pink section forms a distinct band above the white sole.
Fasten off the pink yarn and weave in the ends. You should now have a little cup shape with a defined sole and pink sides. Take a moment to appreciate how your bootie is taking shape!
Step 3: Crafting the Cuff. It’s time to add the pastel blue cuff! Join the blue yarn with a slip stitch anywhere along the top edge of the pink section. Chain 1. Work 1 single crochet in each stitch around. Slip stitch to the first single crochet to join. Repeat this round 4 more times, for a total of 5 rounds in blue. This creates the folded-over cuff seen in the image, adding a soft and cozy finish to the booties.
For the final round of the cuff, we will create a simple picot edge for a decorative touch. Chain 1, work 1 single crochet in the next stitch. Chain 3, slip stitch into the first chain you made (this creates a small picot point). Skip the next stitch, and work 1 single crochet in the stitch after that. Repeat from * to * around. Slip stitch to the first single crochet to join. Fasten off blue yarn and weave in all remaining ends. The picot edge adds a delicate, finished look to the cuff. Observe in the image the subtle picot detail along the blue cuff edge.
Step 4: Adding the Ribbon Ties. To add the finishing touch, we’ll weave a pretty ribbon through the cuff to create adorable ties. Cut your satin ribbon in half, creating two equal lengths. For each bootie, weave a ribbon in and out through the stitches of the second blue round from the top of the cuff, going all the way around. Start at the back of the bootie, bring the ribbon to the front, and tie it in a sweet bow. The ribbon not only adds a decorative element but also helps to gently secure the booties on baby’s feet. See in the image how the pink ribbon is threaded and tied into a bow at the front of the booties.
Congratulations!
You’ve just crocheted a beautiful pair of baby booties! Take a moment to admire your handiwork. These little booties are not only incredibly cute but also a testament to your creativity and skill. Making things by hand is such a rewarding experience, and these booties are sure to be treasured. Don’t be discouraged if your first attempt isn’t perfect; each stitch you make is a step forward in your crochet journey.
We encourage you to try making more pairs in different color combinations to match any outfit or occasion. Handmade baby booties make wonderful gifts for baby showers, birthdays, or just because. Share your creations with friends and family, and spread the joy of handmade crafts! And most importantly, share photos of your finished booties! We’d love to see your adorable creations and celebrate your crochet success. Happy crocheting!