Crochet Your Own Chic Striped Tote Bag
Are you ready to dive into a fun and rewarding crochet project? Today, we’re going to make this absolutely adorable striped tote bag! This project is perfect for beginners who are eager to develop their skills and fashion something beautiful and practical. Imagine strolling around with your own handmade tote – how wonderful is that? Let’s get started on this exciting journey of stitches and stripes!
Materials You’ll Need to Get Started
Before we begin, let’s gather all the supplies we need. Having everything ready will make the process smooth and enjoyable. For this project, you will need:
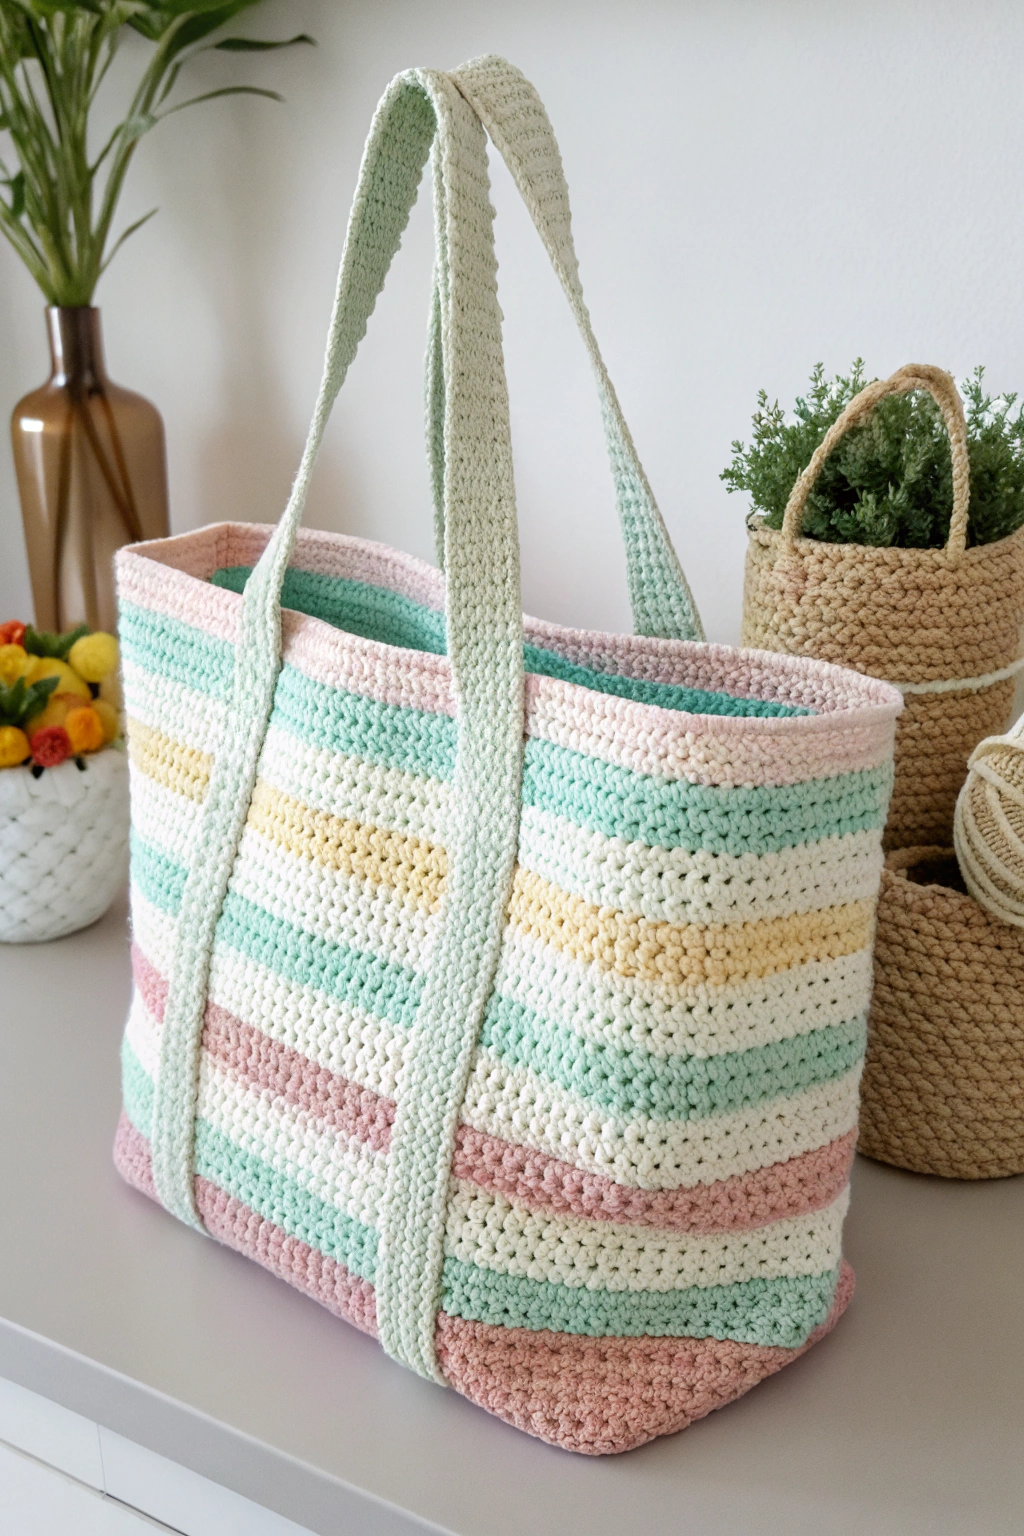
- 🧶 Yarn: You’ll need medium-weight cotton yarn in several colors. Looking at the image, we can see lovely pastel shades: a soft pink for the base and top border, a creamy white, a sunny yellow, a refreshing mint green, and a gentle turquoise for the stripes. Choose colors you love that evoke a similar pastel palette!
- 🪡 Crochet Hook: A 4.0 mm crochet hook is a great size for medium-weight cotton yarn. This size will help you construct a fabric that is dense enough to hold its shape but still soft and pliable.
- ✂️ Scissors: For snipping yarn ends.
- 🧵 Yarn Needle: Also known as a tapestry needle, for weaving in loose ends neatly. This is essential for a polished and professional finish to your crafted tote bag.
- 📌 Stitch Markers (optional): These can be helpful for marking the beginning of rounds, especially if you are new to working in the round.
Getting Ready: Understanding Basic Crochet Stitches
If you’re completely new to crochet, don’t worry! We’ll go through the basics. Think of crochet as building fabric using yarn and a hook. We use different types of loops, called stitches, to achieve different textures and patterns. For this tote bag, we’ll mainly use a very simple stitch called the single crochet.
Imagine you’re forming a chain of loops – that’s the very first step in crochet, called a chain stitch. We’ll use this to start our project. To make a chain stitch, you first fashion a slip knot on your hook (like a loop that tightens). Then, you use your hook to catch the yarn and pull it through the loop on your hook. That’s one chain stitch! Repeat this to build a chain of the desired length.
The single crochet stitch is our main stitch for the bag. It’s a short, dense stitch that produces a sturdy fabric. To craft a single crochet, you insert your hook into a stitch from the previous row or round, catch the yarn with your hook (this is called yarn over), pull the yarn back through the stitch (you’ll now have two loops on your hook), yarn over again, and pull through both loops. Congratulations, you’ve just made a single crochet!
Another stitch we will use is the slip stitch. This is a very simple stitch used to join rounds together and move yarn without adding height. To form a slip stitch, insert your hook into the stitch, yarn over, and pull the yarn directly through both the stitch and the loop on your hook.
These are the basic stitches we’ll use. As we go through the steps to make the tote bag, we’ll explain exactly when and how to use each stitch. Don’t be intimidated, it’s much easier than it sounds once you get started!
Let’s Make the Tote Bag – Step-by-Step
Now for the fun part – actually making our striped tote bag! We’ll start from the bottom and work our way up, building the base, then the body, and finally adding the handles. Refer to the image to see how the different parts come together.
Forming the Base
The base of our tote bag is a rectangular shape, fashioned in single crochet with soft pink yarn. We’ll start by making a chain and then working in rows to develop this base.
Round 1: First, construct a chain of 28 chain stitches using the soft pink yarn. This chain will determine the width of the base of your tote. Adjust this number if you desire a wider or narrower base.
Round 2: Now, we’ll work back along the chain to form the first row of single crochet. Skip the first chain from your hook (this skipped chain acts as a turning chain and doesn’t count as a stitch). Single crochet in each of the next 27 chain stitches. When you reach the end of the chain, you’ll have made 27 single crochet stitches. To turn and start the next row, chain 1 (this is your turning chain), and turn your work.
Round 3 – 12 (approximately): Continue working in rows of single crochet. For each row, single crochet in each stitch across the row. At the end of each row, chain 1 and turn. You’ll be building a rectangle, row by row. Keep making rows until your base looks roughly square, similar to what you see in the image, approximately 12 rows or until it appears square to your eye. Refer to the image – you can see a pink base forming a rectangle. After around the 12th row, fasten off the pink yarn and switch to the creamy white yarn. To fasten off, simply cut the yarn leaving a tail, and pull the tail through the loop on your hook and tighten it to secure.
Building the Bag Body
Now we will construct the main body of the tote bag, working in rounds and developing the striped pattern. We’ll attach the creamy white yarn and begin working around the rectangular base we just fashioned.
Round 1: With the creamy white yarn, join with a slip stitch to any stitch on the edge of your pink base. Now, we’ll work single crochet stitches all around the rectangle. Work one single crochet in each stitch along the long side of the rectangle. When you reach a corner, make 3 single crochet stitches in that corner stitch to help the rectangle turn nicely. Continue single crocheting along the next side, fashioning 3 single crochet stitches in each corner, and repeat until you’ve worked all around the rectangle. Join with a slip stitch to the first single crochet of this round. You have now assembled the first round of the bag body!
Round 2 – 5: Continue working in rounds of single crochet with the creamy white yarn. For each round, single crochet in each stitch around. Since we are working in rounds now, you don’t need to chain 1 and turn. Just keep going around and around in a spiral. Join each round with a slip stitch to the first single crochet of the round. After Round 5, fasten off the creamy white yarn and switch to the sunny yellow yarn.
Round 6 – 8: Now we’ll make stripes! With the sunny yellow yarn, work approximately 3 rounds of single crochet, aiming for stripes of roughly equal width as seen in the image. Join each round with a slip stitch. After Round 8, fasten off the yellow yarn and switch to the mint green yarn.
Round 9 – 11: With the mint green yarn, work approximately 3 rounds of single crochet. Join each round with a slip stitch. After Round 11, fasten off the mint green yarn and switch to the turquoise yarn.
Round 12 – 14: With the turquoise yarn, work approximately 3 rounds of single crochet. Join each round with a slip stitch. After Round 14, fasten off the turquoise yarn and switch back to the creamy white yarn.
Round 15 – 18: With the creamy white yarn, work approximately 4 rounds of single crochet. Join each round with a slip stitch. After Round 18, fasten off the creamy white yarn and switch back to the soft pink yarn.
Round 19 – 21: With the soft pink yarn, work approximately 3 rounds of single crochet. Join each round with a slip stitch. After Round 21, fasten off the soft pink yarn.
You can see in the image how these stripes are fashioned, creating a lovely pastel rainbow effect. Feel free to adjust the number of rounds for each color to achieve a look you love! We are building the height of the bag with these colorful stripes!
Crafting the Top Edge
To give the top edge a neat and finished look, we’ll craft a simple border using the soft pink yarn. While the exact border stitch is subtle in the image, reverse single crochet (crab stitch) is a beautiful way to finish the edge.
Round 1: Join the soft pink yarn with a slip stitch. Work one round of single crochet around the top edge of the bag. Join with a slip stitch.
Round 2 (Optional Textured Edge): For a pretty textured edge, you can make a round of reverse single crochet, also known as crab stitch. This stitch is worked backwards, from left to right (if you are right-handed). Chain 1. Insert your hook into the stitch to the right (the stitch you just came from), yarn over, and pull up a loop. Yarn over again, and pull through both loops on your hook. That’s one reverse single crochet! Continue working reverse single crochet in each stitch around the top edge. It might feel a little awkward at first, but keep going! It produces a lovely, neat, and slightly textured border. Alternatively, you can simply work another round of single crochet if you prefer a simpler edge. Join with a slip stitch to the first reverse single crochet (or single crochet if you chose that option). Fasten off the pink yarn.
Fashioning the Handles
Now we need to fashion the handles so we can actually carry our tote bag! We’ll make two sturdy handles and attach them to the bag. As you can see in the image, mint green handles complement the striped design perfectly.
Handle 1 & 2 (Make Two): With the mint green yarn, chain approximately 70 chains. This is a guideline for the length of your handle; adjust if you prefer longer or shorter handles.
Row 1: Skip the first chain from your hook, and single crochet in each of the next chains (approximately 69 stitches, depending on your starting chain). Chain 1, turn.
Row 2 – 5: Single crochet in each stitch across the row. Chain 1, turn. After Row 5, fasten off the mint green yarn. You have now crafted one handle. Assemble a second handle in the same way.
Attaching the Handles: Now, we will assemble the handles onto the bag. Position the handles evenly on the top edge of the bag, mirroring the placement in the image. Using your yarn needle and a length of mint green yarn, sew each handle securely to the inside of the top edge of the bag. Make sure to attach them firmly so they can support the weight of whatever you carry in your tote. Sew each handle on both the front and back of the bag, making sure they are symmetrically placed.
Finishing Touches and Tips for Success
Congratulations! You’ve fashioned your own striped crochet tote bag! Now for a few finishing touches to make it perfect.
- Weave in all loose ends: Use your yarn needle to weave in all the yarn tails securely on the inside of the bag. This will keep your work neat and prevent ends from coming undone.
- Blocking (optional): If your bag is a little uneven or you want to shape it more precisely, you can gently block it. Lightly dampen the bag with water, shape it as desired, and let it air dry. This helps the stitches relax and the bag to hold its shape.
- Color Play: Feel free to experiment with different color combinations for your stripes! Pastels, bright colors, or even monochrome – it’s all up to your personal style. The beauty of handmade is making it uniquely yours!
- Stitch Counts & Flexibility: Don’t worry too much about exact stitch counts, especially if you are a beginner. The important thing is to build a rectangle for the base and then work evenly around for the body, achieving a similar look to the image. Adjust stripe widths and handle lengths to your preference. Focus on enjoying the process of making and crafting something beautiful.
- Practice Makes Perfect: If your first attempt isn’t perfectly identical to the image, don’t be discouraged! Crocheting is a skill that gets better with practice. Keep crafting, and you’ll be amazed at how quickly you improve. Each handmade item has its own unique charm!
Share Your Makes!
We hope you had a wonderful time making this striped crochet tote bag! It’s such a satisfying feeling to produce something beautiful and useful with your own hands. We would absolutely love to see your finished tote bags! Please share photos of your bags on social media – we can’t wait to admire your handiwork and celebrate your crafting journey with you! Happy crocheting!