Crochet Your Own Amigurumi Elephant
Hello fellow crafters! Are you ready to embark on a wonderfully fun journey of yarn and hooks? Today, we’re going to make the most adorable amigurumi elephant you’ve ever seen! Imagine the joy of fashioning this sweet, cuddly friend with your own two hands. It’s easier than you might think, and absolutely perfect for beginners who are eager to learn the magic of crochet. Get ready to pick up your hook and let’s get started!
Materials You’ll Need
Before we begin, let’s gather all the supplies you’ll need to build your very own amigurumi elephant. Having everything ready will make the process smooth and enjoyable.
- 🧶 Yarn: You’ll need worsted weight yarn in grey for the main body of the elephant and pink for the inner ears and cheeks. A soft, acrylic yarn is a great choice for beginners.
- 🪡 Crochet Hook: A 3.5mm or 4.0mm crochet hook is generally a good size for worsted weight yarn. Check the yarn label for their recommended hook size too!
- 👁️ Safety Eyes: You’ll need two safety eyes, around 6mm to 8mm in size, to give your elephant its charming look.
- 솜 Stuffing: Polyester fiberfill is perfect for stuffing your amigurumi and giving it that huggable plumpness.
- ✂️ Yarn Needle: A yarn needle with a large eye is essential for sewing the different parts together and weaving in yarn ends.
- Scissors: A sharp pair of scissors to cut your yarn.
Getting Started: Basic Crochet Stitches
If you’re completely new to crochet, don’t worry! We’ll walk through each stitch you need, step by step. Think of these stitches as the building blocks for our elephant. We’ll use simple stitches to fashion all the parts.
Slip Knot
First, we need to form a slip knot to start crocheting. Take the yarn and make a loop, crossing the yarn end over the yarn coming from the ball. Insert your hook into the loop from front to back, catch the yarn coming from the ball with your hook, and pull it through the loop. Pull both ends of the yarn to tighten the knot around the hook. You’ve just developed your first slip knot!
Chain Stitch (ch)
The chain stitch is the foundation for many crochet projects. To produce a chain stitch, hold your hook with the slip knot on it. Wrap the yarn from back to front over your hook (this is called “yarn over,” often abbreviated as “yo”). Pull the yarn through the loop on your hook. That’s one chain stitch! Repeat this process to make a chain of any length. Imagine you’re pulling a little thread loop through another loop, again and again.
Single Crochet (sc)
Single crochet is a short, tight stitch that’s perfect for amigurumi. Insert your hook into the next stitch (or space) in your work. Yarn over (yo), and pull the yarn through the stitch (you’ll have two loops on your hook). Yarn over again (yo), and pull the yarn through both loops on your hook. You’ve just crafted a single crochet! It’s like making a small, sturdy knot.
Increase (inc)
An increase means making two single crochet stitches in the same stitch. This is how we develop the shape of our elephant. Simply work one single crochet stitch, and then work another single crochet stitch right into the same stitch again. You’ve just increased your stitches!
Decrease (dec)
A decrease helps to narrow your crochet piece. For an invisible decrease (often used in amigurumi to make decreases less noticeable), insert your hook into the front loop only of the next stitch. Then, insert your hook into the front loop only of the stitch after that. Yarn over (yo), and pull the yarn through both front loops (you’ll have two loops on your hook). Yarn over again (yo), and pull the yarn through both loops on your hook. You’ve just fashioned a decrease! It’s like joining two stitches into one.
Slip Stitch (sl st)
The slip stitch is a very short stitch used to join rounds or finish off pieces. Insert your hook into the stitch. Yarn over (yo), and pull the yarn through the stitch and through the loop already on your hook in one smooth motion. It’s a simple way to move across stitches without adding height.
Magic Ring (MR)
The magic ring is a fantastic way to start crocheting in the round, especially for amigurumi, because it closes up the center hole nicely. Wrap the yarn around your fingers to form a loop, crossing the yarn end over the yarn coming from the ball. Insert your hook into the loop, yarn over (yo), and pull up a loop (like making a chain stitch within the loop). Now, work your first round of stitches (usually single crochet) directly into this loop, working over both strands of yarn from the loop. After completing the round, pull the yarn tail to tighten the ring closed. This constructs a perfect, closed circle to begin your project.
Let’s Make the Elephant: Step-by-Step Guide
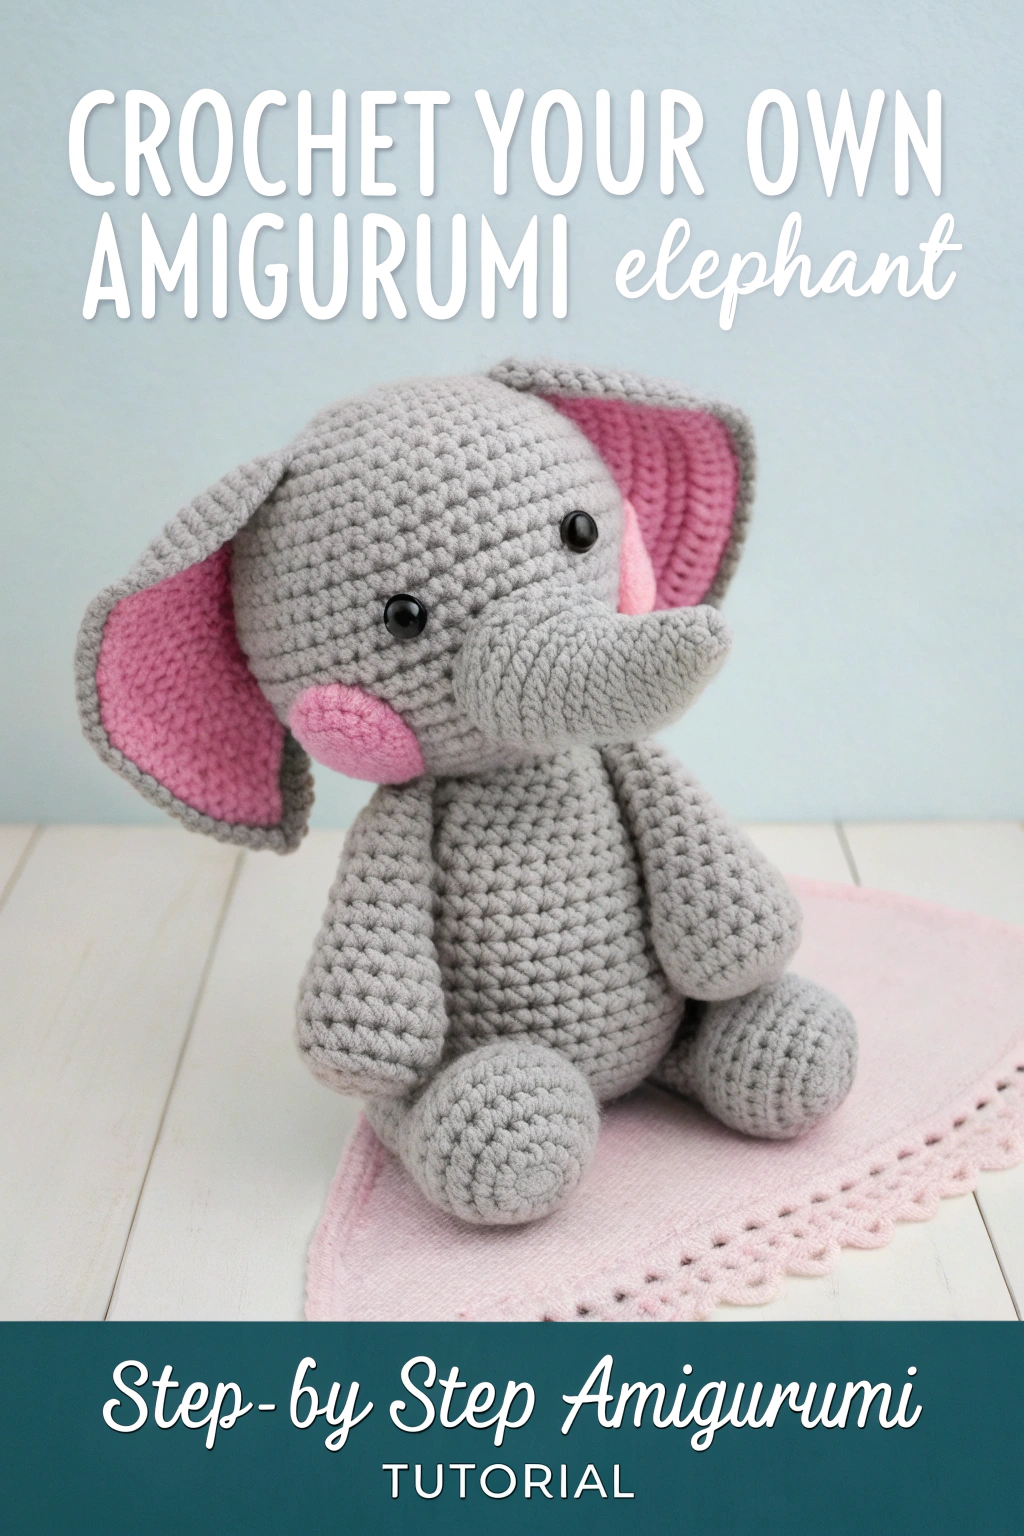
Now for the fun part – actually making our adorable elephant! We’ll work in rounds, which means we’ll crochet in spirals to build each part of the elephant. Refer to the image to see how each piece should look as we go.
Head
We’ll start with the head, developing the main shape first. We’ll use grey yarn for this.
Round 1: 6 sc in a magic ring (6 stitches). Remember the magic ring? Construct a magic ring and then work 6 single crochet stitches right into that ring.
Round 2: Inc in each stitch around (12 stitches). An increase in each stitch means you’ll be doing 2 single crochet stitches in every stitch from the previous round.
Round 3: (sc, inc) repeat 6 times (18 stitches). This means you’ll alternate between one single crochet and then an increase, repeating this pattern six times in total.
Round 4: (sc 2, inc) repeat 6 times (24 stitches). Now, you’ll do two single crochet stitches, then an increase, and repeat that six times.
Round 5: (sc 3, inc) repeat 6 times (30 stitches). Following the pattern, you’ll now do three single crochets, then an increase, repeated six times.
Round 6: (sc 4, inc) repeat 6 times (36 stitches). You’re getting the hang of it! Four single crochets, then an increase, six times around.
Round 7-13: sc in each stitch around (36 stitches). For these seven rounds, you’ll simply single crochet in every stitch. This will start to form the height and roundness of the head. Refer to the image to see the shape taking form.
Round 14: (sc 4, dec) repeat 6 times (30 stitches). Now we start decreasing to shape the head. Four single crochets, then a decrease, repeated six times.
Round 15: (sc 3, dec) repeat 6 times (24 stitches). Three single crochets, then a decrease, six times around.
Round 16: (sc 2, dec) repeat 6 times (18 stitches). Two single crochets, then a decrease, six times around.
Round 17: (sc, dec) repeat 6 times (12 stitches). One single crochet, then a decrease, six times around.
Round 18: dec repeat 6 times (6 stitches). Decrease in every stitch around.
Fasten off, leaving a long tail for sewing. “Fasten off” means to cut the yarn, pull the loop on your hook wider to undo the last stitch, and then pull the yarn tail all the way through the loop and tighten it to secure the end. Weave in the end, or leave it long for sewing later. You have now fashioned the elephant’s head!
Body
Next, we’ll construct the body, which is also grey.
Round 1: 6 sc in a magic ring (6 stitches).
Round 2: Inc in each stitch around (12 stitches).
Round 3: (sc, inc) repeat 6 times (18 stitches).
Round 4: (sc 2, inc) repeat 6 times (24 stitches).
Round 5: (sc 3, inc) repeat 6 times (30 stitches).
Round 6: (sc 4, inc) repeat 6 times (36 stitches).
Round 7-12: sc in each stitch around (36 stitches). These rounds will develop the body’s height.
Round 13: (sc 4, dec) repeat 6 times (30 stitches).
Round 14: (sc 3, dec) repeat 6 times (24 stitches).
Round 15: (sc 2, dec) repeat 6 times (18 stitches).
Round 16: (sc, dec) repeat 6 times (12 stitches).
Round 17: dec repeat 6 times (6 stitches).
Fasten off, leaving a long tail for sewing.
Ears (Make 2)
We need to make two ears, each with a grey outer part and a pink inner part. We’ll start with the grey part.
Grey Part (Make 2):
Round 1: 6 sc in a magic ring (6 stitches).
Round 2: Inc in each stitch around (12 stitches).
Round 3: (sc, inc) repeat 6 times (18 stitches).
Round 4: (sc 2, inc) repeat 6 times (24 stitches).
Round 5: (sc 3, inc) repeat 6 times (30 stitches).
Round 6: (sc 4, inc) repeat 6 times (36 stitches).
Round 7: (sc 5, inc) repeat 6 times (42 stitches).
Round 8: (sc 6, inc) repeat 6 times (48 stitches).
Round 9: (sc 7, inc) repeat 6 times (54 stitches).
Round 10: (sc 8, inc) repeat 6 times (60 stitches).
Round 11-13: sc in each stitch around (60 stitches).
Fasten off the grey part of both ears. Now, we’ll fashion the pink inner ear pieces.
Pink Part (Make 2):
Round 1: 6 sc in a magic ring (6 stitches).
Round 2: Inc in each stitch around (12 stitches).
Round 3: (sc, inc) repeat 6 times (18 stitches).
Round 4: (sc 2, inc) repeat 6 times (24 stitches).
Round 5: (sc 3, inc) repeat 6 times (30 stitches).
Round 6: (sc 4, inc) repeat 6 times (36 stitches).
Round 7: (sc 5, inc) repeat 6 times (42 stitches).
Round 8: (sc 6, inc) repeat 6 times (48 stitches).
Round 9: (sc 7, inc) repeat 6 times (54 stitches).
Round 10: (sc 8, inc) repeat 6 times (60 stitches).
Fasten off the pink part of both ears. Now, place a pink inner ear piece on the back of each grey ear piece and sew them together around the edges using the pink yarn tail and your yarn needle. You’ve assembled the ears! Notice in the image how the pink part peeks out from the grey.
Trunk
Let’s develop the trunk, using grey yarn again.
Round 1: 6 sc in a magic ring (6 stitches).
Round 2: Inc in each stitch around (12 stitches).
Round 3: (sc, inc) repeat 6 times (18 stitches).
Round 4-18: sc in each stitch around (18 stitches). These rounds will form the length of the trunk.
Fasten off, leaving a long tail for sewing. The trunk should be a long, slightly curved piece. You can gently curve it as you stuff it.
Legs (Make 4)
We need to make four legs, all in grey.
Round 1: 6 sc in a magic ring (6 stitches).
Round 2: Inc in each stitch around (12 stitches).
Round 3: (sc, inc) repeat 6 times (18 stitches).
Round 4-9: sc in each stitch around (18 stitches). These rounds will construct the leg cylinders.
Fasten off, leaving a long tail for sewing on each leg.
Cheeks (Make 2)
Finally, we’ll fashion the pink cheeks.
Round 1: 6 sc in a magic ring (6 stitches).
Round 2: Inc in each stitch around (12 stitches).
Round 3: (sc, inc) repeat 6 times (18 stitches).
Round 4: (sc 2, inc) repeat 6 times (24 stitches).
Round 5: sc in each stitch around (24 stitches).
Fasten off, leaving a long tail for sewing. These cheeks will add a touch of sweetness to our elephant’s face.
Assembly
Now comes the exciting part – putting all our pieces together to build our elephant!
- Stuffing: Stuff the head, body, trunk, and legs firmly with polyester fiberfill. Make sure they are nicely rounded and plump. Don’t overstuff, but ensure they are firm enough to hold their shape.
- Attaching the Head and Body: Sew the head to the top of the body using the yarn tails and your yarn needle. Position it centrally and securely.
- Attaching the Legs: Sew the four legs to the bottom of the body. Look at the image to see how they are positioned to allow the elephant to sit nicely. Two legs at the front and two at the back.
- Attaching the Ears: Sew the ears to the sides of the head, a few rounds down from the top. Refer to the image for placement – they should be positioned to frame the face nicely.
- Attaching the Trunk: Sew the top of the trunk to the center of the face, between the eyes. The trunk should curve downwards.
- Attaching the Cheeks: Sew the pink cheeks to the face, just below the eyes and to the sides of the trunk. See in the image how they add a lovely touch to the face.
- Adding Safety Eyes: Insert the safety eyes into the head between Rounds 10 and 11, approximately 5 stitches apart. Make sure they are securely fastened.
- Embroidering the Mouth: Using grey yarn and your yarn needle, embroider a small, simple smile below the trunk. Just a few stitches will do!
Finishing Touches and Sharing Your Amigurumi
Congratulations! You’ve successfully assembled your own adorable amigurumi elephant! Isn’t it wonderful to see what you can make with just yarn and a hook? Take a moment to admire your handiwork. You have fashioned a truly special handmade friend.
Feel free to add your own personal touches! Maybe a little bow, or some embroidered details. The joy of crafting is in making it your own. Now, we’d absolutely love to see your amazing elephant creations! Please share photos of your finished amigurumi elephant online and tag us! It’s so inspiring to see everyone’s unique versions.
Happy crocheting, and remember, every stitch you make is a step towards crafting something beautiful and meaningful!