Crochet Your Own Adorable Kitty Cuddler!
Get ready to cast on and make the cutest crocheted cat plushie you’ve ever seen! This project is purr-fect for beginners eager to dive into the wonderful world of crochet. With just a few basic stitches and a sprinkle of yarn magic, you can fashion your very own cuddly feline friend, just like the one in the picture. Let’s get started on this fun and rewarding journey together!
Materials You’ll Need to Build Your Kitty
Before we begin, gather your supplies. Having everything ready will make the making process smooth and enjoyable!
- 🧶Worsted weight yarn in cream or light beige (for the main body)
- 🧶Worsted weight yarn in light brown or darker beige (for the muzzle, paws, tail tip, and ear edges)
- 🧶Worsted weight yarn in pink (for the inner ears and nose)
- 🧶Worsted weight yarn in grey (for the collar)
- 🧵Black embroidery floss or thin yarn (for whiskers)
- 4.0mm crochet hook
- 👀Safety eyes (approximately 12mm)
- ☁️Polyester fiberfill stuffing
- 🪡Yarn needle
- ✂️Scissors
- 📍Stitch markers (optional, but helpful for beginners)
Let’s Construct Your Crocheted Cat – Step by Step!
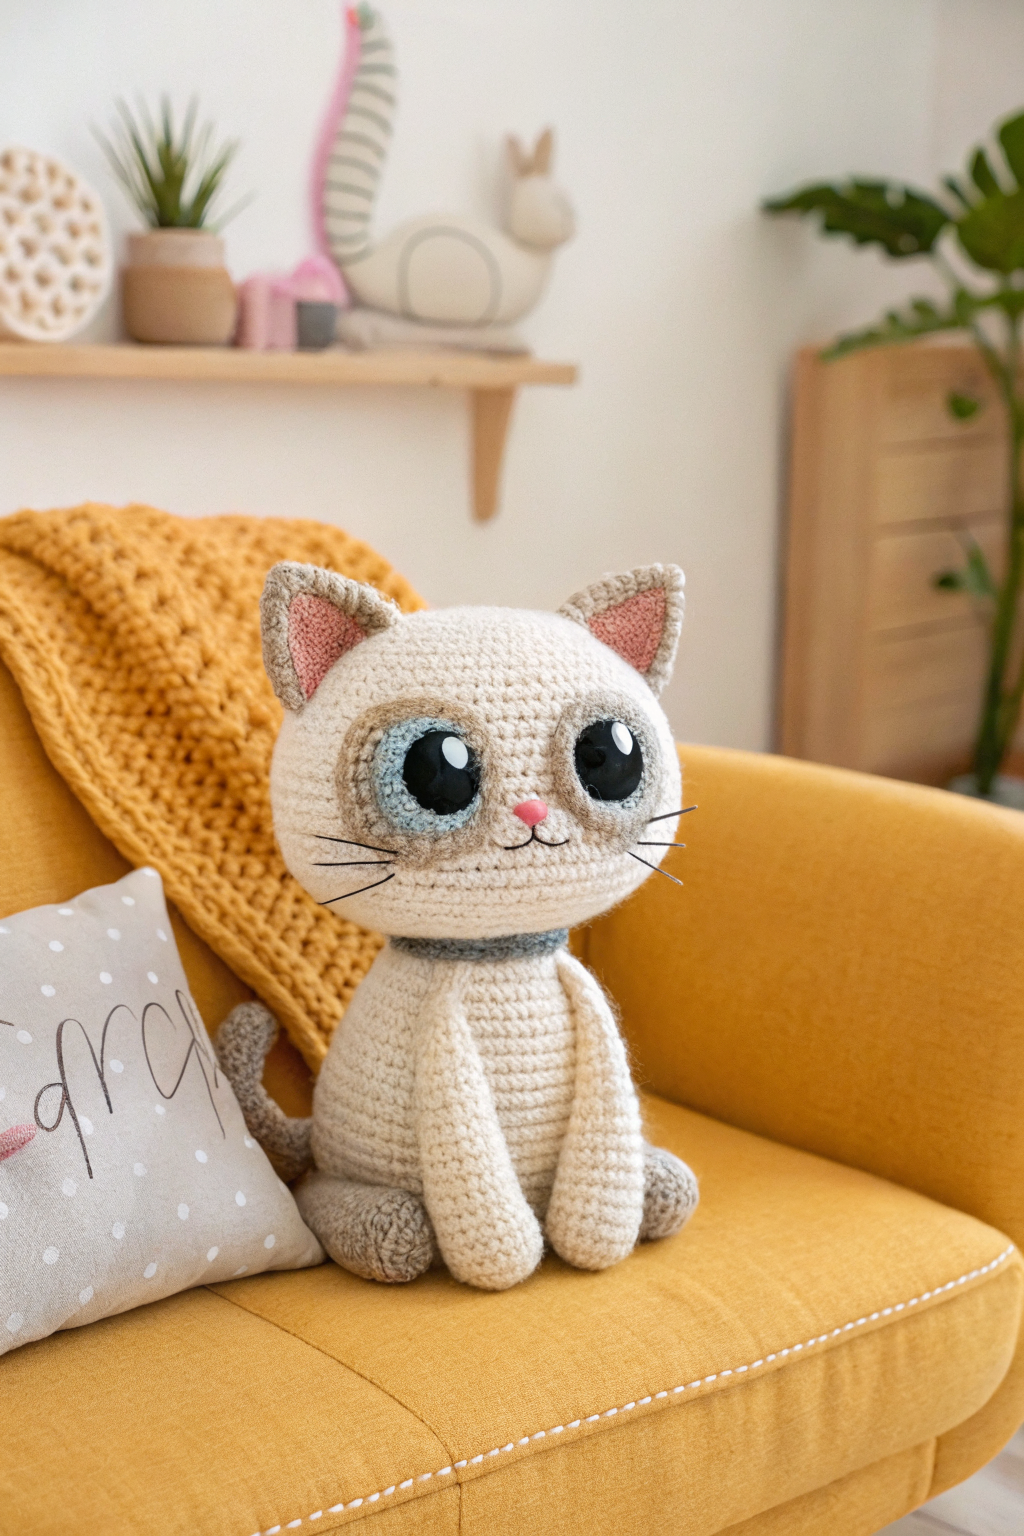
Don’t worry if you’re new to crochet; we’ll guide you through each step. We’ll be using single crochet (sc) as our main stitch. Single crochet is super easy to learn – it’s just inserting your hook, yarn over, pulling through a loop, yarn over again, and pulling through both loops on your hook. Let’s begin assembling our adorable kitty piece by piece! Refer to the image to see how your work should look as you progress.
Making the Head
- Round 1: Start with a magic ring. To form a magic ring, wrap the yarn around your fingers twice, slip the loops off, and insert your hook into the loops. Yarn over and pull up a loop, chain 1 to secure the ring (this ch 1 does not count as a stitch). Now, work 6 single crochet (sc) stitches into the magic ring. Pull the tail of the yarn tightly to close the ring. (6 stitches)
- Round 2: Increase in each stitch around. To increase (inc), work 2 sc stitches in the same stitch. (12 stitches)
- Round 3: *Sc in the next stitch, increase in the next stitch.* Repeat from * to * around. (18 stitches)
- Round 4: *Sc in the next 2 stitches, increase in the next stitch.* Repeat from * to * around. (24 stitches)
- Round 5: *Sc in the next 3 stitches, increase in the next stitch.* Repeat from * to * around. (30 stitches)
- Round 6: *Sc in the next 4 stitches, increase in the next stitch.* Repeat from * to * around. (36 stitches)
- Round 7-14: Sc in each stitch around. (36 stitches) You are now developing the main round shape of the head.
- Round 15: Change to light brown/darker beige yarn for the muzzle area. For a smooth color change, complete the last stitch before the change with the old color, then yarn over with the new color and pull through. Sc in each stitch around. (36 stitches) Notice in the image how the muzzle color starts around the eye area.
- Round 16-18: Sc in each stitch around. (36 stitches)
- Round 19: Change back to cream/light beige yarn. Sc in each stitch around. (36 stitches)
- Round 20-22: Sc in each stitch around. (36 stitches)
- Round 23: *Sc in the next 4 stitches, decrease over the next 2 stitches.* Repeat from * to * around. To decrease (dec), insert your hook into the next stitch, yarn over and pull up a loop. Insert your hook into the stitch after that, yarn over and pull up a loop. You should have 3 loops on your hook. Yarn over and pull through all 3 loops. This is also known as single crochet two together (sc2tog). (30 stitches)
- Round 24: *Sc in the next 3 stitches, decrease over the next 2 stitches.* Repeat from * to * around. (24 stitches)
- Round 25: *Sc in the next 2 stitches, decrease over the next 2 stitches.* Repeat from * to * around. (18 stitches)
- Round 26: *Sc in the next stitch, decrease over the next 2 stitches.* Repeat from * to * around. (12 stitches)
- Round 27: Decrease in each stitch around. (6 stitches)
- Fasten off, leaving a long tail for sewing. To fasten off, cut your yarn, yarn over, and pull the loop all the way through to secure.
Making the Body
The body is fashioned similarly to the head, but slightly more elongated.
- Round 1-16: Follow rounds 1-16 of the head instructions in cream/light beige yarn. (36 stitches in Round 16)
- Round 17-28: Sc in each stitch around. (36 stitches) You are building the length of the body here.
- Round 29: Change to light brown/darker beige yarn for the paws. Sc in each stitch around. (36 stitches)
- Round 30-32: Sc in each stitch around. (36 stitches)
- Round 33: *Sc in the next 4 stitches, decrease over the next 2 stitches.* Repeat from * to * around. (30 stitches)
- Round 34: *Sc in the next 3 stitches, decrease over the next 2 stitches.* Repeat from * to * around. (24 stitches)
- Round 35: *Sc in the next 2 stitches, decrease over the next 2 stitches.* Repeat from * to * around. (18 stitches)
- Round 36: *Sc in the next stitch, decrease over the next 2 stitches.* Repeat from * to * around. (12 stitches)
- Round 37: Decrease in each stitch around. (6 stitches)
- Fasten off, leaving a long tail for sewing.
Making the Front Legs (Make 2)
- Round 1: Magic ring with 6 sc. (6 stitches)
- Round 2: Increase in each stitch around. (12 stitches)
- Round 3-10: Sc in each stitch around in cream/light beige yarn. (12 stitches)
- Round 11: Change to light brown/darker beige yarn. Sc in each stitch around. (12 stitches)
- Round 12-14: Sc in each stitch around. (12 stitches)
- Round 15: Decrease in each stitch around. (6 stitches)
- Fasten off, leaving a long tail for sewing.
Making the Back Legs (Make 2)
Develop the back legs similarly to the front legs, but slightly shorter.
- Round 1-10: Follow rounds 1-10 of the front leg instructions. (12 stitches in Round 10)
- Round 11-14: Follow rounds 11-14 of the front leg instructions in light brown/darker beige yarn. (12 stitches)
- Round 15: Decrease in each stitch around. (6 stitches)
- Fasten off, leaving a long tail for sewing.
Making the Tail
- Round 1: Magic ring with 6 sc. (6 stitches)
- Round 2: Increase in each stitch around. (12 stitches)
- Round 3-20: Sc in each stitch around in cream/light beige yarn. (12 stitches)
- Round 21: Change to light brown/darker beige yarn. Sc in each stitch around. (12 stitches)
- Round 22-24: Sc in each stitch around. (12 stitches)
- Round 25: Decrease in each stitch around. (6 stitches)
- Fasten off, leaving a long tail for sewing.
Making the Ears (Make 2)
- Round 1: Magic ring with 6 sc. (6 stitches)
- Round 2: *Sc in the next stitch, increase in the next stitch.* Repeat from * to * around. (9 stitches)
- Round 3: *Sc in the next 2 stitches, increase in the next stitch.* Repeat from * to * around. (12 stitches)
- Round 4: Sc in each stitch around in cream/light beige yarn. (12 stitches)
- Round 5: Change to pink yarn. Sc in each stitch around. (12 stitches)
- Round 6-7: Sc in each stitch around. (12 stitches)
- Round 8: Decrease in each stitch around. (6 stitches)
- Fasten off, leaving a long tail for sewing. Fold the bottom of the ear flat and sew across to form a slightly curved ear shape as seen in the image.
Making the Collar
- Chain approximately 50 chains with grey yarn, or enough to fit loosely around the cat’s neck.
- Slip stitch (sl st) into the first chain to join and form a ring.
- Fasten off.
Assembly & Finishing Touches
- Stuffing: Start stuffing each piece firmly but not too tightly. Stuff the head and body first, then the legs, tail, and ears.
- Sewing Pieces: Use your yarn needle and the yarn tails to sew the pieces together.
- Sew the head to the top of the body.
- Sew the front legs to the front of the body. Refer to the image to see the placement.
- Sew the back legs to the sides of the body, slightly further back than the front legs.
- Sew the tail to the back of the body.
- Sew the ears to the top of the head. Observe in the image the position of the ears.
- Attaching Safety Eyes: Position the safety eyes on the light brown/darker beige muzzle area of the head. Push the posts of the safety eyes through the crochet and secure them on the inside of the head.
- Embroidering Nose: Use pink yarn to embroider a small triangle nose on the muzzle, centered between and slightly below the eyes, as you can see in the image.
- Adding Whiskers: Cut 6 strands of black embroidery floss or yarn, each about 4-5 inches long. Using your yarn needle, thread each strand through the muzzle area on each side of the nose to fashion whiskers. Tie knots at the base inside the head to secure them and trim to your desired length.
- Adding Collar: Gently place the grey collar around the cat’s neck. You can tack it in place with a few stitches if you like.
Tip for Beginners: Count your stitches after each round, especially in the increase and decrease rounds, to ensure your pieces are the correct size and shape. If you lose count, stitch markers can be very helpful to mark the beginning of each round.
Troubleshooting: If your magic ring has a hole in the center, try pulling the yarn tail tighter. If your piece is curling too much, make sure you are working in continuous rounds and not joining each round with a slip stitch unless instructed to.
You Did It! Enjoy Your Handmade Kitty! 🎉
Congratulations! You’ve just produced your very own adorable crocheted cat plushie. Isn’t it amazing what you can make with just yarn and a hook? This cuddly friend is perfect for gifting, decorating your space, or simply enjoying as a handmade treasure.
Happy crocheting, and keep crafting joy!