Crochet Your Own Adorable Giraffe Toy
Hello fellow crafters! Get ready to embark on a wonderfully fun journey of yarn and hook as we make this absolutely charming crocheted giraffe toy! Just look at the picture – isn’t it simply the sweetest? This project is perfect for anyone who’s eager to learn how to crochet or wants to develop their skills while fashioning something truly special. Even if you’ve never picked up a crochet hook before, don’t worry! We’re here to guide you every step of the way, explaining everything in simple terms, just like chatting with a friend. Let’s dive into the delightful world of crochet and build our own cuddly giraffe companion!
Materials & Tools You’ll Need
Before we start making our giraffe, let’s gather all the bits and bobs we’ll need. Having everything ready beforehand will make the whole process much smoother and more enjoyable!
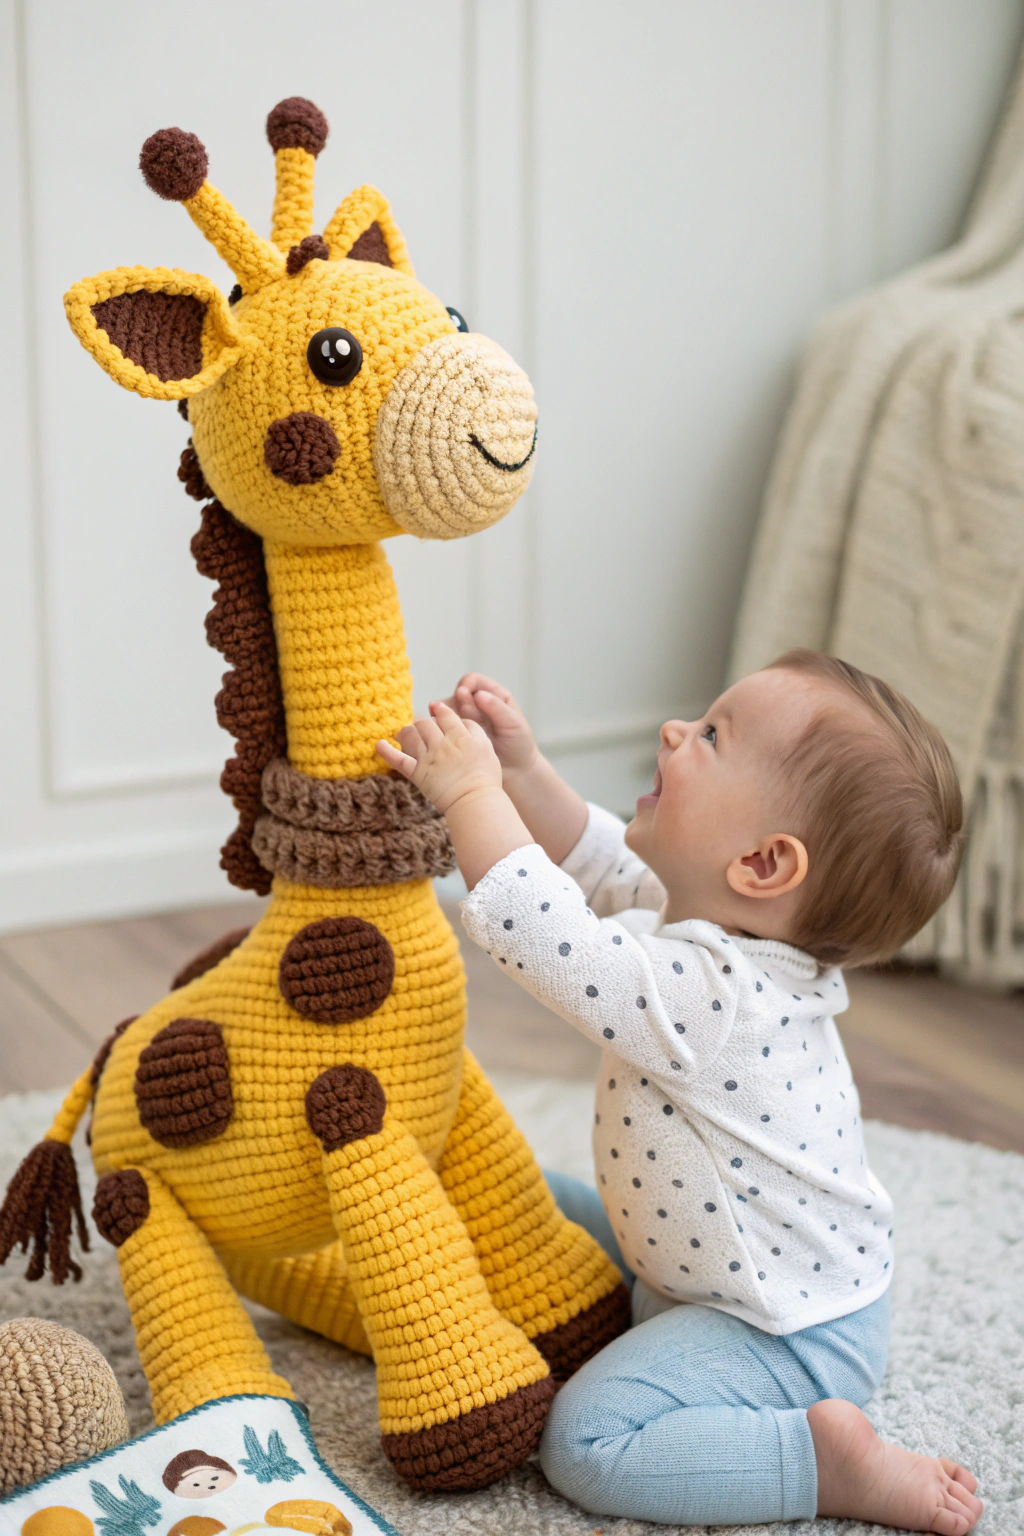
- 🧶 Yarn: You’ll need yellow yarn for the main body, a contrasting brown yarn for the spots, ears, horns, mane, and tail, and a lighter beige or cream yarn for the snout. Choose a soft, chunky yarn that’s beginner-friendly, like worsted weight acrylic or cotton. The giraffe in the image is fashioned from a thicker yarn, which gives it that wonderfully substantial feel.
- 🪡 Crochet Hook: Select a crochet hook size that matches your yarn weight. Usually, the yarn label will suggest a hook size. For worsted weight yarn, a 4mm or 5mm (G/6 or H/8) hook would be a good starting point.
- 👁️ Safety Eyes: You’ll need two safety eyes for the giraffe’s face. In the image, the giraffe has black safety eyes, about 12mm to 15mm in size, but you can choose whatever size you think looks best. If you’re making this for a very young child, you might want to embroider the eyes with yarn instead for extra safety.
- 🐑 Stuffing: Polyester fiberfill is perfect for stuffing your giraffe and giving it that lovely plump shape.
- ✂️ Scissors: For snipping yarn ends.
- 🧵 Yarn Needle: A large-eyed yarn needle is essential for weaving in yarn ends and assembling the giraffe pieces.
- 📌 Stitch Markers (Optional but Helpful): These little tools can be super handy for marking the beginning of rounds or important stitch locations, especially when you are just starting out.
Let’s Get Crocheting!
Now for the exciting part – actually making our giraffe! We’ll construct it piece by piece, and then assemble everything together. Don’t be intimidated; we’ll take it slowly and step-by-step. Remember, crocheting is all about enjoying the process of forming something beautiful with your own hands.
Head
We’ll start with the head of our giraffe. Looking at the image, you can see the head is mostly yellow with a beige snout and those adorable brown spots around the face.
Round 1: To begin, we’ll fashion a magic ring. A magic ring is a way to start crocheting in the round without leaving a hole in the center. To make a magic ring, wrap the yarn around your fingers to form a loop, then insert your hook into the loop, yarn over (that means wrap the yarn around your hook), and pull through a loop. Then chain one stitch (ch 1). This chain stitch doesn’t count as a stitch itself, it just secures the ring. Now, work 6 single crochet stitches (sc) into the magic ring. Single crochet is a basic stitch in crochet. Think of it like building a short, solid brick in a wall of crochet. To single crochet, insert your hook into a stitch, yarn over, pull through a loop (you’ll have two loops on your hook), yarn over again, and pull through both loops. After you’ve made 6 single crochet stitches into the ring, pull the tail of the yarn to tighten the magic ring closed. You’ve just completed your first round!
Round 2: Now we’re going to increase in each stitch. Increase (inc) means making two single crochet stitches in the same stitch. This helps to widen your circle as you crochet. In this round, work 2 single crochet stitches in each of the 6 stitches from the previous round. This will give you a total of 12 stitches.
Round 3: In this round, we’ll alternate between increasing and single crocheting. Work 1 single crochet, then increase in the next stitch. Repeat this pattern * around the round. This means you do one single crochet in the first stitch, then two single crochet stitches in the next stitch, and keep going like that all the way around. You’ll end up with 18 stitches.
Round 4: Repeat the increase pattern again. Work 1 single crochet in each of the next two stitches, then increase in the next stitch. Repeat * around. This will give you 24 stitches.
Round 5: Keep going with the increasing! Work 1 single crochet in each of the next three stitches, then increase in the next stitch. Repeat * around. Now you should have 30 stitches.
Round 6-12: For these rounds, we’re going to develop the shape of the head without increasing. Simply single crochet in each stitch around for rounds 6 through 12. This means you just make one single crochet stitch in every stitch from the previous round. This will start to form a little cup shape.
Round 13: Now we’ll start decreasing to shape the head. Decrease (dec) means joining two stitches together to make one stitch, which narrows your crochet piece. To decrease, insert your hook into the next stitch, yarn over, pull through a loop (two loops on hook), insert your hook into the next stitch, yarn over, pull through a loop (three loops on hook), yarn over, and pull through all three loops on your hook. You’ve just decreased! In this round, work 1 single crochet in each of the next three stitches, then decrease over the next two stitches. Repeat * around. You’ll have 24 stitches left.
Round 14: Work 1 single crochet in each of the next two stitches, then decrease over the next two stitches. Repeat * around. You’ll have 18 stitches.
Round 15: Work 1 single crochet, then decrease over the next two stitches. Repeat * around. You’ll have 12 stitches.
Round 16: Decrease in every stitch around. This means decrease over every pair of stitches. You’ll be left with 6 stitches.
Now, before you close up the head completely, it’s time to add the safety eyes. Refer to the image to see the placement of the eyes on the giraffe’s head. Position the eyes evenly spaced between rounds 9 and 10, approximately 5-6 stitches apart. Attach the safety eyes securely according to the package instructions. If you’re embroidering the eyes, do that now as well.
Once the eyes are in place, stuff the head firmly with fiberfill. Make sure it’s nice and plump!
Round 17: To close up the head, decrease in every stitch again. You’ll be left with just a few stitches. Cut the yarn, leaving a tail. Use your yarn needle to thread the tail through the remaining stitches and pull tight to close the opening. Weave in the yarn end to secure it.
Snout
The snout is the beige or cream colored part of the giraffe’s face. Look closely at the image; it’s a rounded shape attached to the front of the head.
Round 1: Make a magic ring with your beige yarn. Work 6 single crochet stitches into the magic ring. Pull the tail to close the ring.
Round 2: Increase in each stitch around. (12 stitches)
Round 3: Work 1 single crochet, then increase in the next stitch. Repeat * around. (18 stitches)
Round 4-6: Single crochet in each stitch around for three rounds.
Round 7: Decrease in every stitch around. (9 stitches)
Fasten off, leaving a long tail for sewing. Stuff the snout lightly. Sew the snout onto the front of the giraffe’s face, centered below the eyes. Refer to the image to see how it’s positioned.
Ears (Make 2)
The ears are those cute brown semi-circles on top of the giraffe’s head.
Round 1: Make a magic ring with brown yarn. Work 6 single crochet stitches into the magic ring. Pull the tail to close.
Round 2: Increase in each stitch around. (12 stitches)
Round 3: Work 1 single crochet, then increase in the next stitch. Repeat * around. (18 stitches)
Round 4: Single crochet in each stitch around.
Round 5: Decrease in every stitch around. (9 stitches)
Fasten off, leaving a tail for sewing. Flatten the ears slightly at the base and sew them to the top of the head, on either side, as seen in the image.
Horns (Ossicones) (Make 2)
Giraffes have ossicones, not horns, which are those little brown knobs on top of their heads. Let’s fashion those!
Round 1: Make a magic ring with brown yarn. Work 6 single crochet stitches into the magic ring. Pull the tail to close.
Round 2-5: Single crochet in each stitch around for four rounds.
Fasten off, leaving a tail for sewing. Stuff the horns lightly and sew them to the top of the head, between the ears, as shown in the image.
Body
Now we’ll construct the main body of the giraffe. This is the largest part, but don’t worry, it’s just more of the same crochet stitches we’ve already learned. We’ll use yellow yarn for the body.
Round 1: Make a magic ring with yellow yarn. Work 6 single crochet stitches into the magic ring. Pull the tail to close.
Round 2: Increase in each stitch around. (12 stitches)
Round 3: Work 1 single crochet, then increase in the next stitch. Repeat * around. (18 stitches)
Round 4: Work 1 single crochet in each of the next two stitches, then increase in the next stitch. Repeat * around. (24 stitches)
Round 5: Work 1 single crochet in each of the next three stitches, then increase in the next stitch. Repeat * around. (30 stitches)
Round 6: Work 1 single crochet in each of the next four stitches, then increase in the next stitch. Repeat * around. (36 stitches)
Round 7-16: Single crochet in each stitch around for ten rounds. This will form the cylindrical shape of the body.
Round 17: Work 1 single crochet in each of the next four stitches, then decrease over the next two stitches. Repeat * around. (30 stitches)
Round 18: Work 1 single crochet in each of the next three stitches, then decrease over the next two stitches. Repeat * around. (24 stitches)
Round 19: Work 1 single crochet in each of the next two stitches, then decrease over the next two stitches. Repeat * around. (18 stitches)
Round 20: Work 1 single crochet, then decrease over the next two stitches. Repeat * around. (12 stitches)
Fasten off, leaving a long tail for sewing. Stuff the body firmly with fiberfill.
Neck
The giraffe’s long neck is what makes it so distinctive! We’ll make a long tube for the neck. Use yellow yarn.
Round 1: Make a magic ring with yellow yarn. Work 6 single crochet stitches into the magic ring. Pull the tail to close.
Round 2: Increase in each stitch around. (12 stitches)
Round 3: Work 1 single crochet, then increase in the next stitch. Repeat * around. (18 stitches)
Round 4: Work 1 single crochet in each of the next two stitches, then increase in the next stitch. Repeat * around. (24 stitches)
Round 5-35: Single crochet in each stitch around for thirty-one rounds. This will produce a long tube. You can adjust the length to your preference, but the image shows a fairly long neck.
Fasten off, leaving a long tail for sewing. Stuff the neck firmly with fiberfill, but not too tightly, so it remains flexible.
Legs (Make 4)
Giraffes have long, slender legs. We’ll fashion four of these using yellow yarn and brown for the hooves.
Start with yellow yarn.
Round 1: Make a magic ring with yellow yarn. Work 6 single crochet stitches into the magic ring. Pull the tail to close.
Round 2: Increase in each stitch around. (12 stitches)
Round 3-25: Single crochet in each stitch around for twenty-three rounds.
Change to brown yarn for the hooves. To change colors, in the last stitch before the color change, complete the stitch until the last yarn over. Yarn over with the new color and pull through to complete the stitch. Cut the yellow yarn, leaving a short tail to weave in later.
Round 26-28: With brown yarn, single crochet in each stitch around for three rounds.
Fasten off, leaving a tail for sewing. Stuff the legs firmly with fiberfill.
Spots (Make approximately 10-12, or as desired)
Giraffe spots are irregular brown patches. We’ll craft these as flat circles to sew onto the body and head.
Round 1: Make a magic ring with brown yarn. Work 6 single crochet stitches into the magic ring. Pull the tail to close.
Round 2: Increase in each stitch around. (12 stitches)
Fasten off, leaving a tail for sewing. You can make spots of slightly different sizes by adding or subtracting a round of increases. Refer to the image to see how the spots are distributed on the giraffe.
Mane
The mane is the brown strip of yarn running down the giraffe’s neck. We’ll develop this as a separate piece and sew it on.
Row 1: With brown yarn, chain 5 stitches (ch 5). Chain stitch is the most basic stitch, it’s like forming a chain link. To chain stitch, yarn over and pull through the loop on your hook. Repeat.
Row 2: Single crochet in the second chain from the hook and in each chain across. (4 single crochet stitches). Chain 1 and turn. Chain 1 and turn at the end of a row is called a turning chain, it helps to keep the edges neat and gets you ready for the next row.
Row 3-25: Single crochet in each stitch across. Chain 1 and turn at the end of each row. You can adjust the length of the mane if you want it longer or shorter.
Fasten off, leaving a tail for sewing.
Tail
The tail is a simple brown strand with a little tuft at the end.
For the tail strand: Cut a length of brown yarn about 6 inches long.
For the tuft: Wrap brown yarn around your fingers about 10 times. Carefully slide the loops off your fingers. Using a separate piece of yarn, tie the loops tightly in the center. Cut through the loops at both ends to form a little tassel. Trim the ends to neaten it up.
Attach the tassel to one end of the 6-inch yarn strand.
Assembling Your Giraffe
Now comes the exciting part – putting all our fashioned pieces together to assemble our giraffe!
- Sew the neck to the body: Position the neck on top of the body and sew it securely all the way around.
- Sew the head to the neck: Attach the head to the top of the neck, making sure it’s centered and securely sewn.
- Sew on the legs: Attach the legs to the bottom of the body, evenly spaced around the base. Refer to the image to see how the legs are positioned.
- Sew on the spots: Arrange the brown spots randomly over the body and head, just like in the picture, and sew them on securely.
- Attach the mane: Sew the mane along the back of the neck, starting from the top of the head and going down the neck.
- Attach the tail: Sew the plain end of the tail strand to the back of the giraffe’s body, towards the bottom.
Once you’ve assembled all the pieces, give your giraffe a final check. Make sure everything is securely sewn and all yarn ends are woven in. And there you have it – your very own handmade crocheted giraffe toy!
Embrace the Joy of Making!
Isn’t it wonderful to produce something so charming with your own hands? Crocheting is not just about following instructions; it’s about the joy of making, the satisfaction of seeing yarn transform into something beautiful and unique. Don’t worry if your giraffe isn’t perfect – handmade items have their own special charm. Each stitch you form is infused with your care and effort.
We truly hope you enjoyed this tutorial and are thrilled with your newly constructed giraffe friend! If you decide to make your own giraffe, please do share pictures of your creations – we would absolutely love to see them! Happy crocheting, and remember to enjoy every stitch of the process!