Crochet Your Own Adorable Bear Hat
Get ready to cast on and create the coziest bear hat you’ve ever seen! This delightful crochet project is perfect for beginners and seasoned crafters. Imagine the joy of gifting this handmade treasure or seeing your little one wear this charming creation.
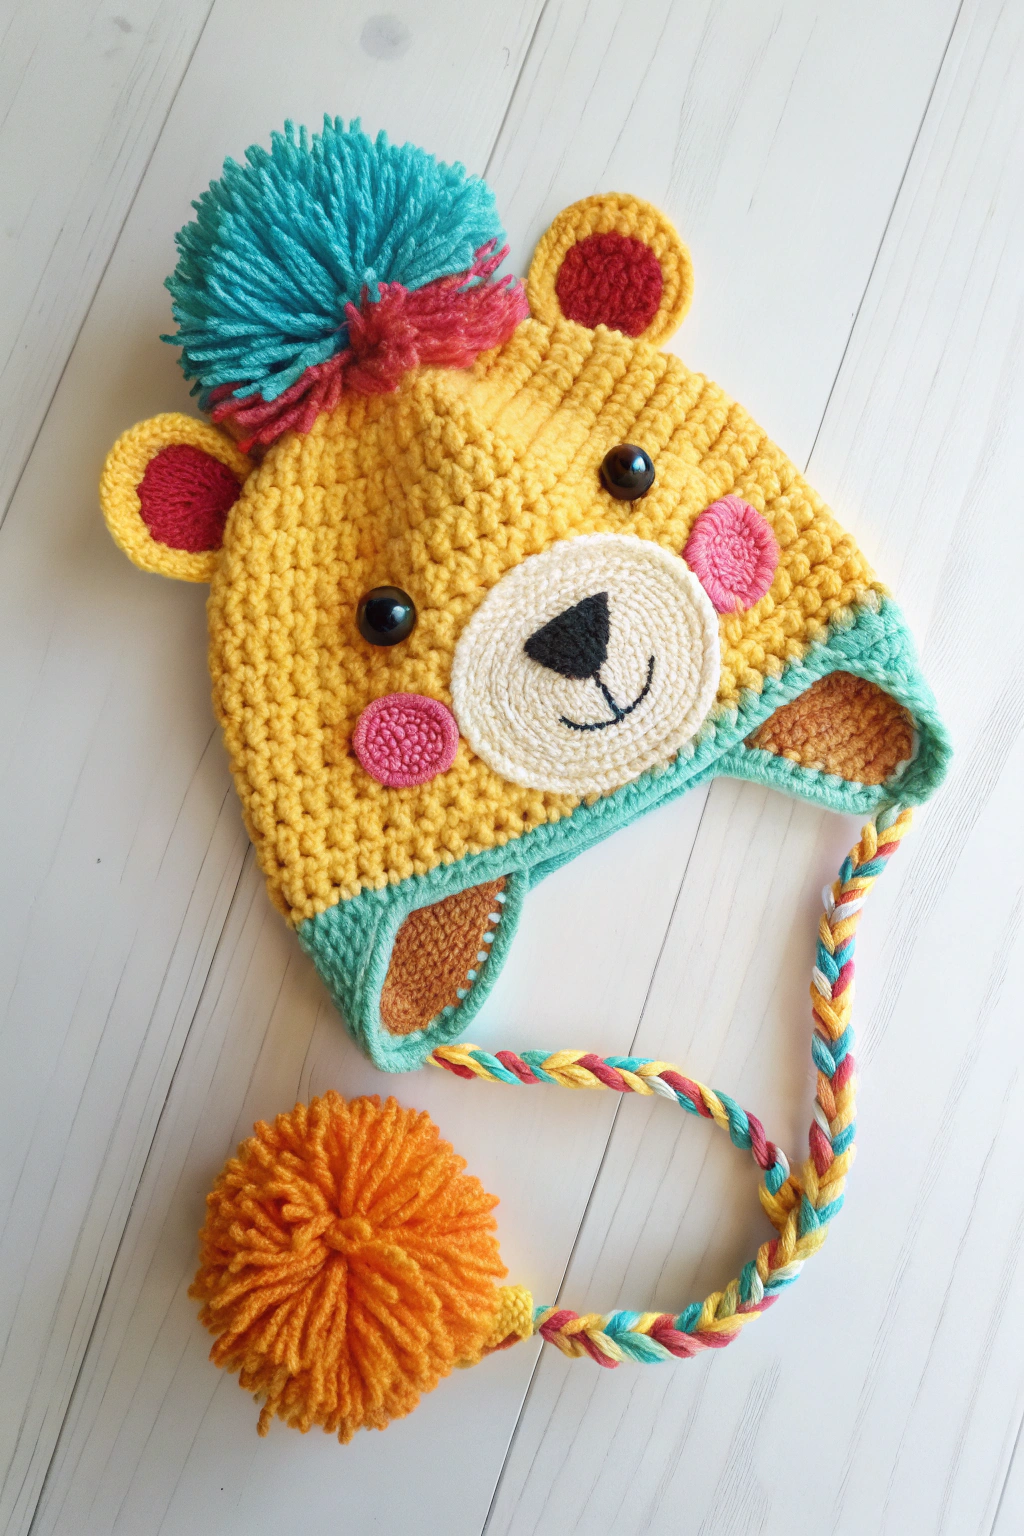
We’ll guide you step-by-step to crochet your very own adorable bear hat, just like the one in the image. Let’s gather our supplies and begin this fun and rewarding crafting journey!
What You’ll Need to Get Started:
- 🧶 Worsted weight yarn in yellow, cream, red, pink, black, orange, turquoise, and green. Choose soft and durable yarn for a cozy and long-lasting hat.
- 🪡 5.0 mm crochet hook (or size needed to obtain gauge). A comfortable hook will enhance your crocheting experience.
- ✂️ Scissors. Sharp scissors are essential for clean yarn cuts.
- 🧵 Tapestry needle. This will be used for weaving in ends and assembling the hat pieces.
- 📍 Stitch markers (optional but helpful). Stitch markers can assist in keeping track of rounds and stitch counts, especially for crochet beginners.
- 👁️ Safety eyes (optional). Alternatively, you can embroider the eyes.
Let’s Learn the Basic Crochet Stitches:
Before making our bear hat, let’s quickly review the essential crochet stitches you’ll need. If you are completely new to crochet, don’t worry – we will explain each stitch as we go.
The foundation of most crochet projects is a slip knot, creating the first loop on your hook. Next, we create chain stitches (ch), forming the base chain or rows.
For this hat, we’ll primarily use single crochet (sc), a basic stitch for a dense fabric. To single crochet, insert your hook, yarn over (yo), pull up a loop, yarn over again, and pull through both loops on your hook.
We will also use double crochet (dc) for details. Double crochet is taller than single crochet, creating a more open fabric. To double crochet, yarn over, insert your hook, yarn over, pull up a loop, yarn over, pull through two loops, yarn over again, and pull through the remaining two loops.
Finally, the slip stitch (sl st) joins rounds or finishes edges. To slip stitch, insert your hook, yarn over, and pull through both the stitch and the loop on your hook.
Step 1: Crocheting the Hat Base
Let’s begin crocheting the main part of the bear hat with yellow yarn. Start with a slip knot and chain 3. Join with a slip stitch to the first chain to form a ring – the center of your hat.
Now, work in rounds.
Round 1: Chain 1 (does not count as a stitch), work 8 single crochet stitches into the ring. Join with a slip stitch to the first single crochet.
Round 2: Chain 1, work 2 single crochet stitches in each stitch around (16 total). Join with a slip stitch.
Round 3: Chain 1, single crochet in the next stitch, 2 single crochet in the next stitch; repeat from to around (24 total). Join with a slip stitch.
Continue increasing in this manner, adding 8 single crochet stitches each round by increasing every other stitch, then every third, and so on. Refer to the image for the hat’s shape and size. Keep crocheting in rounds, increasing evenly, until the hat reaches the desired head circumference.
Measure against the wearer’s head or use a standard size chart. For a baby size, you might stop around 6-7 inches in diameter. Once sized correctly, continue in single crochet rounds without increasing to create the hat’s height.
Crochet straight rounds until the hat comfortably covers the ears. Notice in the image the turquoise ribbed edge. To create this edge, switch to turquoise yarn for the last few rounds and continue single crocheting.
Step 2: Crafting the Bear Ears
Let’s craft the adorable bear ears using yellow and red yarn. For each ear, start with yellow yarn and make a magic ring (or chain 2 and work into the second chain from the hook if preferred).
Round 1: Chain 1, work 6 single crochet stitches into the ring. Join with a slip stitch.
Round 2: Chain 1, work 2 single crochet stitches in each stitch around (12 total). Join with a slip stitch.
Round 3: Chain 1, single crochet in the next stitch, 2 single crochet in the next stitch; repeat from to around (18 total). Join with a slip stitch.
Fasten off yellow yarn and switch to red yarn. Round 4: Chain 1, single crochet in each stitch around (18 total). Join with a slip stitch and fasten off red yarn, leaving a long tail for sewing. Make two ears identically.
Observe in the image the cute red inner ear detail. Slightly fold the bottom edge of each ear to curve them, and sew them securely to the hat’s top, positioned evenly on each side, as shown.
Step 3: Making the Muzzle and Cheeks
Now, let’s create the bear’s face details. For the muzzle, use cream yarn and make a magic ring.
Round 1: Chain 1, work 6 single crochet stitches into the ring. Join with a slip stitch.
Round 2: Chain 1, work 2 single crochet stitches in each stitch around (12 total). Join with a slip stitch.
Round 3: Chain 1, single crochet in the next stitch, 2 single crochet in the next stitch; repeat from to around (18 total). Join with a slip stitch. Fasten off cream yarn, leaving a tail for sewing.
For the nose, use black yarn and create a small triangle by crocheting decreasing single crochet rows or embroider one onto the muzzle. Sew the muzzle to the hat’s center front. Refer to the image for placement.
Next, for each cheek, use pink yarn and make a magic ring.
Round 1: Chain 1, work 6 single crochet stitches into the ring. Join with a slip stitch. Fasten off pink yarn, leaving a tail for sewing. Make two cheeks. Sew the pink cheeks onto the hat on either side of the muzzle, as seen in the image.
Step 4: Adding the Pom-poms and Braided Ties
To add extra charm, let’s create pom-poms and braided ties. For the top pom-pom, combine turquoise and red yarn. Use a pom-pom maker or wrap yarn around your hand or cardboard for a dense pom-pom. Securely tie the center, cut the loops, and trim to shape. Attach the pom-pom to the hat’s top center. See the vibrant pom-pom colors in the image.
For the bottom pom-pom, use orange yarn and create another pom-pom similarly. For the braided ties, cut strands of yellow, turquoise, red, and green yarn, about 18 inches long each. Divide the strands into two groups and braid each tightly. Attach a braid to each side of the hat’s bottom edge, positioned to hang on either side of the face. Finally, attach the orange pom-pom to one braided tie’s end, as shown.
Step 5: Finishing Touches and Personalization
Now for the final details! If using safety eyes, carefully attach them above the muzzle, positioned symmetrically. Alternatively, embroider eyes using black yarn for a softer look.
Weave in all loose ends with your tapestry needle for a neat finish. Double-check all sewn pieces for secure attachment. You’ve now completed your adorable crochet bear hat!
Personalize your hat further by adding different colors, embellishments, or even embroidering a name or initial. Imagine the smiles this handmade hat will bring!
Share Your Bear Hat Creation!
Congratulations on crocheting your bear hat! We hope you enjoyed this tutorial. Crafting handmade items is rewarding, bringing joy to both maker and receiver.
Experiment with different yarn colors and textures for unique hat variations. Share your finished bear hat with us and the crafting community!