Crochet Cutie Octopus: Fun & Easy Project!
Ready to dive into a super fun crochet project? Let’s make this adorable octopus together! This friendly face with its wiggly tentacles is perfect for a handmade gift or a charming addition to your own collection of crafted treasures. Don’t worry if you’re just starting out – we’ll go through each step slowly and clearly, so you can confidently fashion your own little ocean friend. Get ready to grab your hook and yarn, and let’s get started on this exciting adventure of making!
Materials You’ll Need
Before we begin, let’s gather all the supplies you’ll need to construct your very own crochet octopus. Having everything ready will make the process smooth and enjoyable!
- 🧶 Worsted weight yarn in light purple, dark purple, light blue, and black
- 🪡 Crochet hook size 4.0 mm (G/6)
- Yarn needle for sewing and weaving in ends
- ✂️ Scissors
- 👁️ Two safety eyes (10mm)
- Fiberfill stuffing
Getting Started: Basic Crochet Stitches
If you’re brand new to crochet, don’t worry! We’ll use only one basic stitch for this entire project: the single crochet. Think of single crochet as the foundation stitch in crochet – it’s simple to learn and forms a nice, tight fabric, perfect for amigurumi (that’s the Japanese name for crocheted stuffed toys!).
To form a single crochet stitch, first, you’ll need to make a slip knot and place it on your hook. Then, hold your hook and yarn comfortably. Now, insert your hook into the stitch from the previous round (or into the magic ring to start). Yarn over, which means to wrap the yarn around your hook from back to front. Pull the yarn through the stitch – you’ll now have two loops on your hook. Yarn over again, and pull the yarn through both loops on your hook. Congratulations, you’ve just produced a single crochet stitch! It might sound like a lot of steps when written out, but with a little practice, it becomes a very fluid and easy motion.
We’ll also be using a magic ring to start the head. A magic ring is a way to begin crocheting in the round without leaving a hole in the center. It might seem a little tricky at first, but it’s worth learning! To develop a magic ring, wrap the yarn around your fingers to fashion a loop, then insert your hook into the loop, yarn over, and pull through to make a chain stitch within the loop. Now, you can crochet your first round of stitches into this loop. After the first round, pull the tail of the yarn to tighten the loop closed – magic! If you prefer not to use a magic ring, you can also start with chaining 2 stitches and working your first round into the second chain from the hook.
Finally, we’ll use increases and decreases to shape our octopus. An increase (inc) simply means you’ll craft two single crochet stitches in the same stitch. This makes your circle get bigger. A decrease (dec) helps to make your circle smaller. There are a couple of ways to decrease, but we’ll use the invisible decrease for this project to keep our stitches neat. For an invisible decrease, insert your hook into the front loop only of the next stitch, then insert your hook into the front loop only of the stitch after that. Yarn over and pull through the first two loops on your hook, yarn over again, and pull through the remaining two loops. This effectively joins two stitches into one, making your work smaller.
Let’s Fashion the Octopus Head
Round 1
Let’s start by building the head using the light purple yarn. We’ll begin with a magic ring. Construct 6 single crochet stitches into the magic ring. Pull the tail tight to close the ring. (6 stitches total)
Round 2
Now, we’re going to increase in every stitch to make the circle bigger. Make 2 single crochet stitches in each stitch around. This means you’ll be increasing 6 times in this round. (12 stitches total)
Round 3
For this round, we’ll alternate between increasing and single crocheting. Fashion one single crochet in the first stitch, then increase in the next stitch. Repeat this pattern all the way around. (18 stitches total)
Round 4
Continue increasing the size of the head. Develop one single crochet in each of the next two stitches, then increase in the stitch after that. Repeat this pattern around. (24 stitches total)
Round 5
You’re getting the hang of it! Now, assemble one single crochet in each of the next three stitches, then increase in the following stitch. Repeat this around. (30 stitches total)
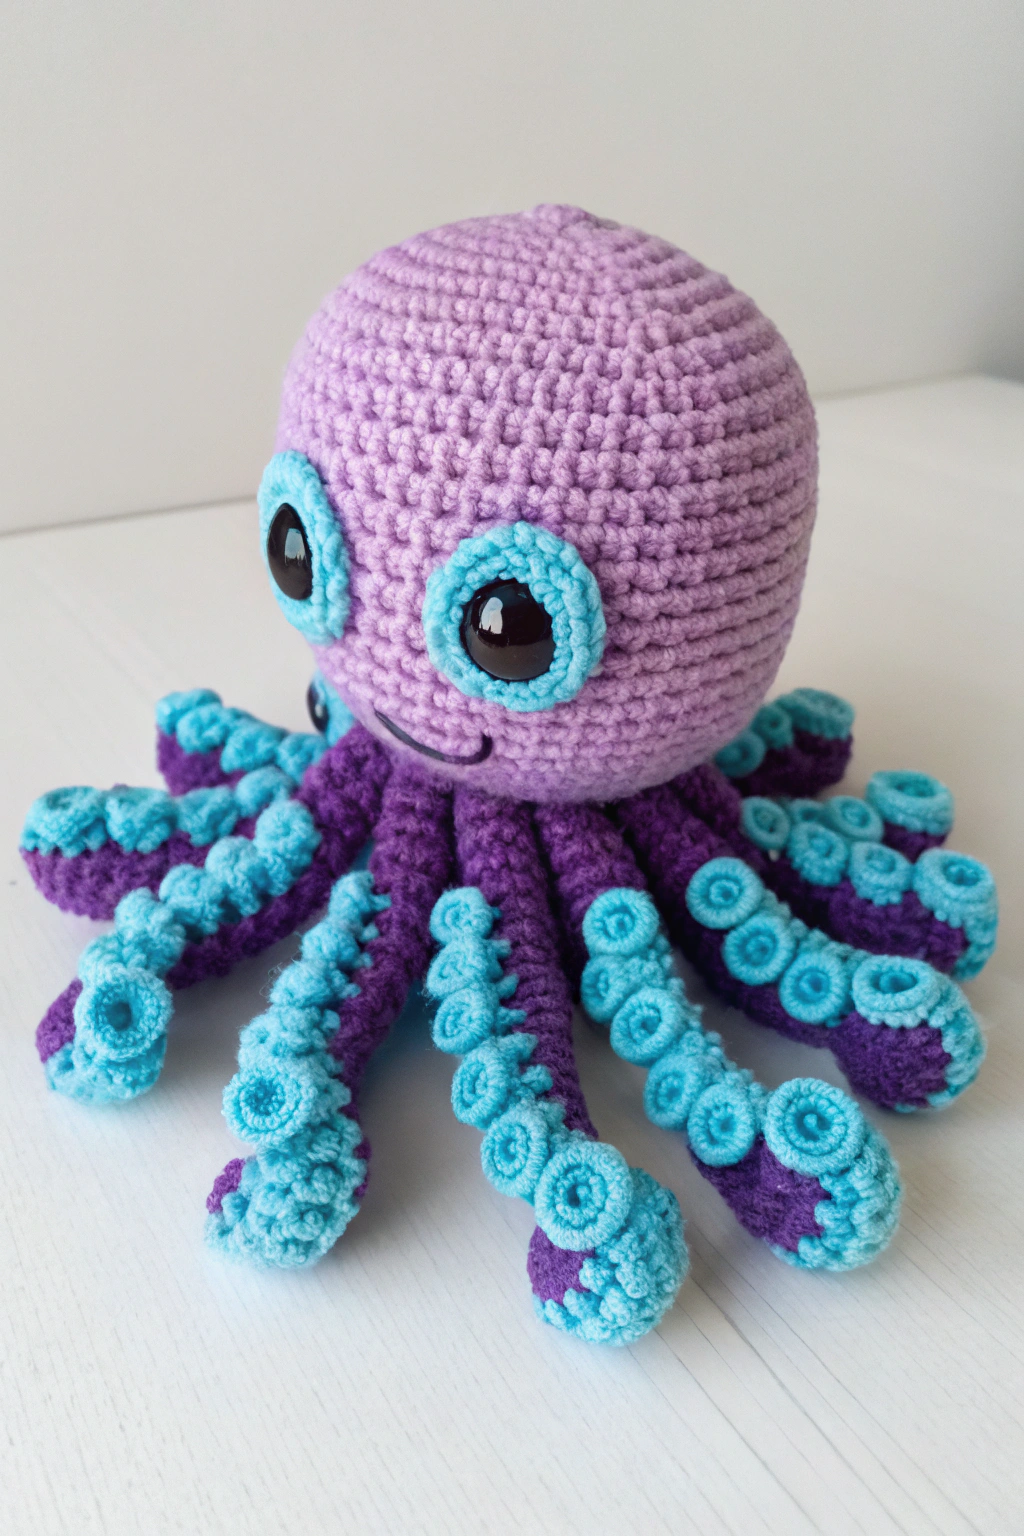
Rounds 6-12
Keep producing the head shape. For the next seven rounds (rounds 6 through 12), simply single crochet in each stitch around. No increases or decreases here – we’re just building height. (30 stitches in each round) Refer to the image to see the round shape of the octopus head. You can observe in the image how the head is nicely rounded.
Round 13
Now, we’ll start decreasing to shape the top of the head and close it up. Craft one single crochet in each of the next three stitches, then decrease over the next two stitches. Repeat this pattern all the way around. (24 stitches total)
Round 14
Continue decreasing. Form one single crochet in each of the next two stitches, then decrease over the next two stitches. Repeat around. (18 stitches total)
Round 15
One more decrease round! Make one single crochet in the next stitch, then decrease over the next two stitches. Repeat around. (12 stitches total)
Round 16
Before we close the head completely, it’s time to stuff it firmly with fiberfill. Make sure to stuff it quite firmly to give it a good shape. Now, decrease in every stitch around. This means you’ll be decreasing 6 times. (6 stitches total)
Round 17
Finally, to close the head completely, decrease over the last 6 stitches. You can cut the yarn, pull it through the last loop, and weave in the end to secure it. You’ve now constructed the main head shape!
Fashioning the Cute Eyes
We’ll make two eyes, each with a blue surround and a black center, just like in the image.
Blue Eye Surround (Make 2)
Using light blue yarn:
Round 1
Start with a magic ring. Develop 6 single crochet stitches into the magic ring. Pull the tail tight to close. (6 stitches total)
Round 2
Increase in each stitch around. (12 stitches total)
Fasten off and leave a tail for sewing.
Black Eye Center (Make 2)
Using black yarn:
Round 1
Start with a magic ring. Assemble 6 single crochet stitches into the magic ring. Pull the tail tight to close. (6 stitches total)
Fasten off and leave a tail for sewing.
Eye Assembly
Now, take your black circle and place it in the center of the blue circle. Using black yarn and your yarn needle, sew the black circle to the blue circle. This produces your eye pieces. You can add a tiny white stitch in the corner of each black circle with white yarn to craft a highlight, just like you see in the image, for extra sparkle!
Crafting the Wobbly Tentacles
We’ll make eight tentacles for our octopus, each with those adorable blue suckers. We will build the base of the tentacles in dark purple and then add the blue suckers.
Tentacle Base (Make 8)
Using dark purple yarn:
Round 1
Start with a magic ring. Construct 6 single crochet stitches into the magic ring. Pull the tail tight to close. (6 stitches total)
Rounds 2-20
Single crochet in each stitch around for the next 19 rounds. (6 stitches in each round) This will fashion a long tube.
Fasten off, leaving a long tail for sewing. Don’t stuff the tentacles. They should be flat and wiggly!
Forming the Ruffled Suckers (For each tentacle, make approximately 6-7 suckers)
Using light blue yarn:
Round 1
Start with a magic ring. Assemble 6 single crochet stitches into the magic ring. Pull the tail tight to close. (6 stitches total)
Round 2
In this round, we’ll develop a little ruffle. Craft two double crochet stitches in each stitch around. A double crochet stitch is a taller stitch than single crochet, and it will give us that nice ruffle. To make a double crochet, yarn over, insert hook into stitch, yarn over, pull through stitch (3 loops on hook), yarn over, pull through 2 loops (2 loops on hook), yarn over, pull through last 2 loops. Increasing with double crochet stitches produces a ruffle edge. (12 stitches total)
Fasten off, leaving a tail for sewing. Construct about 6 or 7 of these suckers for each tentacle. Look at the image to see how many suckers are on each tentacle and how they are arranged.
Assembling Your Octopus
Attaching the Eyes
Position the eyes on the head. Refer to the image to see where the eyes are placed – they are fairly close together and slightly towards the front of the head. Using the yarn tails you left on the blue eye surrounds, sew the eyes securely to the head.
Attaching the Tentacles and Suckers
Now comes the fun part – attaching the tentacles and suckers! Sew the wider, open end of each dark purple tentacle tube to the bottom of the head. Arrange them evenly around the base, just like you see in the image.
Next, sew the blue ruffled suckers onto the tentacles. Attach them in rows down the length of each tentacle, spacing them out as you like. Refer to the image to see a good spacing and arrangement. This step really brings your octopus to life!
Developing the Smile
Finally, let’s fashion a cute little smile! Using black yarn and your yarn needle, embroider a small, curved smile just below the eyes. A simple, curved line works perfectly. Observe in the image the sweet and simple smile.
Finishing Touches
Weave in all your yarn ends using your yarn needle to keep everything neat and secure. Give your octopus a gentle squeeze and admire your handiwork! You’ve just made a truly charming crochet octopus.
Share Your Makes!
Congratulations on crafting your adorable crochet octopus! We hope you enjoyed this project as much as we enjoyed guiding you through it. Don’t be shy – we’d absolutely love to see your finished octopi! Share photos of your creations with us online – it’s so inspiring to see everyone’s unique handmade projects. Happy crocheting, and may your crafting journey be filled with joy and making wonderful things!