Crochet Cute Nautical Baby Booties
Ready to make something adorable and handmade? These nautical baby booties are the perfect project for beginner crocheters! Imagine the joy of fashioning these tiny shoes with your own hands for a special little one. Let’s dive into making these charming booties step-by-step.
Materials You’ll Need
Before we begin, let’s gather everything you need. Having your materials ready makes the making process smooth and enjoyable.
- 🧶 Worsted Weight Cotton Yarn in Navy Blue and White: Cotton yarn is soft and gentle for baby’s skin. We’ll use navy for the main bootie and white for accents.
- 🪡 4.0mm Crochet Hook: This is a common size for worsted weight yarn and perfect for these booties.
- ✂️ Yarn Needle: For weaving in the yarn ends and assembling the laces.
- 📍 Stitch Markers (optional but helpful): These little markers can help you keep track of your rounds, especially when you’re just starting out.
- 📏 Scissors: For cutting your yarn.
Getting Started: Crafting the Sole
We’ll begin by forming the white sole of the baby bootie. This is the foundation of our little shoe! If you’ve never crocheted before, don’t worry! We’ll go through it slowly and simply.
Round 1: The Magic Ring
Let’s start with something called a “magic ring” or “magic circle.” Think of it as a way to start crocheting in the round without leaving a hole in the center. To make a magic ring, wrap the yarn around your fingers to form a loop, then insert your hook into the loop, yarn over (that means wrap the yarn around your hook), and pull through. This forms your first stitch in the ring. Now, we’ll work single crochet stitches into this ring.
Round 1: Make a magic ring. Then, work 6 single crochet (sc) stitches into the ring. A single crochet is a basic stitch – you insert your hook into the stitch, yarn over, pull through a loop (you’ll have two loops on your hook), yarn over again, and pull through both loops. Once you have 6 sc stitches, pull the tail of your magic ring tight to close the center hole. You’ve just fashioned the very center of the sole!
Round 2: Increasing the Sole
Now we need to make the sole a bit bigger. We’ll do this by increasing the number of stitches in each round. “Increasing” means making two stitches in one stitch, which adds stitches to your work and makes it grow wider.
Round 2: Work 2 single crochet (sc) stitches in each stitch around. This means in every stitch from the previous round, you will make two single crochet stitches. You’ll end up with 12 stitches in this round. See how it’s starting to become a little circle? That’s your sole taking shape!
Round 3: Expanding Further
Let’s continue expanding the sole to the right size. We’ll use a pattern of increases and single crochet stitches.
Round 3: *Work 1 single crochet (sc) in the next stitch, then 2 single crochet (sc) in the next stitch.* Repeat from * to * around. This means you’ll alternate between making one sc in a stitch and then two sc in the next stitch all the way around the circle. You should have 18 stitches at the end of this round.
Round 4: Almost There!
We’re getting close to the final size of the sole. Let’s increase one more time.
Round 4: *Work 1 single crochet (sc) in each of the next 2 stitches, then 2 single crochet (sc) in the next stitch.* Repeat from * to * around. This time, you’ll make one sc in each of the next two stitches, and then increase in the stitch after that, repeating around the circle. You’ll have 24 stitches when you finish this round.
Round 5: Final Sole Round
This is the last round for the white sole. We’ll just work single crochet stitches all the way around to even it out.
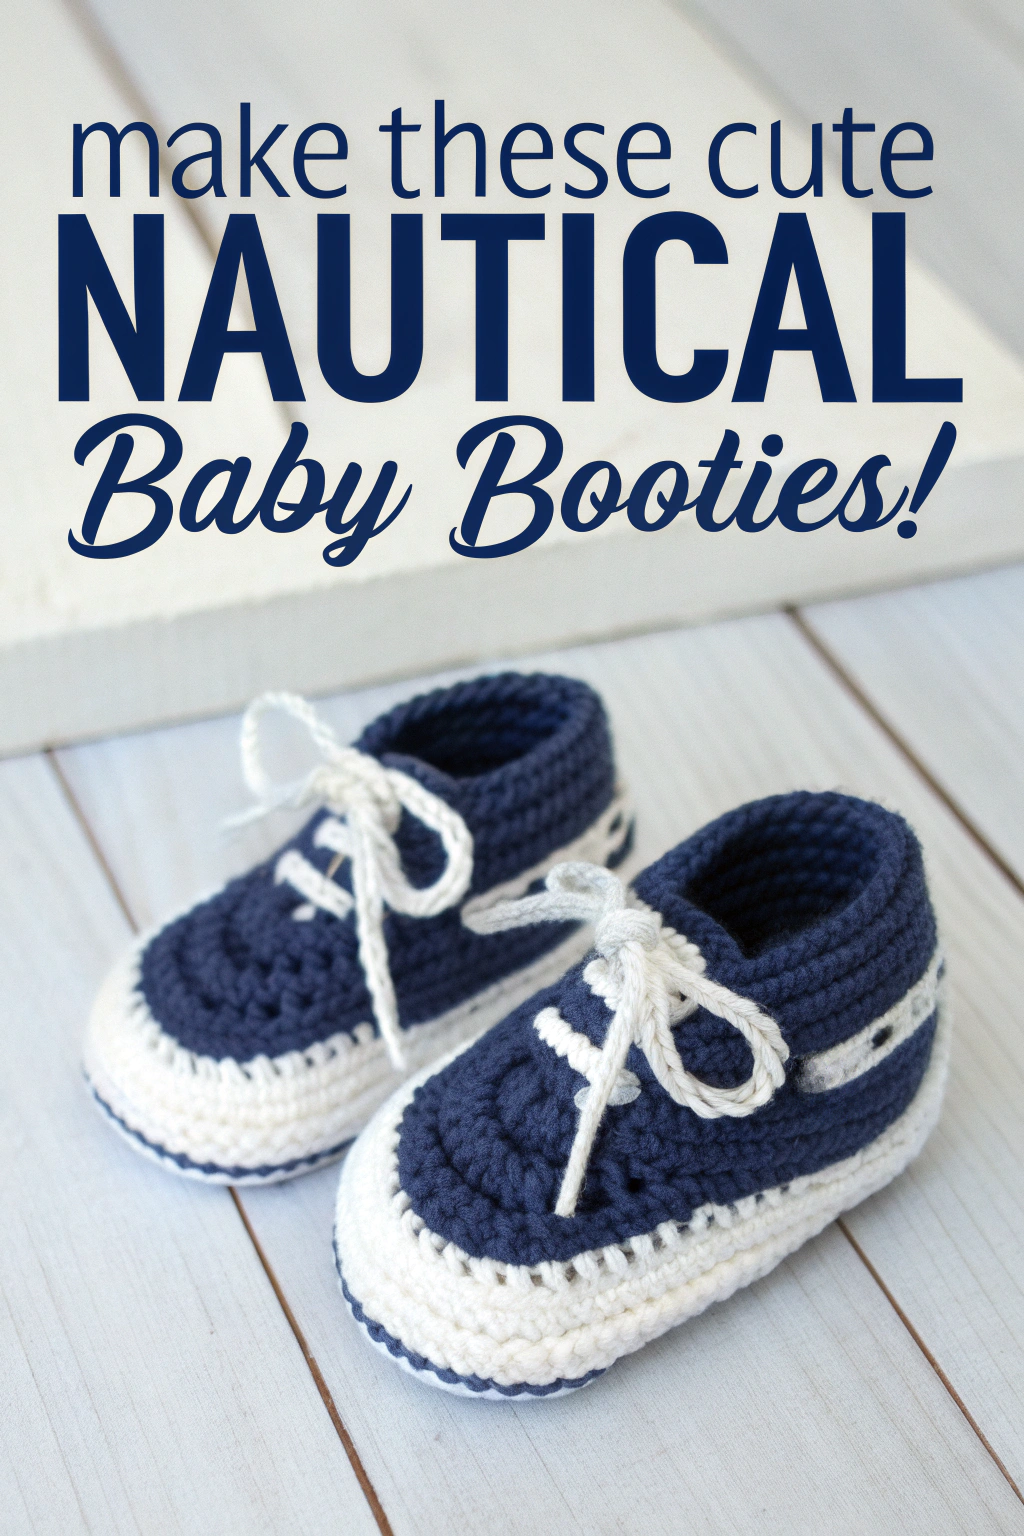
Round 5: Work 1 single crochet (sc) in each stitch around. No increases this time! Just single crochet in every stitch from the previous round. You’ll still have 24 stitches. Fasten off the white yarn. “Fasten off” means to cut the yarn, pull the loop on your hook to make a knot, and then pull the yarn tail tight to secure your work. You’ve successfully constructed the white sole! Refer to the image to see the shape and size of the white sole compared to the rest of the bootie.
Building the Bootie Upper in Navy
Now it’s time to switch to the navy blue yarn and start building the upper part of the bootie. This is where the bootie starts to look more like a shoe!
Round 6: Starting the Sides
We’ll attach the navy yarn and begin working upwards to form the sides of the bootie.
Round 6: Join navy yarn. To join yarn, make a slip knot with the new yarn, place it on your hook, and pull it through any stitch on your sole. Then, chain 1 (ch 1) – a chain stitch is another basic stitch where you yarn over and pull through the loop on your hook. Now, work 1 single crochet (sc) in each stitch around. Work in the “back loop only” for this round. “Back loop only” means when you look at the top of a stitch, you’ll see two loops forming a ‘V’. You’ll insert your hook only under the back loop (the loop further away from you). This will give the sole a nice defined edge as you start working up. You’ll still have 24 stitches.
Rounds 7-12: Raising the Bootie
Now we’ll continue working in rounds to develop the height of the bootie. We’ll use simple single crochet stitches.
Rounds 7-12: Work 1 single crochet (sc) in each stitch around. For these rounds, work in both loops of the stitch (the normal way to single crochet, unless instructed otherwise). Keep going around and around, making each round on top of the previous one. You’re essentially fashioning a little cup shape that will be the main part of the bootie. After round 12, you should see a nice little navy “shoe” starting to take form.
Round 13: Shaping the Front Opening
To make the bootie look more like a shoe and have an opening for the laces, we need to shape the front. We’ll do this by working fewer stitches in this round.
Round 13: Chain 1 (ch 1), then work 1 single crochet (sc) in each of the next 7 stitches. Chain 10 (ch 10). Skip the next 10 stitches. Work 1 single crochet (sc) in each of the last 7 stitches. You’ve just produced the opening for the laces! The chain 10 will form the tongue of the bootie, and the skipped stitches will be the opening. You’ll still have a total of 24 stitches and chains in this round if you count the chain stitches as stitches.
Round 14: Working Over the Chain
In this round, we’ll work over the chain stitches to solidify the opening and form a neater edge.
Round 14: Chain 1 (ch 1), work 1 single crochet (sc) in each of the next 7 stitches. Work 1 single crochet (sc) in each of the next 10 chain stitches from the previous round. Work 1 single crochet (sc) in each of the last 7 stitches. You’re now working single crochet stitches into the chain stitches, essentially filling in the gap you made in the last round and making a solid piece again. You should have 24 stitches again. Fasten off the navy yarn.
Adding Nautical Stripes
Let’s introduce the white yarn again to craft those cute nautical stripes at the ankle! This detail really brings the nautical theme to life. Refer to the image to see the placement and thickness of these stripes.
Rounds 15 & 16: White Stripes
We’ll work two rounds of white single crochet to develop the stripes.
Rounds 15 & 16: Join white yarn. Chain 1 (ch 1), work 1 single crochet (sc) in each stitch around for two rounds. That’s it! Two simple rounds of white single crochet will give you those charming stripes. Fasten off the white yarn.
Fashioning the Laces
The final touch is to fashion the white laces! These add a classic sneaker look to our baby booties and make them even more adorable.
Making the Laces
Laces are super easy to make using chain stitches.
Make two laces: For each lace, chain approximately 60 chains. Chain stitch is simply yarning over and pulling through the loop on your hook repeatedly until you have the desired length. Fasten off each lace. You can adjust the length of the chain if you want longer or shorter laces.
Lacing Up
Now, thread the white laces through the spaces in Round 13 where you chained 10. You can use your yarn needle to help you thread them through. Lace them up like you would regular shoelaces and tie a cute bow! Refer to the image to see how the laces are threaded and tied.
Finishing Touches and You’re Done!
Weave in all your yarn ends using the yarn needle. “Weaving in ends” means to thread the yarn tail through the back of your stitches to hide it and secure it so it doesn’t come undone. Trim any excess yarn.
And there you have it! You’ve just assembled a pair of adorable nautical baby booties! Aren’t they just the cutest?
Share Your Bootie Creations!
Congratulations on making your own pair of nautical baby booties! We hope you enjoyed this project and discovered the joy of crocheting something special with your own hands. Don’t be shy – show off your creations! Share pictures of your finished booties with friends and family, or even online! Happy crafting!