Crochet a Sweet Fox Jar Cozy For Beginners
Are you excited to dive into a super cute and totally rewarding crochet adventure? Let’s whip up an adorable Crochet Fox Jar Cozy that’s just perfect for sprinkling some handmade charm around your home! This project is a dream for beginners, and we’ll walk you through every single step. Get set to turn a plain old jar into a delightful fox pal!
Materials and Tools You’ll Need
Before we begin, let’s gather all the supplies you’ll need to fashion your charming fox cozy.
- Worsted weight yarn in light brown 🧶, cream 🧶, dark brown 🧶, mint green 🧶, black 🧶, and pink 🧶. (Small amounts of each color are needed, perfect for using up yarn scraps!)
- Crochet hook size H/8 (5.0 mm) or size recommended for your yarn 钩.
- Tapestry needle 🪡 for weaving in ends and sewing pieces together.
- Scissors ✂️.
- Stitch markers (optional, but helpful for beginners!) 📍.
- Safety eyes (optional, approximately 8-10mm) 👀 or black yarn for embroidered eyes.
- A glass jar (size is flexible, adjust your cozy size as needed to fit!) 🏺.
Let’s Get Started: Making the Jar Cozy Base
We’ll start by building the main part of the cozy that will wrap around your jar. We’ll be working in rounds, which means we’ll crochet in a spiral without joining rounds unless specified.
Round 1: With your light brown yarn, begin by forming a magic ring. If you’re new to magic rings, don’t worry! You can also chain 3 and slip stitch into the first chain to develop a ring. Once you have your ring, work 6 single crochet (sc) stitches into the ring. Pull the tail of the magic ring tight to close the center. (6 stitches)
Round 2: Work 2 sc in each stitch around. This is called increasing. You’re essentially doubling the stitches in this round. (12 stitches)
Round 3: *Sc in the next stitch, 2 sc in the next stitch.* Repeat from * to * around. This means you alternate between a regular single crochet and an increase (two single crochets in one stitch). (18 stitches)
Round 4: *Sc in the next 2 stitches, 2 sc in the next stitch.* Repeat from * to * around. (24 stitches)
Round 5: *Sc in the next 3 stitches, 2 sc in the next stitch.* Repeat from * to * around. (30 stitches)
Round 6: *Sc in the next 4 stitches, 2 sc in the next stitch.* Repeat from * to * around. (36 stitches)
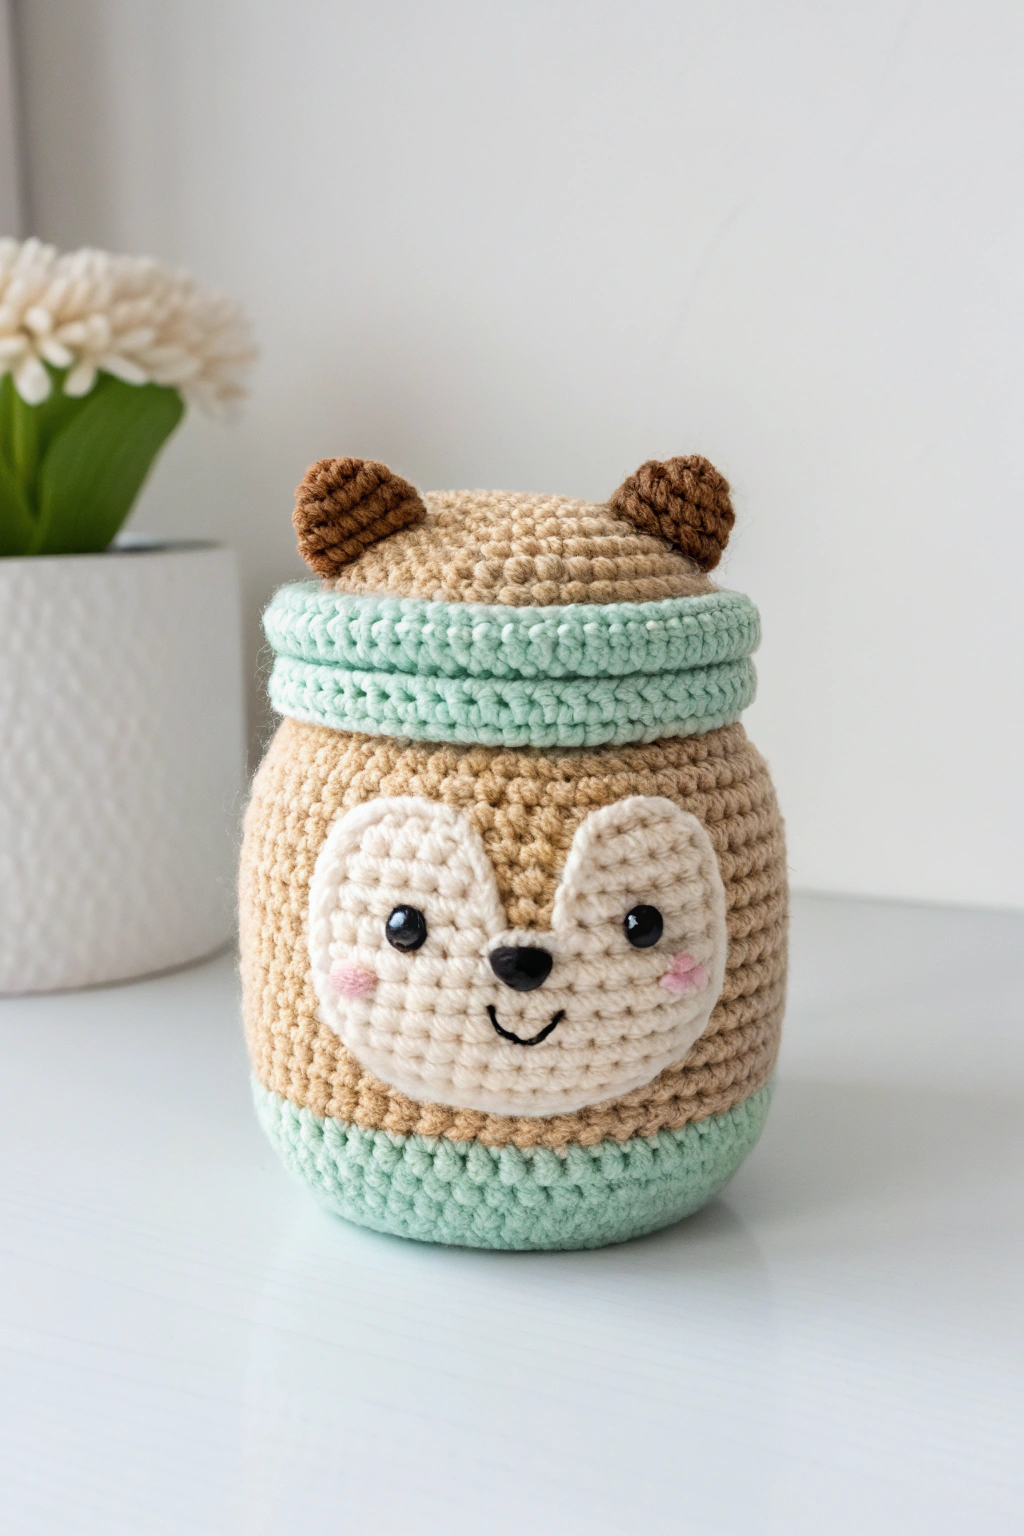
Continue increasing in this manner (increasing the number of single crochet stitches between each increase in each round) until your base circle is slightly smaller than the bottom of your jar. Refer to the image to see the approximate size of the base. You want it to fit snugly but not be too tight. For example, if your jar base is about 3 inches in diameter, you might stop increasing around Round 10 or 12, depending on your yarn and hook size.
Once your base circle is the right size, we’ll start working up the sides of the cozy.
Round 7: Work sc in each stitch around. Do not increase anymore. (Maintain the same stitch count as the last round).
Keep working single crochet rounds until the cozy reaches the desired height to cover most of your jar, leaving some space at the top and bottom for the mint green trim. You can periodically hold it up to your jar to check the height. Refer to the image to see how high the light brown part of the cozy goes.
Time for the Mint Green Trim!
Now we’ll switch to mint green yarn to fashion the bottom trim.
Round 8: With mint green yarn, work sc in each stitch around.
Round 9: Work sc in each stitch around.
Fasten off the mint green yarn and weave in the ends using your tapestry needle.
Let’s Add the Top Mint Green Trim!
We’ll repeat the mint green trim at the top of the cozy.
Join mint green yarn to the top edge of the light brown cozy.
Round 10: With mint green yarn, work sc in each stitch around.
Round 11: Work sc in each stitch around.
Fasten off the mint green yarn and weave in the ends. You now have the main body of your jar cozy!
Constructing the Lid
Now we’ll make the lid, which is similar to the base but slightly larger so it sits comfortably on top of the jar.
Round 1-6: Repeat Rounds 1-6 from the Jar Cozy Base instructions using light brown yarn.
Continue increasing in the same manner as the base until your lid circle is just a bit larger than the opening of your jar. This ensures it will sit nicely on top. It might be a couple more rounds of increasing than you did for the base. Again, refer to the image and hold it up to your jar for sizing.
Once the lid circle is the right size, we’ll add the mint green border.
Round 7: Switch to mint green yarn and work sc in each stitch around.
Round 8: Work sc in each stitch around.
Fasten off mint green yarn and weave in the ends. The lid is ready!
Developing the Cute Fox Ears (Make 2)
Let’s assemble the adorable ears using dark brown yarn. These are small and quick to make.
Round 1: With dark brown yarn, form a magic ring and work 6 sc into the ring. Pull the tail tight. (6 stitches)
Round 2: Work 2 sc in each stitch around. (12 stitches)
Round 3: *Sc in the next stitch, 2 sc in the next stitch.* Repeat from * to * around. (18 stitches)
Round 4: Sc in each stitch around. (18 stitches)
Fasten off, leaving a long tail for sewing. Shape the ear into a slightly rounded triangle. Repeat to produce a second ear.
Sew the Ears to the Lid: Position the ears on top of the lid, referring to the image for placement. Use the tapestry needle and the yarn tail to sew the ears securely to the lid.
Crafting the Fox Face Details
Now for the fun part – making the fox face! We’ll develop the cream face patch first.
Cream Face Patch:
Round 1: With cream yarn, form a magic ring and work 6 sc into the ring. Pull the tail tight. (6 stitches)
Round 2: Work 2 sc in each stitch around. (12 stitches)
Round 3: *Sc in the next stitch, 2 sc in the next stitch.* Repeat from * to * around. (18 stitches)
Round 4: *Sc in the next 2 stitches, 2 sc in the next stitch.* Repeat from * to * around. (24 stitches)
Round 5: *Sc in the next 3 stitches, 2 sc in the next stitch.* Repeat from * to * around. (30 stitches)
Round 6: Sc in each stitch around. (30 stitches)
Fasten off, leaving a long tail for sewing. Shape the cream piece into a slightly rounded shape, as seen in the image.
Sew the Face Patch to the Cozy: Position the cream face patch on the front of the jar cozy, centered vertically and horizontally. Refer to the image to see the placement. Sew it securely to the cozy using the yarn tail and tapestry needle.
Adding the Eyes, Nose, Mouth and Cheeks:
- Eyes: If using safety eyes, attach them to the cream face patch, referring to the image for spacing. If using yarn, embroider small black circles or ovals for eyes.
- Nose: With black yarn, embroider a small triangle or oval shape for the nose just below the eyes, centered on the cream patch.
- Mouth: With black yarn, embroider a small, curved line for the mouth, below the nose.
- Cheeks: With pink yarn, make two small circles or ovals. You can form these by making a magic ring and working a few single crochet stitches in it, then fastening off. Sew a pink cheek on each side of the cream face patch, as seen in the image.
Finishing Touches:
Weave in all remaining yarn ends to keep your cozy neat and tidy. Place your crafted fox cozy on your jar and admire your handiwork!
Helpful Tips:
- Stitch Markers: If you’re new to crochet, stitch markers can be super helpful! Place a marker at the beginning of each round to help you keep track of your rounds.
- Tension: Try to maintain consistent tension throughout your project. This will make your stitches even and your cozy look more polished.
- Size Adjustments: If your jar is a different size, you can adjust the number of increase rounds and the height of the cozy to fit perfectly. Just keep trying it on as you go!
- Troubleshooting: If your cozy seems to be getting wavy as you increase, you might be increasing too much. If it’s cupping, you might not be increasing enough. Don’t be afraid to undo a few rounds and adjust!
Congratulations! You’ve just produced a charming Crochet Fox Jar Cozy! Isn’t it adorable? Making things with your own hands is so rewarding, and we hope you enjoyed this project.