Crochet a Rainbow Bib: Easy Guide
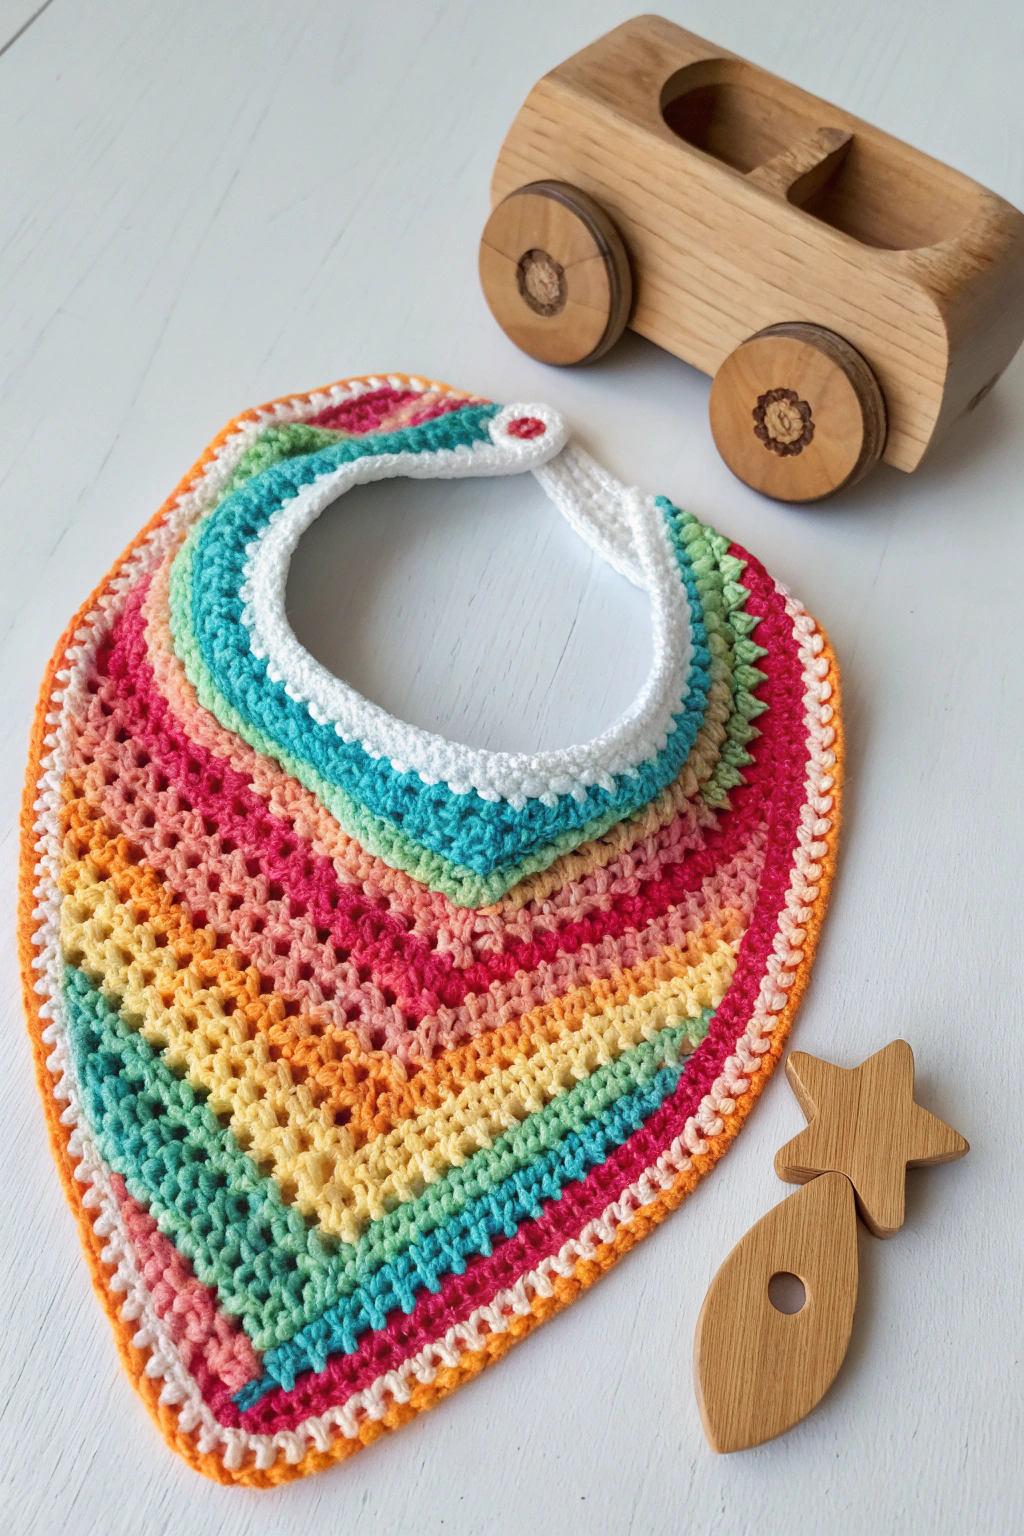
Are you ready to dive into the wonderful world of crochet? If you’ve always wanted to learn or are just starting out, you’ve come to the right place! Today, we’re going to make something super cute and practical: a Rainbow Crochet Bib! Look at the beautiful bib in the image – isn’t it just adorable? Imagine making one of these yourself!
Crocheting is like painting with yarn. You use a hook to pull loops of yarn through other loops, creating fabric. It might sound a little tricky at first, but trust me, with a little patience and these easy steps, you’ll be crocheting in no time. Making things with your own hands is so rewarding. There’s a special joy in creating something unique and handmade, especially for little ones. This rainbow bib is not only useful for catching dribbles and spills, but it’s also a cheerful and colorful accessory. Let’s grab our supplies and begin this fun crafting adventure together!
What You’ll Need to Make Your Rainbow Bib
Before we start crocheting our rainbow bib, let’s gather all the things we’ll need. Having everything ready will make the process smooth and enjoyable. Here’s what you’ll need:
- 🧶 Yarn: You’ll need lightweight cotton yarn in rainbow colors and white. Cotton yarn is soft and gentle on baby’s skin, and it’s easy to wash. For the rainbow part, you’ll need small amounts of each color: orange, yellow, light green, turquoise, light blue, pink, and red. You’ll need a bit more white yarn for the neckband and border. Look at the bib in the image to see the lovely rainbow colors we’re aiming for!
- 🪡 Crochet Hook: You’ll need a 4.0 mm crochet hook. This is a common size and works well with lightweight cotton yarn. A crochet hook is like your magic wand for pulling yarn into loops!
- ✂️ Scissors: For cutting the yarn. Any sharp scissors will do.
- 🔘 Button: You can make a yarn-covered button like the one in the image, or for an easier option, you can use one small button, about 1/2 inch (1.3 cm) in diameter. A small, cute button will work perfectly to close the bib at the back. The bib in the image has a white, yarn-covered button, but if you use a regular button, you can choose any color you like! If you choose to make the yarn-covered button, you will need a little extra white yarn to cover it (as mentioned above) and you can optionally use a small plain button as a base to wrap yarn around.
- 🧵 Needle for Sewing: A yarn needle or a tapestry needle with a large eye is best for weaving in yarn ends. This is like a sewing needle, but bigger and with a bigger hole to thread yarn through.
- 📍 Stitch Markers (optional): These are little clips that can help you mark certain stitches. They are helpful for beginners to keep track of rows, but not essential for this project.
Basic Crochet Stitches You’ll Use
Don’t worry if you’ve never crocheted before! We’ll go through each stitch step by step. For this bib, we’ll mainly use a few very basic crochet stitches. Think of stitches as the building blocks of crochet. Once you learn a few basic ones, you can create all sorts of amazing things!
Slip Knot – The Starting Point
Every crochet project starts with a slip knot. This is like making the first loop on your hook.
- Hold the yarn and make a loop. Imagine you’re making the letter ‘P’.
- Put the yarn end behind the loop and bring it to the front.
- Insert your crochet hook into the loop from front to back.
- Catch the yarn with your hook and pull it through the loop on your hook.
- Pull the yarn ends to tighten the knot on your hook. That’s your slip knot! You’re ready to start crocheting!
Chain Stitch (ch) – The Foundation
The chain stitch is the most basic stitch in crochet. It’s like making a chain of yarn loops. We’ll use it to start our bib and create the neckband.
- Hold your hook with the slip knot.
- Wrap the yarn around your hook from back to front. This is called “yarn over”.
- Pull the yarn through the loop on your hook. You’ve made one chain stitch!
- Repeat steps 2 and 3 to make more chain stitches. Each time you pull the yarn through, you create a new chain. Look at the image, and you can imagine these chain stitches forming the base of the neckband.
Double Crochet (dc) – Making the Fabric
Double crochet is a taller stitch that creates a more open fabric, like building a slightly taller brick in a wall compared to a shorter stitch. It’s the main stitch we’ll use for the colorful part of the bib.
- Yarn over (wrap the yarn around your hook).
- Insert your hook into the stitch you want to crochet into. “Insert” means to push your hook through the stitch from front to back.
- Yarn over again.
- Pull the yarn through the stitch. You now have three loops on your hook.
- Yarn over again.
- Pull the yarn through the first two loops on your hook. You now have two loops left.
- Yarn over one last time.
- Pull the yarn through the last two loops on your hook. You’ve completed a double crochet stitch!
Single Crochet (sc) – A Shorter Stitch for Edges
Single crochet is a shorter, tighter stitch. It creates a denser fabric and is great for borders and edges. We’ll use it for the white border around the bib and the neckband.
- Insert your hook into the stitch.
- Yarn over.
- Pull the yarn through the stitch. You now have two loops on your hook.
- Yarn over again.
- Pull the yarn through both loops on your hook. That’s a single crochet!
Slip Stitch (sl st) – Joining and Finishing
The slip stitch is a very simple stitch used to join rounds together or to move across stitches without adding height. It’s like a very flat stitch.
- Insert your hook into the stitch.
- Yarn over.
- Pull the yarn through the stitch AND through the loop already on your hook in one smooth movement. It’s almost like just pulling the yarn through everything quickly.
Let’s Crochet the Rainbow Bib – Step-by-Step
Now for the exciting part – making our rainbow bib! We’ll start from the bottom point of the bib and work our way up, adding stripes of color as we go. Refer to the image often to see how the shape and colors are forming.
Starting the Bib – The First Triangle
We’ll start with the orange yarn and create a small triangle shape that will be the bottom point of the bib.
Round 1: Start with a slip knot in orange yarn. Chain 3. This means make 3 chain stitches. In the 3rd chain from the hook (count back three chains from the hook, the loop on your hook does not count), make 3 double crochet stitches. Chain 2, and make 3 more double crochet stitches in the same 3rd chain. Chain 2, and slip stitch to join in the top of the first double crochet. This creates a small circle with two sets of double crochet stitches separated by chain spaces.
Round 2: Chain 3 (this counts as your first double crochet). Now, in the first chain-2 space from the previous round, make 3 double crochet stitches, chain 2, and 3 more double crochet stitches. In the next set of 3 double crochet stitches from the previous round, make 1 double crochet in each stitch. In the next chain-2 space, make 3 double crochet stitches, chain 2, and 3 more double crochet stitches. In the last set of 3 double crochet stitches, make 1 double crochet in each stitch. Chain 2, and slip stitch to join in the top of the starting chain-3.
Round 3: Chain 3 (counts as first double crochet). In the first chain-2 space from the previous round, make 3 double crochet stitches, chain 2, and 3 more double crochet stitches. Make 1 double crochet in each double crochet stitch across to the next chain-2 space. In the next chain-2 space, make 3 double crochet stitches, chain 2, and 3 more double crochet stitches. Make 1 double crochet in each double crochet stitch across to the end. Chain 2, and slip stitch to join in the top of the starting chain-3.
You are now starting to form a triangle shape. Notice in the image how the bib widens as it goes up. These chain-2 spaces at the corners are what help create that triangle shape!
Creating the Body – Adding Color Stripes
Now we’ll continue increasing the triangle size and change colors to create the rainbow stripes.
Rounds 4 – 5: Change to yellow yarn. Repeat Round 3 for two rounds. Fasten off orange yarn (cut the orange yarn, leaving a tail of about 6 inches). To fasten off, just pull the yarn end through the last loop on your hook and pull it tight to secure.
Rounds 6 – 7: Change to light green yarn. Repeat Round 3 for two rounds. Fasten off yellow yarn.
Rounds 8 – 9: Change to turquoise yarn. Repeat Round 3 for two rounds. Fasten off light green yarn.
Rounds 10 – 11: Change to light blue yarn. Repeat Round 3 for two rounds. Fasten off turquoise yarn.
Rounds 12 – 13: Change to pink yarn. Repeat Round 3 for two rounds. Fasten off light blue yarn.
Rounds 14 – 15: Change to red yarn. Repeat Round 3 for two rounds. Fasten off pink yarn.
After these rounds, you should have a colorful triangle shape that looks similar in size and shape to the rainbow part of the bib in the image. Don’t worry if yours is not exactly the same – handmade items are unique!
Making the Neckband and Border
Now we will use white yarn to create the neckband and border. This will give the bib a neat and finished look, just like in the image.
Round 16 (Neckband): Join white yarn with a slip stitch anywhere along the top edge of the red section. Chain 1 (this does not count as a stitch). Single crochet in each stitch around the entire bib edge. When you reach the corners of the triangle (the chain-2 spaces), make 2 single crochet stitches in each chain-2 space. Continue single crocheting all the way around. When you reach the top edge again, continue single crocheting across the top edge to form one side of the neckband. Chain 12. Skip about 1 inch (2.5 cm) along the top edge, and continue single crocheting across the remaining top edge to form the other side of the neckband. Slip stitch to join to the first single crochet of this round.
Round 17 (Border): Chain 1 (does not count as a stitch). Single crochet in each stitch around, including the chain stitches of the neckband. When you reach the end of the neckband chains, you will be working single crochet into each of those 12 chain stitches. Slip stitch to join to the first single crochet of this round. Fasten off white yarn.
Creating the Button Loop
We need a loop to fasten the button, so the bib can be closed.
- With white yarn, make a slip knot.
- Chain about 15 chain stitches. This will be the loop. Check the size by holding it up to your button – it should be just big enough for the button to pass through.
- Slip stitch to join the chain back to the slip knot, forming a loop. Fasten off white yarn, leaving a long tail for sewing.
Finishing Touches – Attaching the Button and Weaving in Ends
We’re almost done! Now we need to attach the button and hide all the yarn ends.
- Attach the Button Loop: Use the yarn tail from the button loop and your yarn needle to sew the loop securely to one side of the white neckband, on the opposite side from the button placement. Refer to the image to see where the loop is attached.
- Attach the Button: Sew the button to the other side of the white neckband, so it lines up with the button loop. When buttoned, the bib should fit nicely around a baby’s neck.
- Weave in Ends: Use your yarn needle to weave in all the loose yarn ends on the back of the bib. This means threading the yarn end through the stitches to hide it and secure it so it doesn’t come undone. Trim off any excess yarn.
You Did It! Your Rainbow Crochet Bib is Ready!
Congratulations! You’ve just crocheted a beautiful and practical Rainbow Crochet Bib! Take a moment to admire your handiwork. Isn’t it satisfying to make something lovely with your own hands?
This bib is perfect for a baby shower gift, or just to make for your own little one. The rainbow colors are so cheerful and fun, and the cotton yarn is soft and gentle.
Don’t be discouraged if your first attempt isn’t perfect. Like any new skill, crochet takes practice. The more you crochet, the easier and more natural it will become. And most importantly, have fun with it!
We’d love to see your creations! If you make a rainbow bib using this tutorial, please share a picture! Happy crocheting!