Crochet a Chic Granny Square Tote Bag
Ready to embark on a delightful crochet journey? Creating this vibrant granny square tote bag is easier than you might think, even if you’re just starting out with crochet! Gather your supplies, and let’s bring this beautiful and practical bag to life. You’ll find immense satisfaction in crafting something so lovely with your own hands.
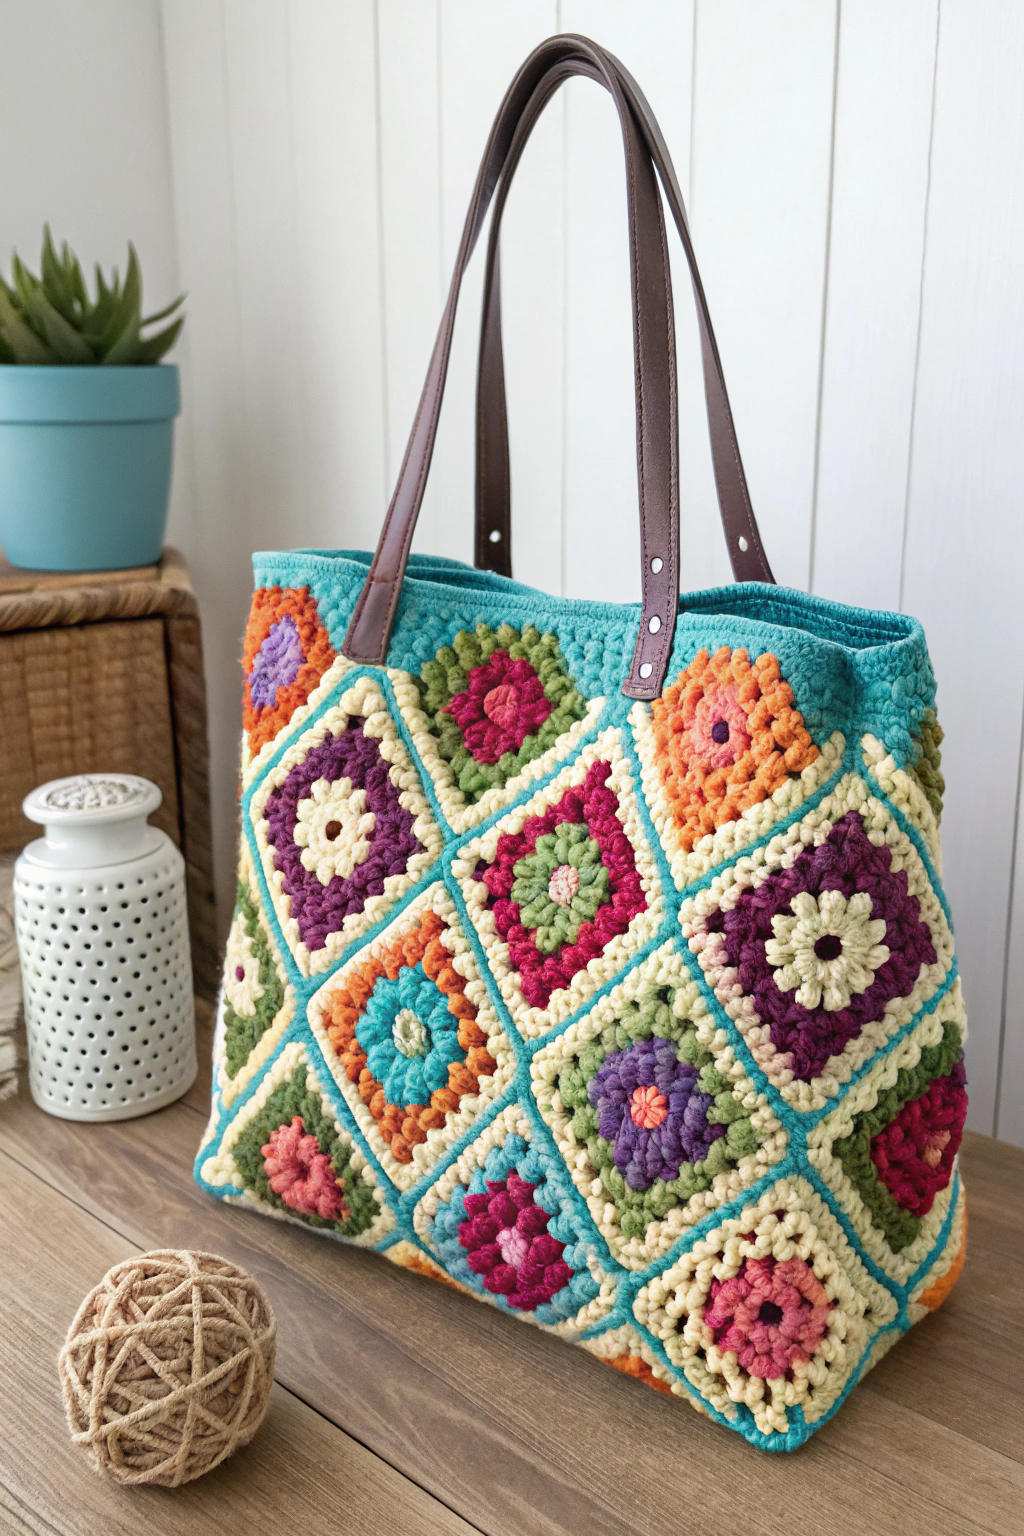
- Yarn: Worsted weight cotton yarn in a variety of colors. For the squares, choose cream as the base and then an assortment of bright colors for the flower centers and petals. Looking at the image, consider colors like shades of pink, purple, orange, blue, and green for the flower motifs. You will also need turquoise yarn for joining the squares and creating the top border.
- Crochet Hook: A 4.0mm crochet hook is a great starting point for worsted weight cotton yarn. However, always check your yarn label for recommended hook size and adjust if needed to achieve a comfortable gauge.
- Yarn Needle: For weaving in those yarn ends neatly and tidily.
- Leather Straps: Two leather straps with pre-punched holes and rivets for easy attachment. You can find these at craft stores or online. The image shows brown leather straps, approximately 24-28 inches long, which are perfect for shoulder bags.
- Scissors: To snip your yarn.
Let’s Learn the Basic Crochet Stitches:
Before we begin making our granny squares, let’s quickly go over the fundamental crochet stitches you’ll be using. Don’t worry if you’re completely new to this; we’ll explain everything step-by-step. The beauty of crochet lies in mastering just a few basic stitches to create intricate and beautiful designs.
First, we have the chain stitch (ch). This is the foundation of most crochet projects and is simply created by making loops of yarn with your hook. It’s the stitch you’ll use to start each round of your granny square and to create starting chains.
Next is the single crochet (sc). For a single crochet, you insert your hook into the stitch, yarn over (wrap the yarn around your hook), pull up a loop, yarn over again, and pull through both loops on your hook. While we won’t use single crochet extensively in the squares themselves, it’s a handy stitch to know and might be useful for variations or edgings in other projects.
Finally, and most importantly for our granny squares, we have the double crochet (dc). To make a double crochet, yarn over, insert your hook into the stitch, yarn over, pull up a loop (you’ll have three loops on your hook), yarn over, pull through two loops, yarn over again, and pull through the last two loops on your hook. The double crochet is what gives granny squares their classic open and airy texture, and we’ll be using it in clusters to create the square motifs.
Step 1: Creating the Granny Squares
Now for the fun part – making the granny squares! We will need to crochet 12-16 granny squares in total to create a tote bag. For a bag similar to the image, which features a 3×4 grid on the front panel, you’ll need at least 12 squares. For a fuller tote with front and back panels, 16 squares (arranged in a 4×4 grid for each panel or a different layout as you prefer) is recommended. Each square will feature a lovely flower motif in the center. Let’s begin with the cream base color for the square itself, and then add your chosen bright colors for the flower.
Round 1 (Center Flower): Start with a slip knot and chain 4 with your chosen flower center color (e.g., pink). Slip stitch to the first chain to form a ring. Chain 3 (this counts as your first double crochet), work 11 double crochets into the ring. Slip stitch to the top of the beginning chain 3 to join. You’ve now completed the center of your flower.
Round 2 (Slightly Raised Flower Petals): Change to your petal color (e.g., orange). Join with a slip stitch in any stitch. Chain 3 (counts as first double crochet), double crochet in the same stitch. *Chain 2, (double crochet, chain 1, double crochet) in the next stitch*. Repeat from * to * around 10 more times. Chain 2, slip stitch to the top of the beginning chain 3 to join. This round creates slightly raised petals around the center flower.
Round 3 (Square Shaping – First Color): Change to your first square color (e.g., green). Join with a slip stitch in any chain-2 space. Chain 3 (counts as first double crochet), 2 double crochets in the same chain-2 space. *Chain 1, in the next chain-2 space work 3 double crochets*. Repeat from * to * around 10 more times. Chain 1, slip stitch to the top of the beginning chain 3 to join. This round starts to shape the square.
Round 4 (Square Shaping – Cream Base): Change to your cream yarn. Join with a slip stitch in any chain-1 space. Chain 3 (counts as first double crochet), (2 double crochets, chain 2, 3 double crochets) in the same chain-1 space (this creates a corner). *Chain 1, in the next chain-1 space work 3 double crochets, chain 1, in the next chain-1 space work 3 double crochets, chain 1, in the next chain-1 space work (3 double crochets, chain 2, 3 double crochets)* (this creates the next corner). Repeat from * to * around 2 more times. Chain 1, in the next chain-1 space work 3 double crochets, chain 1, in the next chain-1 space work 3 double crochets, chain 1, slip stitch to the top of the beginning chain 3 to join. Fasten off and weave in your ends. You’ve completed your first granny square!
Repeat Rounds 1-4 to create a total of 12-16 granny squares, varying the flower center and petal colors as you desire to achieve a vibrant and unique look similar to the bag in the image. Notice in the image how each square has a slightly different color combination, adding to the charm.
Step 2: Joining the Granny Squares
Once you have your granny squares, it’s time to join them together. For a bag front panel similar to the image, lay out your 12 squares in a 3×4 arrangement. If you are making a full tote bag, lay out 16 squares in a 4×4 arrangement for each side (front and back), mirroring the design in the image or creating your own color pattern. This step allows you to visualize your final tote bag before joining. We will use turquoise yarn, as seen in the image, to join the squares and create a cohesive look.
We will use a visible slip stitch join to create a decorative grid effect, as seen in the image. Place two squares right sides together. Join your turquoise yarn with a slip stitch in the corner chain-2 space of one square. Insert your hook through both corner chain-2 spaces (of both squares), yarn over, and pull through all loops. Continue to slip stitch along the edges, aligning stitches as neatly as possible. Work one slip stitch in each double crochet and chain-1 space along the edges. When slip stitching, make sure to keep your tension consistent and slightly looser than usual to ensure the turquoise joining is prominent on the right side of the bag. When you reach the end of the edge, fasten off. Repeat to join all squares in rows (of three or four depending on your layout), and then join the rows together to form the main body of the tote bag. Refer to the image to see how the turquoise joining creates a nice grid effect.
Step 3: Adding the Top Border and Straps
To finish your tote bag, we’ll add a top border for a clean edge and then attach the leather straps. Using the same turquoise yarn, join with a slip stitch anywhere along the top edge of the bag. Work single crochet stitches evenly around the entire top opening of the bag. For a sturdier border, you can work two or three rounds of single crochet. This border not only neatens the top edge but also provides a good base for attaching the straps. Observe in the image how the turquoise border neatly finishes the top of the bag.
Now, for the leather straps. Position the straps evenly on the top edge of the bag, referring to the image for placement. For a professional look and comfortable wear, position the leather straps approximately 2-3 cm (or about an inch) inwards from the side edges of the top border, as observed in the image. Use the provided rivets to securely attach the leather straps to the crocheted border. Follow the instructions that come with your rivets and leather straps for proper attachment. Ensure they are firmly fixed to comfortably support the weight of the bag’s contents.
Enjoy Your Handmade Tote!
Congratulations! You’ve crocheted your very own granny square tote bag. Isn’t it rewarding to create something beautiful and functional with your own hands? This vibrant bag is perfect for everyday use, shopping trips, or even as a stylish beach bag. The possibilities are endless!
We encourage you to experiment with different color combinations and yarn types in future projects. Crochet is a wonderfully versatile craft, and each handmade piece carries a special touch of creativity and care. Don’t hesitate to share your finished tote bag with friends and family, and inspire others to discover the joy of crochet. We would absolutely love to see your creations – please share photos of your bags online and tag us! Happy crocheting!