Cozy Crochet Hooded Baby Cardigan
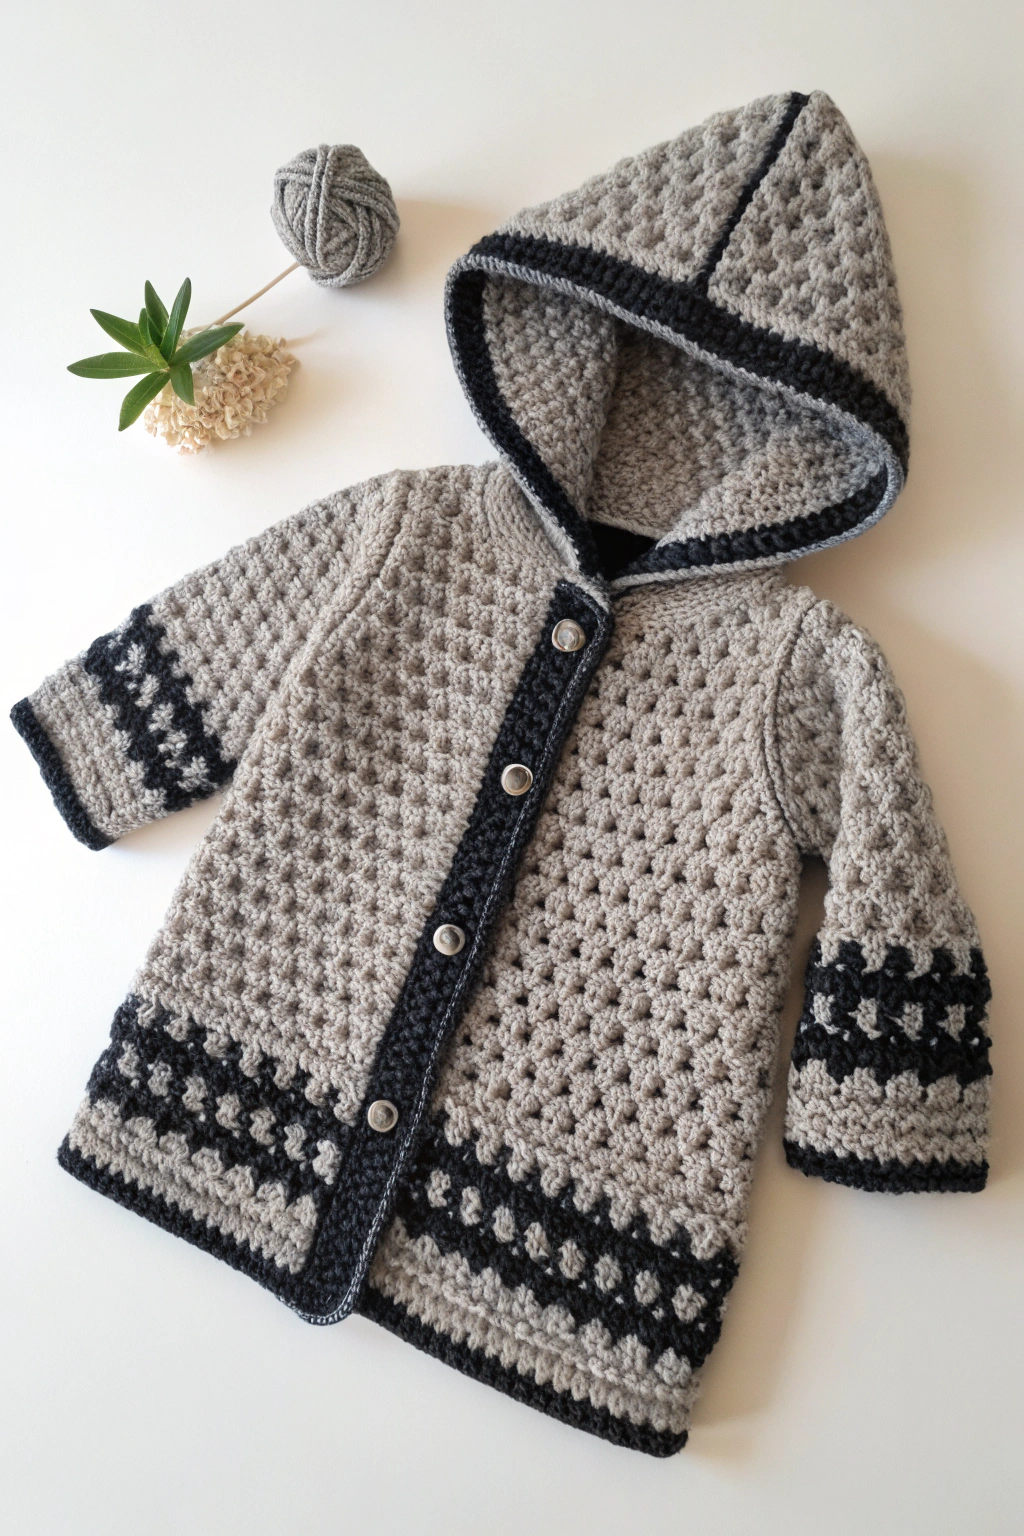
Hello fellow yarn enthusiasts! Have you ever seen a handmade baby item and thought, “I wish I could make something that lovely”? Well, you absolutely can! This guide will walk you, step-by-step, through putting together the adorable hooded baby cardigan shown in the image. It features a wonderfully textured stitch, stylish dark contrasting bands, and a snuggly hood – perfect for keeping a little one warm. Even if you’re just starting your crochet journey, we’ll take it slow and explain everything along the way. Get ready to feel that amazing satisfaction of bringing yarn and hook together into something truly special!
What You’ll Need
Gather these supplies before you begin:
- 🧶 Yarn: Worsted weight yarn (Category 4). You’ll need two colors: a main color (the light grey shown) and a contrasting color (the dark grey/black shown). Estimate about 200-300 yards of the main color and 50-100 yards of the contrast color for a size like 6-12 months, but adjust based on the size you intend to fashion.
- 🪡 Crochet Hook: A size H/8 (5.0 mm) hook is a good starting point for worsted yarn, but check your yarn label’s recommendation. Adjust if needed to get a fabric you like.
- ✂️ Scissors: For snipping yarn.
- 🧵 Yarn Needle: Also called a tapestry needle, for weaving in ends and any seaming.
- 🔘 Buttons: Four small buttons (around 1/2 inch or 1.5 cm diameter).
- 📏 Measuring Tape: To check your sizing as you go.
Getting Started: Basic Stitches Explained
This pattern uses a few fundamental crochet stitches. Let’s break them down simply:
- Chain (ch): This is your foundation. Make a slip knot on your hook. Yarn over (wrap yarn around the hook from back to front) and pull the yarn through the loop already on your hook. That’s one chain! Repeat for the desired number.
- Slip Stitch (sl st): This stitch is used for joining or moving across stitches without adding height. Insert your hook into the specified stitch, yarn over, and pull the yarn through both the stitch and the loop on your hook in one motion.
- Single Crochet (sc): This is a short, dense stitch. Insert your hook into the specified stitch, yarn over, pull up a loop (you’ll have two loops on your hook). Yarn over again, and pull through both loops on the hook.
- Double Crochet (dc): This is a taller stitch, used in the main body pattern. Yarn over, insert your hook into the specified stitch, yarn over, pull up a loop (three loops on hook). Yarn over, pull through the first two loops on the hook (two loops remaining). Yarn over again, pull through the remaining two loops.
A Note on Gauge: Before you start the actual cardigan, it’s wise to make a small test swatch (maybe 4×4 inches) using the main stitch pattern (explained below). Measure how many stitches and rows fit into a certain area (e.g., 4 inches). This helps ensure your finished cardigan matches the intended size. If you have too many stitches/rows, try a larger hook. Too few? Try a smaller hook.
Constructing the Cardigan Body (Top-Down)
This cardigan is worked from the neckline down, all in one piece initially. This method minimizes sewing later! We’ll use increases at four points to shape the yoke (the top part covering shoulders and chest).
The Yoke
- Starting Chain: Using your main color (light grey), make a chain long enough to comfortably fit around a baby’s neck. For a 6-12 month size, try chaining 52. Make sure it’s a multiple of 4. Join the last chain to the first chain with a slip stitch (sl st) to form a ring, being careful not to twist the chain. Important: For absolute beginners, working back and forth instead of in a ring might be easier initially. If you prefer, chain 53, and start row 1 in the second chain from the hook, working flat. You’ll sew a small seam at the back of the neck later if you work flat. The instructions below assume working flat for simplicity. If working in the round, join each round and turn.
- Row 1 (Setup): Chain 1 (this doesn’t count as a stitch). Work 1 single crochet (sc) in each chain across. (e.g., 52 sc). Turn your work.
- Row 2 (Foundation for Stitch Pattern): Chain 3 (this counts as your first double crochet (dc) here and throughout). Skip the first sc (the base of the ch-3). Work 1 dc in the next stitch. Skip the next 2 stitches, work 3 dc in the next stitch. Repeat the part between the * * across the row until you have 3 stitches left. Skip the next 2 stitches, work 1 dc in each of the last 2 stitches. Turn.
- Row 3 (Main Stitch Pattern – Cluster Row): Chain 3 (counts as 1 dc). Work 2 dc in the very first space (the space between the turning chain and the next dc group from the previous row). Work 3 dc in the next space between dc groups. Repeat from * across, working 3 dc into each space between the 3-dc groups of the previous row. To finish the row, work 3 dc in the space before the final turning chain of the previous row. Turn.
- Understanding the Stitch: You are essentially working groups of 3 double crochet stitches into the spaces between the groups from the row below. This forms the textured, slightly open fabric seen in the image.
- Row 4 (Increase Row): This is where we shape the yoke. Chain 3 (counts as 1 dc). Work 2 dc in the first space as usual. Continue working the 3-dc groups in each space across, BUT you need to establish four “corners” for increases. Divide your stitches roughly into Back, Shoulder, Front, Shoulder, Front sections. A typical division for 52 starting stitches might be: Front (3 groups), Corner, Shoulder (4 groups), Corner, Back (6 groups), Corner, Shoulder (4 groups), Corner, Front (3 groups).
- At each Corner: Instead of just working (3 dc) in the space, work (3 dc, chain 1, 3 dc) all in the same space. This “chain 1” space becomes your new increase point in subsequent increase rows.
- Tip: Place stitch markers in the chain-1 spaces at the corners so you don’t lose track of them!
- Row 5 (Cluster Row): Work as Row 3, working 3 dc in each space between groups, including the chain-1 corner spaces you established. Turn.
- Row 6 (Increase Row): Work as Row 4, making sure to work (3 dc, ch 1, 3 dc) into each of the chain-1 corner spaces marked from the previous increase row. Turn.
- Repeat Rows 5 and 6: Continue alternating between the regular cluster row (Row 5) and the increase row (Row 6). You’ll see the yoke growing, separating into distinct sections for the front panels, back, and sleeves. Keep going until the yoke is deep enough to reach the baby’s underarm. Measure from the neck down. (For 6-12 months, around 5-6 inches might be right). Ensure you end on a Row 5 repeat (a non-increase row).
Dividing for Body and Sleeves
- Separation Row: Chain 3 (counts as 1 dc). Work the 3-dc cluster pattern across the first front section until you reach the first corner space.
- Work 3 dc directly into that corner space.
- Skip all the stitches belonging to the first sleeve section.
- Work 3 dc directly into the next corner space (the one marking the start of the back section). This joins the front to the back and forms the first armhole!
- Continue the 3-dc cluster pattern across all the back section stitches until you reach the third corner space.
- Work 3 dc directly into that corner space.
- Skip all the stitches belonging to the second sleeve section.
- Work 3 dc directly into the final corner space (the one marking the start of the second front section). This forms the second armhole.
- Continue the 3-dc cluster pattern across the remaining second front section stitches. Turn. You now have the body of the cardigan joined together!
Working the Body Length
- Continue working the 3-dc cluster pattern (like Row 3) back and forth in rows on only these joined body stitches. No more increases are needed here.
- Adding the First Color Band: When the body is about two-thirds of the desired final length (measure from underarm down), it’s time for the first dark grey band seen near the bottom.
- Changing Colors: To change to the dark grey yarn, work the very last double crochet of your light grey row until the final step (when you have two loops left on the hook). Drop the light grey yarn (leave it attached for later), yarn over with the dark grey yarn, and pull it through the last two loops to complete the stitch. Now your hook has the dark grey yarn ready. Chain 3 with the dark grey. Turn.
- Work one full row of the 3-dc cluster pattern using the dark grey yarn.
- At the end of this dark grey row, change back to the light grey yarn using the same method (complete the final dc stitch by pulling the light grey through the last two loops). Chain 3 with light grey. Turn.
- Work one full row of the 3-dc cluster pattern using the light grey yarn. Turn.
- Adding the Second Color Band: Change back to the dark grey yarn. Work two full rows of the 3-dc cluster pattern using the dark grey yarn. Change back to light grey at the end of the second dark grey row. Turn.
- Continue working the 3-dc cluster pattern in light grey until the cardigan reaches your desired total length (e.g., measure from shoulder to hip or desired hemline).
- Final Edging (Bottom): Work one row of single crochet (sc) evenly across the bottom edge in light grey for a neat finish. Then, change to dark grey. Work one final row of single crochet (sc) in dark grey all along the bottom edge. Fasten off the yarn (cut, leaving a tail, and pull the tail through the last loop on the hook).
Adding the Sleeves
Now go back to the armholes you formed.
- Join Yarn: Attach your main color (light grey) yarn with a slip stitch into the center of the underarm area (where you skipped stitches). It’s best to join in one of the 3-dc groups you worked into the corner spaces when dividing.
- Round 1: Chain 3 (counts as 1 dc). Work the 3-dc cluster pattern evenly around the armhole opening, working into the spaces between stitches/groups along the edge. Join the round with a slip stitch to the top of the starting ch-3. Important: Unlike the body worked back-and-forth, sleeves are usually worked in joined rounds. Do not turn your work unless specified.
- Continue Rounds: Keep working the 3-dc cluster pattern in joined rounds.
- Adding the Sleeve Color Band: When the sleeve is about 1-1.5 inches from the desired final length, it’s time for the dark grey band near the cuff.
- Follow the same color change process as the body bands: Work one round in dark grey, one round in light grey, then one round in dark grey. Change back to light grey.
- Final Cuff Edging: Work one round of single crochet (sc) evenly around the cuff edge in light grey. Join with sl st. Change to dark grey. Work one final round of single crochet (sc) in dark grey. Fasten off.
- Repeat the entire sleeve process for the second armhole.
Fashioning the Hood
The hood gives this cardigan its cozy charm!
- Attach Yarn: Using your main color (light grey), attach the yarn with a slip stitch to one of the front corners of the original neckline chain/row.
- Row 1: Chain 3 (counts as 1 dc). Work the 3-dc cluster pattern evenly across the entire neckline edge, working into the chain spaces or stitches of that first row. Turn.
- Continue Rows: Keep working the 3-dc cluster pattern back and forth in rows, building up the height of the hood. Make it deep enough to comfortably cover a baby’s head (around 6-7 inches high is typical). End with a full row. Do not fasten off yet.
- Shaping the Top: Fold the hood piece exactly in half lengthwise, with the right sides facing inwards. You essentially have two edges meeting at the top-back of the hood.
- Seaming: You can either fasten off, leaving a long tail, and sew the top edges together using your yarn needle and a whip stitch. OR, for a seamless join: Chain 1, and working through both layers of the folded hood edge, slip stitch the top edges together across the row. This forms the seam at the back of the hood. Fasten off.
The Finishing Touches: Button Bands and Hood Trim
This is where the dark grey trim really defines the cardigan.
- Button Band (Right Front – as worn):
- Attach the dark grey yarn at the bottom corner of the right front opening.
- Chain 1. Work a row of single crochet (sc) evenly up the entire front edge, continuing around the front edge of the hood, all the way to the top seam, and then down the other side of the hood edge, and finally down the left front opening edge to the bottom corner. Aim for about 2 sc stitches for every dc row-end, and 1 sc per sc stitch/chain space along the neck/hood edge. Keep the stitches neat and ensure the edge doesn’t pucker or ruffle.
- Tip: Place your stitches consistently for a professional look.
- Work 2-3 more rows of sc in dark grey, turning at the end of each row. On the second or third row, along the right front edge only, incorporate buttonholes.
- Making Buttonholes: Decide where you want your four buttons. At each button position, chain 2, skip the next 2 sc stitches, then continue with sc. On the next row, work 2 sc into each ch-2 space to complete the hole. Ensure your buttonholes are the right size for your chosen buttons!
- Hood Seam Trim: The image shows a dark grey trim along the center seam of the hood. Attach the dark grey yarn at the base of the hood seam (near the neck). Work a line of slip stitches or single crochet stitches directly over the seam line, all the way to the top edge. Fasten off.
- Weave in Ends: Use your yarn needle to carefully weave in all loose yarn tails on the inside of the cardigan. Trim any excess.
- Attach Buttons: Sew the four buttons onto the left front band, directly opposite the buttonholes you fashioned on the right band.
You’ve Done It!
Take a moment to admire the beautiful hooded cardigan you’ve put together! Each stitch, each color change, was guided by your own hands. This piece isn’t just clothing; it’s a warm hug stitched with care. Imagine a little one bundled up snugly inside – that’s the real magic of handmade.
Don’t hesitate to try this project. Go slow, be patient with yourself (especially if you’re new!), and enjoy the process of watching the fabric grow. We’d love to see the lovely jackets you put together – feel free to share photos of your finished pieces! Happy stitching!