Chic Crocheted Clutch | Your Beginner-Friendly Project!
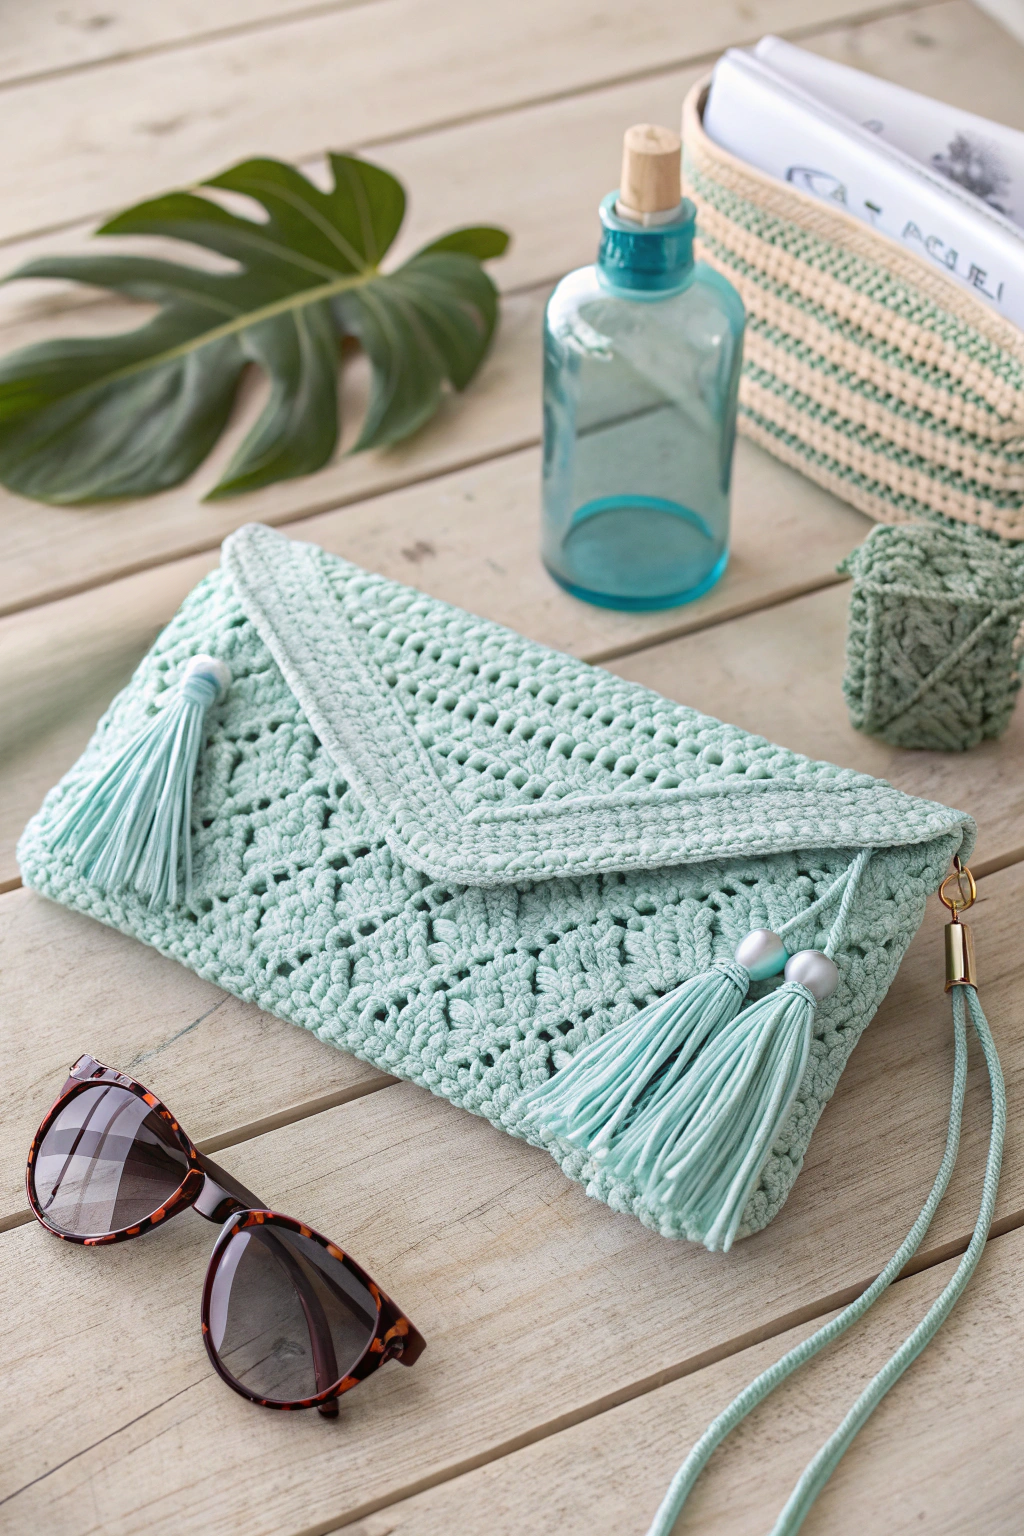
Are you ready to pick up your crochet hook and make something beautiful and practical? In this guide, we’ll walk you through how to fashion your very own stylish crocheted clutch bag, just like the gorgeous one you see in the picture! Don’t worry if you’ve never held a hook before – we’ll take it slow and steady, step by step. Get ready to experience the joy of making something amazing with your own two hands!
Materials You’ll Need
Before we begin, let’s gather everything we need. Having your materials ready will make the whole process smooth and enjoyable.
- 🧶 Yarn: About 200 yards of DK weight cotton yarn in a lovely light blue (or your favorite color!). Cotton is great because it’s sturdy and gives your clutch nice structure.
- 🪡 Crochet Hook: A size D/3 (3.25 mm) crochet hook. This size is perfect for DK weight yarn and will help you form a fabric that’s not too tight and not too loose.
- ✂️ Scissors: For snipping yarn ends.
- 📍 Yarn Needle: Also known as a tapestry needle, for weaving in those loose ends to keep your work neat and tidy.
- Two decorative beads: About 1/2 inch in diameter, for adding a touch of elegance to the tassels. Silver beads like in the picture would look fantastic!
- Optional: A magnetic snap closure if you want to add extra security to your clutch.
- Optional: A small metal ring and clasp for attaching the strap. You can see these in the image on the right side of the clutch.
Let’s Get Started! Step-by-Step Guide to Making Your Clutch Bag
Now for the fun part – let’s start building our clutch bag! We’ll go through each part step-by-step. Remember, there are no mistakes, just learning opportunities! Take your time, and enjoy the process of fashioning this beautiful accessory.
Making the Base of the Clutch
First, we’re going to develop the main body of the clutch bag. This is like laying the foundation of a house – it’s the base we’ll build everything else upon.
Step 1: Start with a slip knot on your crochet hook. A slip knot is just a simple loop that you tighten on your hook to begin crocheting. If you’ve never fashioned one before, don’t worry! There are tons of super easy video tutorials online that can show you exactly how. Just search for “slip knot crochet.”
Step 2: Chain 60 stitches. To chain, you wrap the yarn around your hook and pull it through the loop on your hook. Repeat this 60 times. This chain is the foundation row – the very first row of your clutch. This long chain will determine the width of your clutch bag. You can see in the image that the clutch is rectangular and this chain starts that shape.
Step 3: Work the first row in single crochet. Single crochet is a basic stitch in crochet. It’s quite simple! To single crochet, insert your hook into the second chain from your hook (skip the first chain). Yarn over (wrap the yarn around your hook), pull up a loop (you’ll have two loops on your hook), yarn over again, and pull through both loops on your hook. That’s one single crochet! Work a single crochet in each chain across the entire row. When you reach the end of the row, you will have 59 single crochet stitches.
Step 4: Chain 1 and turn your work. Chaining 1 at the end of a row and turning is how we get ready for the next row in most crochet projects. It’s like flipping the page in a book to start a new line of text.
Step 5: Now we will begin the stitch pattern that gives the clutch its lovely openwork texture that you can see clearly in the image. This pattern uses a combination of single crochet and chain stitches. We’ll work in rows.
Step 6: Row 2: Single crochet in the first stitch. Then, chain 2. Skip the next two stitches. Single crochet in the next stitch. Repeat “chain 2, skip two stitches, single crochet in the next stitch” across the row. When you reach the end of the row, you should end with a single crochet in the last stitch. Chain 1 and turn.
Step 7: Row 3: Single crochet in the first stitch. Chain 2. Single crochet in the next single crochet stitch from the previous row (you’ll be working into the single crochet stitches, not the chain spaces). Repeat “chain 2, single crochet in the next single crochet stitch” across the row. End with a single crochet in the last stitch. Chain 1 and turn.
Step 8: Repeat Rows 3 until your piece measures about 10 inches tall, or until it’s the size you want for your clutch. You can see in the image that the clutch is taller than it is wide when folded, so aim for a rectangular shape before folding it over to assemble the clutch. Keep counting your rows as you go! This repeating pattern is what produces the main fabric of your clutch.
Step 9: Once you reach the desired height, make one more row of single crochet stitches across. This row gives a nice solid edge to the top of the clutch. Fasten off your yarn and weave in the ends. “Fasten off” just means to secure the last stitch so it doesn’t unravel. Usually, you cut the yarn, pull the loop through, and tighten it. “Weaving in the ends” means using your yarn needle to tuck the loose yarn ends back into your crochet work so they are hidden and secure. This makes your crafted piece look neat and professional.
Crafting the Flap
Now we’ll fashion the flap that folds over to close the clutch. Look at the image – the flap is triangular and has a lovely scalloped edge.
Step 1: Count in 15 stitches from one side of the top edge of your crocheted piece. Attach your yarn here. “Attaching yarn” usually means making a slip knot on your hook and then pulling the loop through the stitch where you want to start, and then chaining 1 to secure it.
Step 2: Row 1: Single crochet in the next 30 stitches. Chain 1 and turn. So the flap will be 30 single crochet stitches wide.
Step 3: Row 2: Single crochet decrease, single crochet in the next 26 stitches, single crochet decrease. Chain 1 and turn. A “single crochet decrease” is how we make the flap narrower to form the triangle shape. To single crochet decrease, insert your hook into the next stitch, yarn over, pull up a loop (two loops on hook), insert hook into the next stitch, yarn over, pull up a loop (three loops on hook), yarn over, and pull through all three loops. You’ve just decreased two stitches into one!
Step 4: Row 3: Single crochet decrease, single crochet in the next 24 stitches, single crochet decrease. Chain 1 and turn.
Step 5: Continue decreasing in this way on each row, decreasing one stitch on each side in each row, until you have only 2 stitches left. Single crochet these two stitches together (another decrease). Fasten off and weave in the ends. You’ve now developed the triangular flap!
Adding the Scalloped Edge
To produce the pretty scalloped edge on the flap just like in the picture, we’ll add a final decorative round.
Step 1: Attach your yarn at the bottom corner of the flap.
Step 2: Work a slip stitch evenly around the entire edge of the flap. A slip stitch is a very simple stitch. Insert your hook into the stitch, yarn over, and pull through both loops on your hook in one go. Work slip stitches all the way around the flap edge.
Step 3: When you reach the starting point of your slip stitch round, fasten off and weave in the ends. This neatens the edge and gives it a finished look.
Forming the Tassels
Tassels add a playful and elegant touch to our clutch, just like you can observe in the image.
Step 1: For each tassel (you’ll need two), cut about 20 strands of yarn, each about 8 inches long.
Step 2: Gather the strands together and fold them in half.
Step 3: Use a separate piece of yarn to tie tightly around the folded strands, about 1 inch down from the fold. This forms the “head” of the tassel.
Step 4: Thread one bead onto the tying yarn. Slide the bead up to the tassel head and tie the yarn securely underneath the bead to hold it in place.
Step 5: Trim the ends of the tassel to make them even.
Step 6: Attach one tassel to each bottom corner of the flap, as shown in the image. You can use the tying yarn to securely sew them onto the corners.
Assembling the Clutch
Now it’s time to assemble all the pieces and build our clutch into its final shape!
Step 1: Fold the bottom edge of your crocheted piece up to meet the base of the flap. This will form the body of the clutch.
Step 2: Using your yarn needle and yarn, sew the side edges together, starting from the bottom and going up to where the flap begins. You can use a whip stitch or a mattress stitch to join the sides neatly. Make sure your stitches are secure so the sides of the clutch are firmly joined.
Step 3: If you are using a magnetic snap, now is the time to attach it. Follow the instructions that come with your snap to attach one part to the inside center of the flap and the other part to the front of the clutch body, so they meet when the flap is closed.
Forming the Strap (Optional)
The image shows a delicate crocheted strap, which is a lovely addition for carrying your clutch. If you want to make a strap:
Step 1: Chain about 120 stitches (or however long you want your strap to be).
Step 2: Slip stitch in the back loop only of each chain stitch across the entire chain. This will fashion a narrow, cord-like strap. Fasten off and weave in the ends.
Step 3: Attach the metal ring (if using) to one end of the clutch side. Attach the strap to the ring and the other end of the strap to the other side of the clutch, opposite the ring, using the clasps. If you are not using a ring and clasp, you can simply sew the ends of the strap directly to the sides of the clutch.
Finishing Touches and Enjoying Your Crafted Clutch!
Congratulations! You’ve just produced your own beautiful crocheted clutch bag! Take a moment to admire your handiwork. You developed this lovely accessory from just yarn and a hook – how amazing is that?
Feel free to experiment with different yarn colors and bead types to truly personalize your clutch. You can also add lining fabric inside if you wish, for extra durability and a more finished interior.
We hope you enjoyed this tutorial and the process of making your clutch. Don’t hesitate to try this project and share pictures of your own clutches! We’d love to see how yours turns out! Happy crocheting!