Bright Lemon Glazed Cookies
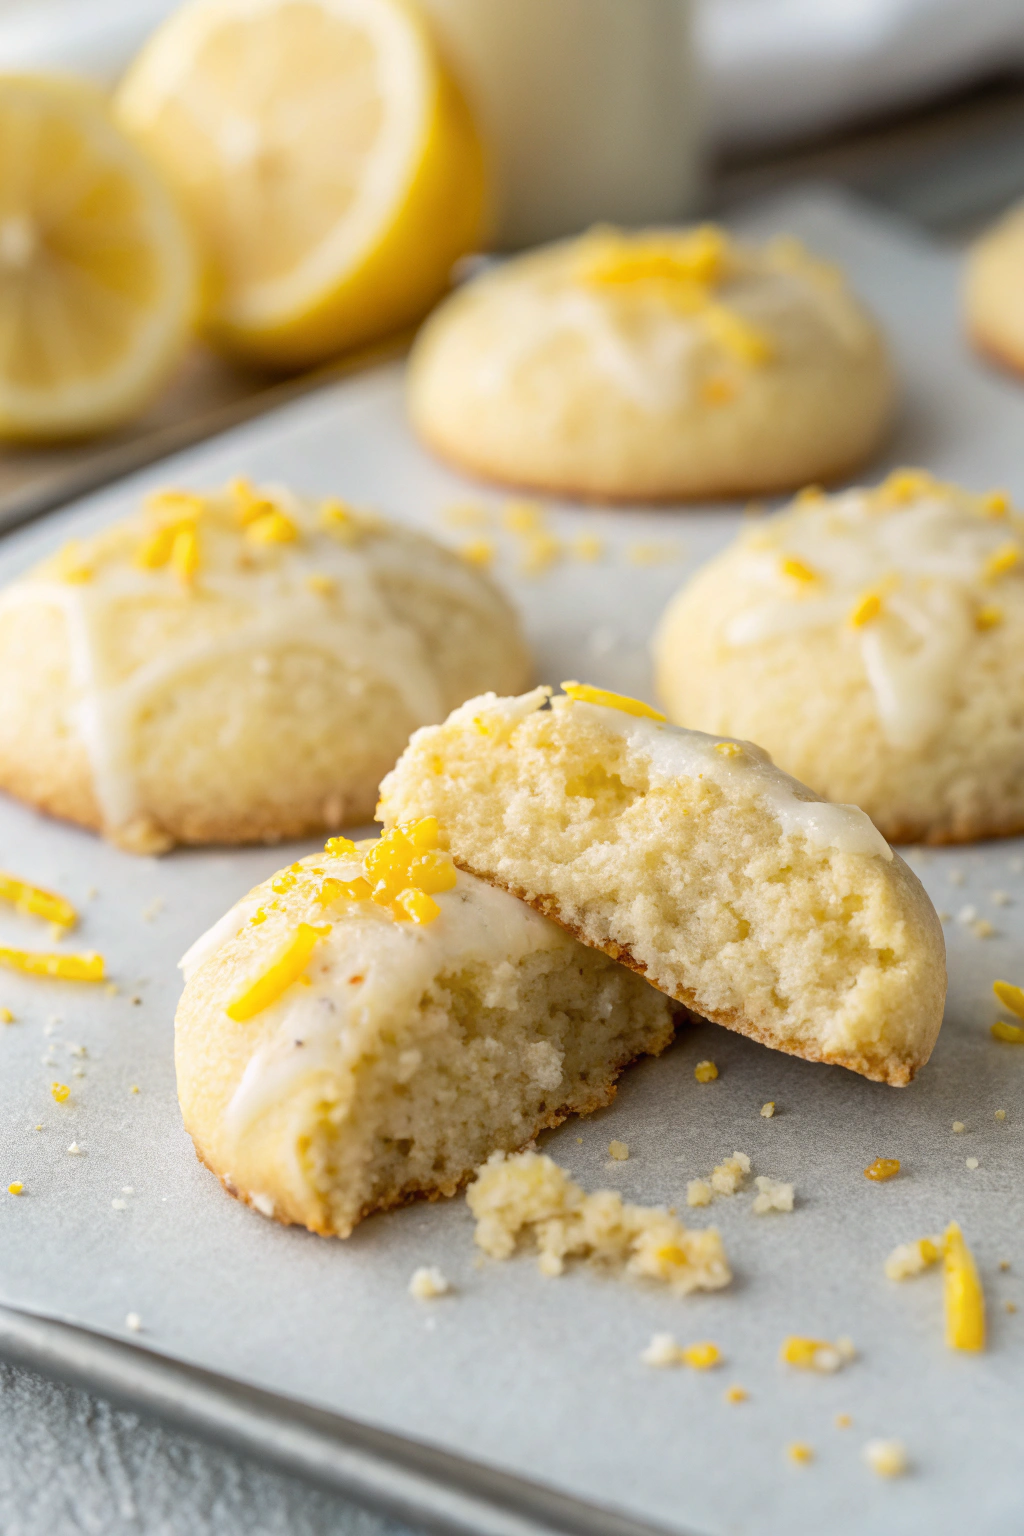
Get ready to experience the simple joy of making these absolutely delightful Lemon Glazed Cookies in your very own kitchen! Just look at them in the picture – soft, pale yellow little bites of sunshine, topped with a pretty white glaze and a cheerful sprinkle of fresh lemon zest. See the one that’s broken open? It shows off that incredibly tender, almost cake-like inside that just melts in your mouth. These cookies strike that perfect, lovely balance between sweet and zesty lemon brightness. They’re wonderful for sharing with people you love, or just for brightening up your own day. Even if you’re totally new to baking, this guide will happily walk you through every step to assemble these sunny treats. You’re totally going to nail this and have a fun time doing it!
Preparing for Baking Success
Embarking on a baking project begins with gathering the right tools and ingredients. Having everything ready beforehand makes the process smooth and enjoyable.
Essential Halal Ingredients
Ensure all ingredients meet dietary requirements. Here’s what is needed for these lemon cookies:
- 🧈 Unsalted Butter: 1 cup (226g), softened (Ensure Halal if concerned about additives/processing)
- 🍚 Granulated Sugar: 1 cup (200g)
- 🥚 Large Egg: 1 (Confirm source is Halal if necessary)
- 🍋 Lemons: 2 large (for zest and juice)
- 💧 Vanilla Extract: 1 teaspoon (Use alcohol-free for Halal preparation)
- 🌾 All-Purpose Flour: 2 ¾ cups (330g) (Generally Halal)
- 🥄 Baking Powder: 1 teaspoon (Check for Halal certification if preferred)
- 🧂 Salt: ½ teaspoon (Generally Halal)
- ✨ Powdered Sugar: 1 cup (120g), for the glaze (Generally Halal)
- 🥛 Milk or Lemon Juice: 2-3 tablespoons, for the glaze (Milk should be Halal)
Kitchen Equipment Required
- 🥣 Large Mixing Bowl
- 🥄 Medium Mixing Bowl
- ⚡️ Electric Mixer (Handheld or Stand) or 💪 Whisk & Wooden Spoon
- 📐 Measuring Cups and Spoons
- 🔪 Fine Zester or Grater
- 🍊 Juicer (optional, for lemon juice)
- 🍪 Baking Sheets (usually 2)
- 📄 Parchment Paper
- ↔️ Rubber Spatula
- 🌬️ Wire Cooling Rack
- 🍴 Small Bowl (for glaze)
- 🥄 Small Whisk or Fork (for glaze)
Step-by-Step Guide to Lemon Goodness
Follow these instructions carefully to assemble cookies that mirror the soft texture and bright look seen in the photograph.
1. Initial Preparations
Set the oven temperature to 350°F (175°C). Line baking sheets with parchment paper. This special paper prevents the cookies from sticking and makes cleanup much easier. Next, prepare the lemons. Zesting means carefully grating only the bright yellow outer layer of the peel using a fine zester or the small holes on a box grater. Avoid the white part underneath, called the pith, as it tastes bitter. Zest both lemons and set the zest aside – some is for the dough, and some is for the garnish seen sprinkled on the finished cookies. After zesting, cut the lemons in half and squeeze out the juice. Measure the juice needed for the glaze later and set it aside.
2. Combining the Dry Components
In the medium mixing bowl, combine the all-purpose flour, baking powder, and salt. Use a whisk to stir these ingredients together thoroughly. Whisking dry ingredients helps distribute everything evenly, which is important for the texture of the cookies, and it also breaks up any small lumps in the flour.
3. Mixing the Wet Ingredients
In the large mixing bowl, place the softened unsalted butter and granulated sugar. Using an electric mixer on medium speed (or a wooden spoon and some effort), cream the butter and sugar together. “Creaming” involves beating these two ingredients until the mixture becomes pale, light in volume, and looks fluffy. This step incorporates air, contributing to the cookies’ soft texture. This usually takes about 2-3 minutes with an electric mixer. Add the large egg and the alcohol-free vanilla extract to the creamed mixture. Add about 1 tablespoon of the reserved lemon zest. Beat again until everything is well combined and smooth. Remember to scrape down the sides of the bowl occasionally with a rubber spatula to ensure all ingredients are mixed in evenly.
4. Forming the Cookie Dough
Now, it’s time to bring the wet and dry components together. Pour about one-third of the flour mixture into the large bowl containing the butter mixture. Mix on low speed (or stir gently) until the flour is just incorporated. “Just incorporated” means mixing only until you no longer see streaks of dry flour. Add another third of the flour mixture, mix again until just incorporated, and then add the final third, mixing until combined. Be careful not to overmix the dough at this stage. Overmixing can develop the gluten in the flour too much, resulting in tough cookies instead of the tender ones pictured. The final dough should be soft.
5. Shaping the Cookies
Using a spoon or a small cookie scoop, drop rounded portions of dough onto the parchment-lined baking sheets. Leave about 2 inches between each dough ball to allow for spreading. The cookies in the image possess a slightly domed top, indicating they were likely dropped as rounded mounds rather than flattened before baking. Aim for dough balls about 1.5 inches in diameter.
6. Baking Process
Place the baking sheets into the preheated oven. Bake for 10-13 minutes. The cookies are ready when the edges are set and the bottoms are just beginning to turn a light golden brown. The tops should remain pale yellow, consistent with the appearance in the photograph. Keep a close eye on them, as oven temperatures can vary.
7. Cooling the Cookies
Once baked, let the cookies rest on the baking sheets for about 5 minutes. This helps them firm up slightly. Then, carefully transfer them using a spatula to a wire cooling rack. Allow the cookies to cool completely before adding the glaze. Glazing warm cookies will cause the glaze to melt and run off.
8. Preparing the Lemon Glaze
While the cookies cool, prepare the simple lemon glaze. In a small bowl, place the powdered sugar. Add 2 tablespoons of lemon juice (or milk for a less tart glaze). Whisk vigorously with a small whisk or fork until the glaze is smooth and has a consistency that can be drizzled. If it’s too thick, add a tiny bit more liquid (lemon juice or milk), half a teaspoon at a time. If it’s too thin, add a little more powdered sugar.
9. Glazing and Garnishing
Ensure the cookies are completely cool. Arrange them on the wire rack with parchment paper underneath to catch drips. Using a spoon or fork, drizzle the glaze over each cookie. The image shows a distinct drizzled pattern rather than a full coating. While the glaze is still wet, immediately sprinkle the remaining fresh lemon zest over the top. This zest garnish adds a pop of color and reinforces the bright lemon flavor. Let the glaze set for about 20-30 minutes before serving or storing.
Enjoy Your Homemade Lemon Treats
These Lemon Glazed Cookies, with their soft interior and bright citrus notes, are a wonderful result of spending time in the kitchen. The process, from zesting the lemon to drizzling the final glaze, offers its own rewards. Presenting these homemade goodies brings a sense of accomplishment. Feel welcome to try this method and perhaps share photos of the lovely lemon cookies produced! They are sure to brighten anyone’s day.