Beige & Cream Dream Bag How-To
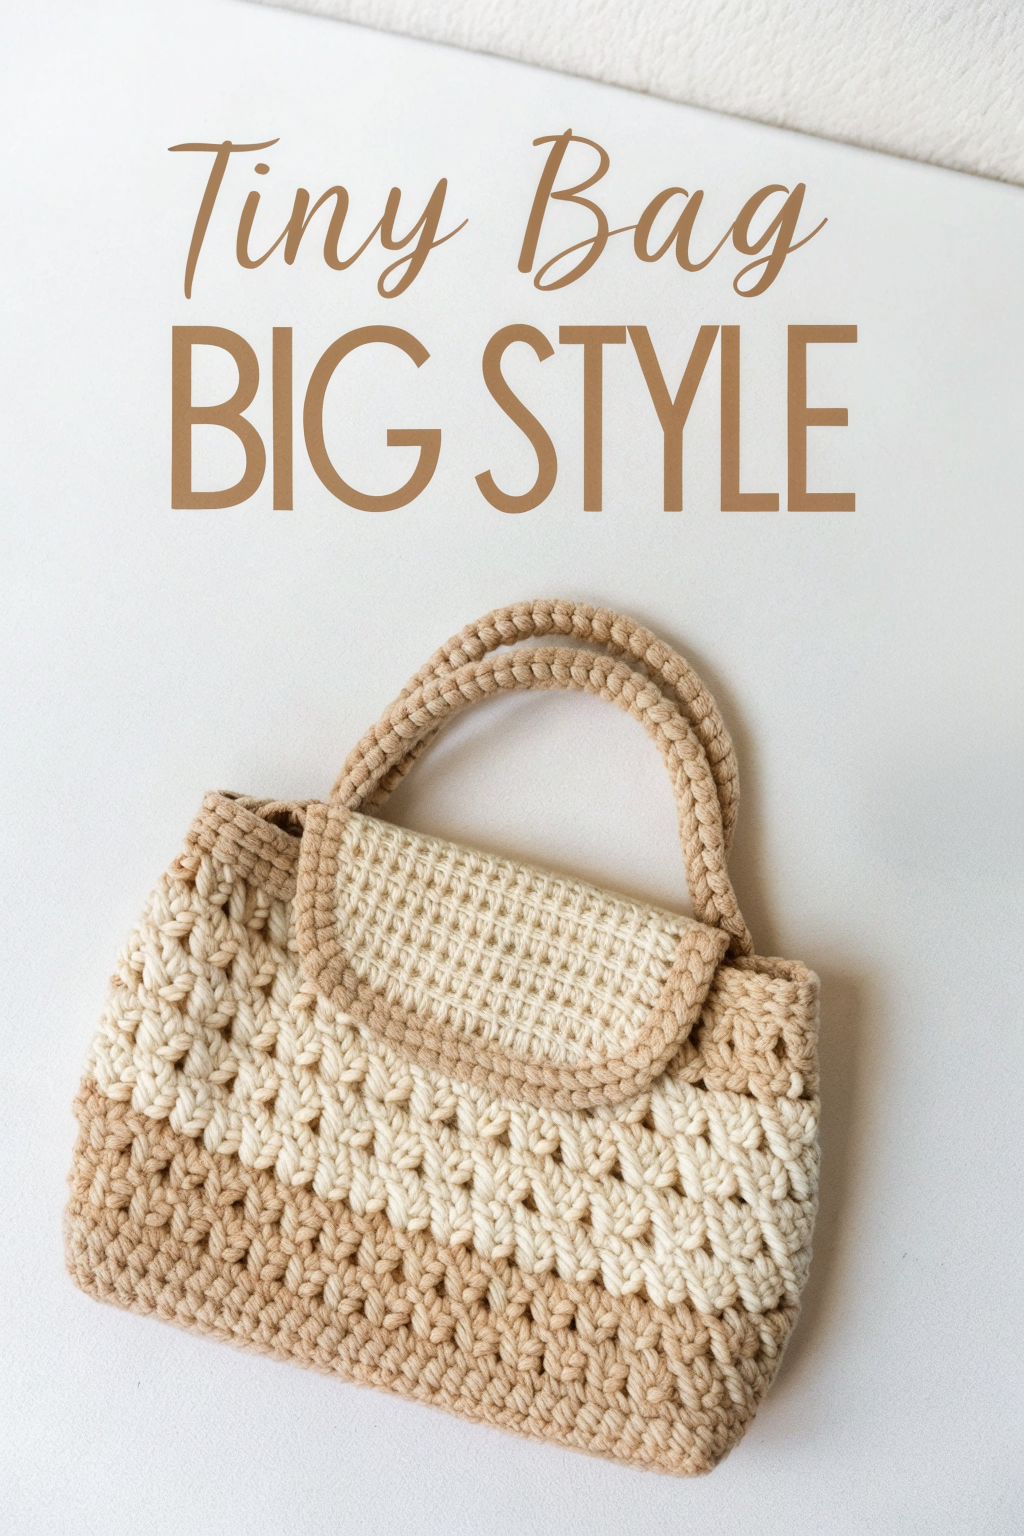
Isn’t there something special about fashioning beautiful, practical items yourself? If you’re nodding along, you’ll adore this project! Take a look at the lovely crocheted mini handbag in the photo – it’s compact, yes, but it absolutely radiates BIG STYLE. It’s the ideal size for your essentials and brings that wonderful handmade warmth to your look. And the best part? Even if crochet is new territory for you, this guide will walk you through making this exact bag, explaining every step clearly. Let’s pick up our hooks and begin!
Getting Started: What You’ll Need
Before we dive in, let’s gather our supplies. For this specific bag, you’ll need a sturdy yarn, like a cotton or cotton blend, to give the bag good structure.
- 🧶 Yarn: Worsted weight cotton or cotton-blend yarn in two colors:
- Color A: Medium Beige (approx. 100 yards)
- Color B: Cream/Off-White (approx. 75 yards)
- 🪝 Crochet Hook: Size H-8 (5.0 mm) – adjust if needed to meet gauge or your tension preference.
- ✂️ Scissors: For trimming yarn ends.
- 🪡 Yarn Needle: For weaving in ends and assembling the bag.
- 📍 Stitch Markers: Helpful for marking stitches or rows. (Optional, but recommended for beginners!)
Understanding the Basics (For Absolute Beginners!)
Don’t worry if these terms are new! We’ll walk through them.
- Chain (ch): This is usually your starting point. Make a slip knot on your hook, yarn over (wrap yarn over the hook), and pull the yarn through the loop on your hook. That’s one chain! Repeat for the required number.
- Single Crochet (sc): Insert your hook into the indicated stitch, yarn over, pull up a loop (you’ll have 2 loops on your hook), yarn over again, and pull through both loops on the hook. This is a short, dense stitch.
- Double Crochet (dc): Yarn over, insert your hook into the indicated stitch, yarn over, pull up a loop (3 loops on hook), yarn over, pull through the first 2 loops (2 loops remaining on hook), yarn over again, and pull through the final 2 loops. This stitch is taller than a single crochet.
- Slip Stitch (sl st): Insert your hook into the indicated stitch, yarn over, and pull the yarn through both the stitch and the loop already on your hook. Used for joining rounds or finishing off.
- Working in Rows: You’ll work back and forth, turning your piece at the end of each row. You’ll usually start each row with a turning chain (e.g., ch 1 for sc, ch 3 for dc) which counts as the first stitch or brings the yarn up to the correct height.
- Changing Colors: Before the final pull-through of the last stitch in the old color, drop the old color, pick up the new color, yarn over with the new color, and pull through the remaining loops on the hook to complete the stitch.
Let’s Build Your Bag!
We’ll construct the bag piece by piece: the base and body panel, the flap, and the handles.
Part 1: The Base and Body Panel
This part forms the main structure of the bag. We start with the solid beige base and work our way up through the textured pattern.
- Foundation Chain: Using Color A (Beige), chain 26. (This determines the width of your bag. You can adjust slightly, but keep it an even number plus 2 for the pattern later).
- Row 1 (Base): Sc in the 2nd chain from the hook and in each chain across. (25 sc). Ch 1, turn.
- Rows 2-8 (Base): Sc in each stitch across. (25 sc). Ch 1, turn. After Row 8, you have completed the solid beige base. Do not fasten off Color A yet if you are comfortable carrying yarn up the side; otherwise, fasten off and rejoin for Row 9.
- Row 9 (Begin Textured Pattern): Switch to Color B (Cream). Ch 3 (counts as first dc), skip the first sc (base of ch 3), work 2 dc into the next sc. Skip the next 2 sc, work 3 dc into the next sc. Repeat from * to * across the row until you have 2 sc remaining. Skip the next sc, work 1 dc into the last sc. (You should have groups of 3 dc separated by skipped stitches). Ch 1, turn. This introduces the V-Cluster pattern. The 3 dc stitches worked into the same stitch form the bottom of the ‘V’.
- Row 10: Using Color B (Cream). Sc in each stitch across. (25 sc). Ch 1, turn. At the end of this row, change to Color A (Beige).
- Row 11: Using Color A (Beige). Ch 3 (counts as first dc). Now, we work into the spaces between the 3-dc groups from Row 9 (aim for the middle of the 2 skipped sc below Row 10). Work 3 dc into the first space between clusters. Work 3 dc into the next space between clusters. Repeat from * to * across. Work 1 dc into the top of the turning chain from Row 9. (You’re placing the beige clusters between the cream clusters below). Ch 1, turn.
- Row 12: Using Color A (Beige). Sc in each stitch across. (25 sc). Ch 1, turn. At the end of this row, change to Color B (Cream).
- Row 13: Using Color B (Cream). Ch 3 (counts as first dc). Work 2 dc into the first space (the space immediately after the turning ch, above the first beige cluster). Work 3 dc into the next space between the beige clusters below. Repeat from * to * across. Work 1 dc into the top of the turning chain from Row 11. Ch 1, turn. (The cream clusters are now aligned above the previous cream clusters).
- Row 14: Using Color B (Cream). Sc in each stitch across. (25 sc). Ch 1, turn. At the end of this row, change to Color A (Beige).
Repeat Rows 11-14 twice more (for a total of 3 sets of alternating color cluster rows). You should end having just finished a Row 14 repeat (a Cream sc row).
- Next Rows (Top Border): Continue with Color A (Beige). Work 3 more rows of sc in each stitch across (25 sc per row), chaining 1 and turning at the end of each row.
Fasten off, leaving a long tail for sewing the side seam later. You should now have a flat panel with a solid beige bottom, alternating textured rows, and a solid beige top border. The front and back of the bag are worked as one piece initially.
Part 2: The Flap
The flap is worked separately in Cream with a Beige border.
- Foundation Chain: Using Color B (Cream), chain 18.
- Row 1: Sc in the 2nd chain from the hook and in each chain across. (17 sc). Ch 1, turn.
- Rows 2-10 (or until desired length): Sc in each stitch across. (17 sc). Ch 1, turn. The flap in the image has a dense, flat texture, achieved by these sc rows.
- Border Round: Do not fasten off Color B. Ch 1, turn. Work 1 sc in each stitch across the last row. When you reach the corner, work 3 sc into the corner stitch. Now, work sc evenly down the side edge of the flap (about 1 sc per row end). Work 3 sc in the next corner (along the foundation chain edge). Work sc across the foundation chain edge (working into the bottom loops of the chain). Work 3 sc in the next corner. Work sc evenly up the remaining side edge. When you reach the first sc of this round, change to Color A (Beige) on the last pull-through of the last sc. Sl st to the first sc of the round to join.
- Final Border Round: Using Color A (Beige), ch 1. Work 1 sc in each sc around the entire flap, working 3 sc into the center sc of each corner. Sl st to the first sc to join.
Fasten off, leaving a long tail for sewing the flap to the bag body.
Part 3: The Handles (Make 2)
The handles are sturdy and rounded. We’ll make them using single crochet worked tightly.
- Foundation Chain: Using Color A (Beige), chain 36 (adjust for desired handle length). Be careful not to twist the chain.
- Row 1: Sc in the 2nd chain from the hook and in each chain across. (35 sc). Ch 1, turn.
- Rows 2-4: Sc in each stitch across. (35 sc). Ch 1, turn.
- Finishing: After Row 4, do not turn. Fold the handle strip in half lengthwise, matching the stitches of Row 4 with the foundation chain edge. Working through both layers, sl st or sc across to join the edges, forming a tube.
Fasten off, leaving long tails on both ends of each handle for sewing.
Part 4: Assembly – Putting It All Together!
Now for the exciting part – seeing your bag take shape!
- Fold the Body Panel: Lay the main body panel flat. Fold it in half widthwise, bringing the foundation chain edge up to meet the last row of the top border, with the textured side facing outwards. The fold line is the bottom center of your bag.
- Sew Side Seams: Using the long tail left on the body panel and your yarn needle, whipstitch or mattress stitch the side edges together neatly, from the bottom fold up to the top edge. Repeat for the other side seam using a new strand of Color A yarn if needed. Weave in the ends securely.
- Attach the Flap: Position the flap on the back side of the bag opening. The straight edge (the one without the border round worked across it initially) should align with the top edge of the bag’s back panel. Using the long tail left on the flap and your yarn needle, sew the flap securely to the inside top edge of the back panel. Ensure it’s centered.
- Attach the Handles: Position one handle on the front side of the bag. Place the ends of the handle tube just inside the top edge, about 1-1.5 inches in from each side seam. Using the long tails left on the handle and your yarn needle, sew the ends firmly to the inside top edge of the bag. Go over the stitches several times for strength. Repeat this process to attach the second handle to the back side of the bag, aligning it directly behind the front handle.
Weave in any remaining ends securely on the inside of the bag.
Admire Your Handiwork!
Stand back and look at the beautiful mini handbag you just fashioned! That distinctive V-Cluster pattern in contrasting colors gives it such visual appeal, and the sturdy construction means it’s ready for use. The process of turning simple yarn into something tangible and stylish is so rewarding, isn’t it?
Feel free to play with different color combinations on your next try! This pattern is a wonderful base for experimenting.
We hope you enjoyed making this tiny bag with big style. We’d absolutely love to see your finished pieces! Share them online and tag us, or tell us about your experience in the comments below. Happy stitching!