Beginner-Friendly Striped Tote Bag Crochet Guide
Ready to dive into the wonderful world of crochet? Let’s fashion a beautiful and practical striped tote bag together! This project is perfect for beginners, and you’ll be amazed at how quickly you can build your own stylish accessory. Imagine strolling around with a handmade bag you assembled yourself – so rewarding! We’ll guide you through each step, making it super easy and fun. Let’s grab our hooks and yarn and get started on this exciting project!
What You’ll Need to Get Started
Before we begin, let’s gather all the materials we need to make our lovely tote bag. Here’s a handy list of everything you’ll need:
- 🧶Bulky yarn in two colors (Color A – Grey, Color B – White) – Approximately 300 yards of Color A and 150 yards of Color B (adjust based on your desired bag size).
- 🪡Crochet hook size 8mm (L/11) – Or size needed to obtain gauge (check your yarn label for recommendations).
- ✂️Scissors – For snipping yarn.
- Yarn needle (tapestry needle) – For weaving in ends.
- 📍Stitch markers (optional but helpful) – To mark the beginning of rounds or specific stitches.
Let’s Fashion Your Tote Bag: Step-by-Step Guide
We’re going to develop this tote bag in rounds, starting from the base and working our way up. Don’t worry if you’re new to crochet; we’ll explain everything as we go. Refer to the image to see how each step comes together to produce the finished tote.
Step 1: Crafting the Base
Round 1: To begin, make a magic ring. If you’re not familiar with the magic ring, there are tons of easy tutorials online! It’s a fantastic way to start crochet in the round without a hole in the center. Once you have your magic ring, work 6 single crochet (sc) stitches into the ring. Pull the tail of the yarn tight to close the ring. A single crochet is a basic stitch where you insert your hook into a stitch, yarn over, pull up a loop, yarn over again, and pull through both loops on your hook. This forms the very center of your bag base.
Round 2: Increase round! We’re going to increase in each stitch to make the base bigger. Work 2 single crochet stitches in each stitch around. This means you’ll end up with 12 stitches in this round. Increasing is just working more than one stitch into a single stitch from the previous round.
Round 3: 1 single crochet, 2 single crochet in the next stitch; repeat from * to * around. This is an increase round pattern. You’ll work one single crochet in the first stitch, then two single crochets in the next stitch, and keep repeating this sequence around the circle. You should have 18 stitches at the end of this round.
Round 4: 1 single crochet in the next 2 stitches, 2 single crochet in the next stitch; repeat from * to * around. See how our circle is growing? This round continues the increase pattern. You’ll single crochet in the next two stitches, then increase in the stitch after that. You’ll finish with 24 stitches.
Round 5: 1 single crochet in the next 3 stitches, 2 single crochet in the next stitch; repeat from * to * around. Keep going with this pattern! Single crochet in the next three stitches, increase in the next. You’ll have 30 stitches.
Round 6: 1 single crochet in the next 4 stitches, 2 single crochet in the next stitch; repeat from * to * around. By now, you’re getting the hang of increasing in rounds! Single crochet in the next four stitches, increase in the next. You should have 36 stitches.
Continue increasing in this manner, adding one more single crochet between each increase in each round, until your base is the desired size. For a tote bag similar to the one in the image, aim for a base that is approximately 8-10 inches in diameter. Refer to the image to see the flat, circular base of the tote.
Step 2: Building the Bag Body (Lower Grey Section)
Round 1 (Body Round): Now we’re going to stop increasing and start working straight up to build the sides of the bag. Work 1 single crochet in each stitch around. From now on, we’ll be working in continuous rounds unless specified. No more joining rounds with slip stitches, just keep crocheting in a spiral. You might find stitch markers helpful to mark the start of each round if you lose track.
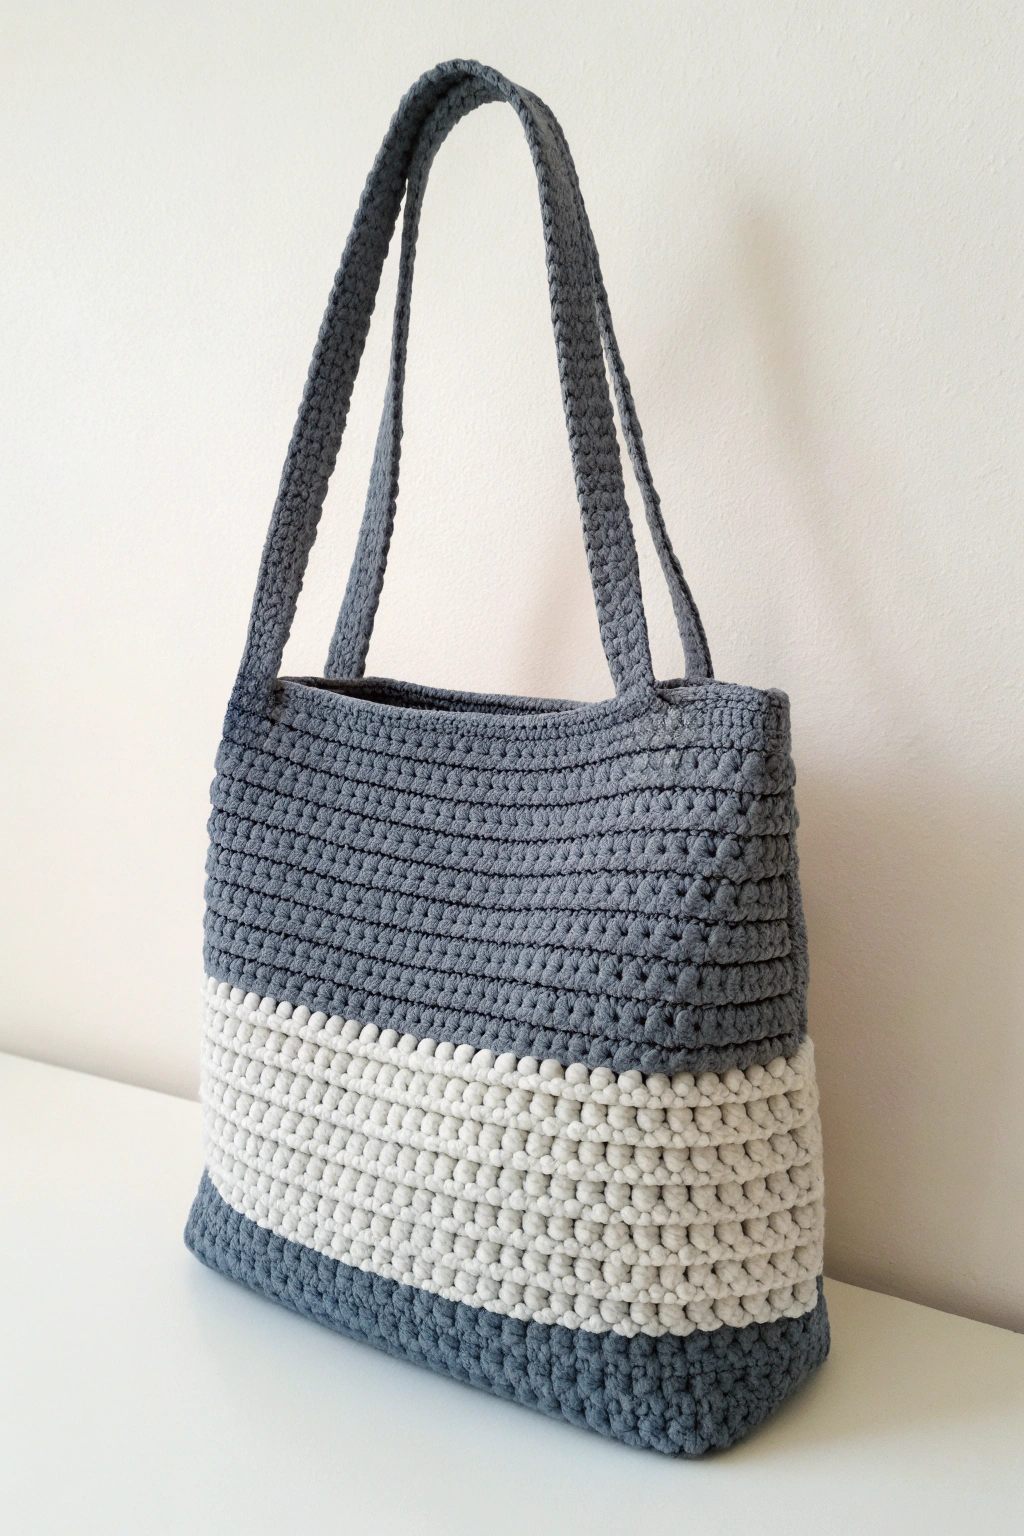
Rounds 2 – 35 (approximately): Continue working single crochet in each stitch around using Color A (Grey). You’re essentially constructing a tube shape now. Notice in the image how the lower grey section is taller. You can adjust the number of rounds to make this lower section taller or shorter to your preference. Keep crocheting until this lower grey section reaches your desired height.
Tip: Keep your tension consistent throughout these rounds for a neat, even fabric. If your stitches are too tight, your bag might become too stiff. If they’re too loose, it might be too floppy.
Step 3: Adding the White Stripe
Round 36: Change to Color B (White). To change color, work the last stitch of the previous round with Color A until the last yarn over. Yarn over with Color B and pull through to complete the stitch. Now you are working with Color B. Work 1 single crochet in each stitch around with Color B.
Rounds 37 – 41 (approximately): Continue working single crochet in each stitch around with Color B (White). Refer to the image; you can see the white stripe creates a band slightly above the bottom of the bag. Adjust the number of white rounds to match the stripe width you prefer.
Step 4: Finishing the Bag Body (Upper Grey Section)
Round 42: Change back to Color A (Grey) using the same color change technique as before. Work 1 single crochet in each stitch around with Color A.
Rounds 43 – 55 (approximately): Continue working single crochet in each stitch around with Color A to finish the top grey section of the bag body. Observe in the image that the upper grey section above the white stripe is shorter than the grey section below. Adjust the number of rounds to reach your desired bag height, keeping in mind the proportions seen in the image.
Step 5: Forming the Handles
Round 56: We’re going to fashion the handles now. First, we need to decide where we want the handles to be placed. In the image, they look to be positioned on opposite sides of the bag. Let’s say we want each handle to be about 6 stitches wide and the gap between them at the top of the bag to be about 10 stitches.
- Work single crochet in the next 10 stitches.
- Chain 60 (or desired handle length). This chain will make your first handle.
- Skip the next 16 stitches (this will form the gap for the handle and the start of the next handle).
- Work single crochet in the next 10 stitches.
- Chain 60 again for the second handle.
- Skip the next 16 stitches.
- Single crochet in the remaining stitches to complete the round.
Round 57: Now we’re going to work around the handles and the top of the bag.
- Work single crochet in each of the single crochet stitches from the previous round.
- When you reach the first chain-60 handle, work single crochet into each chain stitch (60 sc). This will develop the handle.
- Continue single crocheting around the top edge of the bag.
- When you reach the second chain-60 handle, work single crochet into each chain stitch (60 sc).
- Single crochet in the remaining stitches to complete the round.
Rounds 58 – 60 (approximately): Work 2-3 more rounds of single crochet around the entire top edge and handles to assemble sturdy and comfortable handles. Refer to the image to see the handles. You can add more rounds if you want thicker handles, or keep it to fewer rounds for thinner handles as shown in the image.
Step 6: Finishing Touches
Fasten off your yarn by cutting the yarn, pulling the loop through the last stitch, and tightening it. Weave in all your yarn ends using a yarn needle to neatly hide them inside the bag. This will give your tote bag a professional and polished look.
Troubleshooting Tip: If your handles seem too long or short, you can adjust the number of chains in Round 56. Experiment to find the handle length that’s just right for you!
You Did It! Admire Your Handmade Tote Bag!
Congratulations! You’ve just fashioned your very own striped tote bag! Isn’t it amazing what you can make with just yarn and a hook? This bag is not only stylish but also super practical for carrying groceries, books, or anything else you need. Every time you use it, you’ll be reminded of the joy of building something beautiful with your own hands.