Beautiful Bobble Stitch Tote Bag From Start to Finish
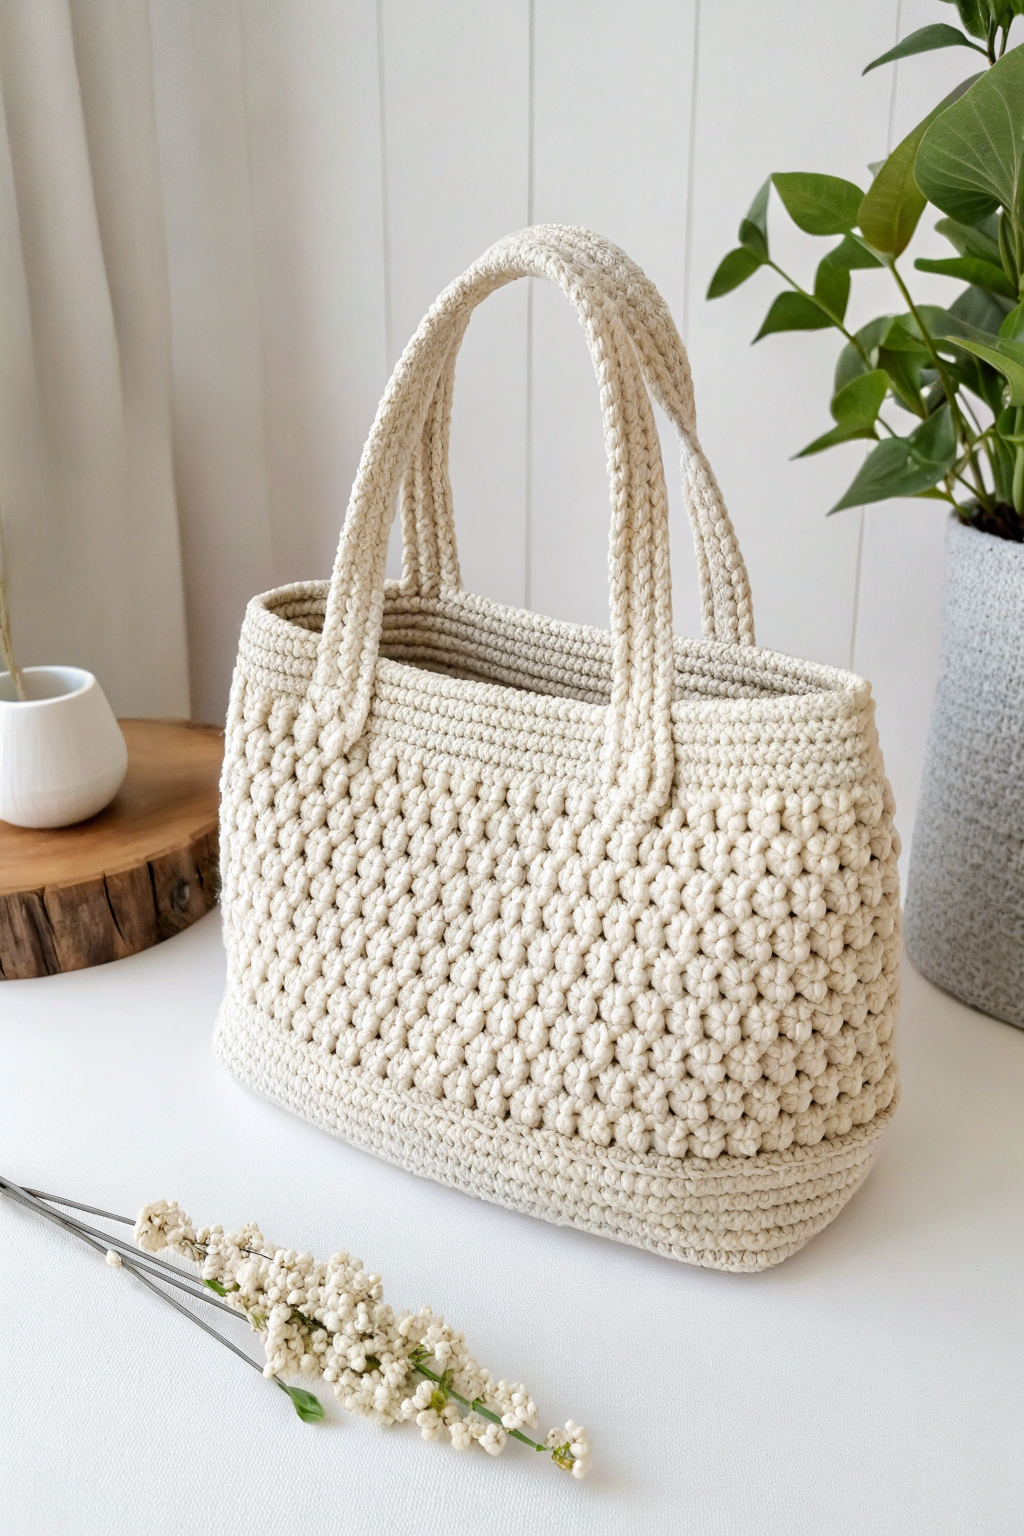
Today, we’re going to make a beautiful crocheted tote bag, just like the one you see in the picture! This bag is not only super stylish but also wonderfully practical for everyday use. If you’ve been wanting to try crocheting, or if you’re looking for a satisfying project to craft with your hands, you’ve come to the right place! Don’t worry if you’re completely new to this – we’ll go through every step together, nice and slow. Get ready to experience the joy of fashioning something gorgeous with your own two hands!
Gather Your Supplies to Start Crafting!
Before we begin, let’s gather all the things you’ll need. Having everything ready will make the whole process much smoother and more enjoyable. For this lovely tote bag, you will need:
- 🧶 Yarn: A bulky or super bulky weight yarn in your favorite color! The bag in the image is made with a lovely cream color. About 300-400 yards should be plenty, but it’s always good to have a little extra, just in case. Cotton or a cotton blend yarn works wonderfully for bags as it’s sturdy and holds its shape well.
- 🪡 Crochet Hook: Choose a crochet hook that matches your yarn weight. For bulky or super bulky yarn, an 8mm or 9mm hook (US size L/11 or M/13) is usually a good starting point. Check your yarn label for the recommended hook size – this is a great guide!
- ✂️ Scissors: For snipping yarn ends.
- 📍 Stitch Markers (optional but helpful): These little tools can be lifesavers for keeping track of your rounds, especially when you’re just starting out. They look like small plastic clips or rings.
- tapestry needle (for weaving in ends)
Let’s Learn the Basics: Simple Stitches for a Stunning Bag
If you’re brand new to crochet, don’t fret! We’ll start with the absolute basics. Think of crocheting like building with yarn and a hook. We use simple movements to form loops and knots, which become stitches, and stitches joined together develop fabric. For this bag, we’ll mainly use two very fundamental stitches: the chain stitch and the single crochet.
Making a Slip Knot: The Very First Step
To begin any crochet project, you need to assemble a slip knot on your hook. This is like the starting point for everything else. Hold the end of your yarn and fashion a loop. Imagine you are making the letter ‘P’. Then, reach through the loop with your hook, catch the yarn coming from the ball (this is called the ‘yarn over’), and pull it back through the loop on your hook. Pull gently on both ends of the yarn to tighten the knot around the hook. Congratulations, you’ve just produced a slip knot!
Chain Stitch (ch): The Foundation Row
The chain stitch is the most basic stitch in crochet, and it’s used to construct the foundation of many projects, like our bag! To make a chain stitch, hold your hook with the slip knot, yarn over (wrap the yarn around your hook from back to front), and pull the yarn through the loop on your hook. That’s one chain stitch! Repeat this movement – yarn over, pull through – to fashion a chain of any length. It’s like making a simple braid with yarn using your hook. Practice making a chain of about 20 stitches to get the hang of it. Refer to the image to see the overall texture and how the stitches look.
Single Crochet (sc): Building a Solid Fabric
The single crochet stitch is a bit denser than the chain stitch and is perfect for building solid fabric, like the main part of our bag. For a single crochet, first, you need to have a row of chain stitches already formed. Let’s say you have your chain of 20 stitches. Insert your hook into the second chain stitch from your hook (skip the first chain stitch closest to the hook). Yarn over, and pull the yarn through that chain stitch. You’ll now have two loops on your hook. Yarn over again, and pull the yarn through both loops on your hook. That’s one single crochet stitch! You’ve just produced a small, tight stitch. Continue single crocheting into each chain stitch across your row. At the end of the row, you’ll have a row of single crochet stitches.
Forming the Base of Your Tote Bag
Now that you know the basics, let’s start making the base of our tote bag! We’ll be working in rounds, which means we’ll crochet in a spiral to develop a circular or oval shape. The base of the bag in the image is oval-shaped.
Round 1: Fashion a chain of 12 stitches. This will be the starting length of our oval base.
Round 2: In the second chain from the hook, make 1 single crochet stitch. Then, single crochet in each of the next 9 chain stitches. In the very last chain stitch, assemble 3 single crochet stitches – this will start to round out the end. Now, working on the other side of your starting chain (you’ll be crocheting around the chain now), single crochet in the next 9 chain stitches. In the last chain stitch (which is also where you started the round), produce 2 single crochet stitches. Join with a slip stitch to the first single crochet of this round. You’ve just constructed your first oval round! (You can use a stitch marker here to mark the beginning of each round, if you find it helpful.)
Round 3: Chain 1 (this doesn’t count as a stitch, it’s just to bring the yarn up to the next round). Single crochet in each stitch around, but when you reach the three single crochet stitches you made together in the previous round (at one end of the oval), craft 2 single crochet stitches in each of those three stitches. This increases the size of the oval. Do the same when you reach the group of two single crochet stitches at the other end of the oval – make 2 single crochet stitches in each of those two stitches. Join with a slip stitch to the first single crochet of this round.
Round 4: Chain 1. Single crochet in each stitch around. In this round, we’ll increase again, but slightly differently to keep the oval shape growing nicely. When you reach the areas where you increased in the previous round, develop an increase (2 single crochet stitches in one stitch) in every other stitch of those increased sections. For example, if you increased in 6 stitches in the previous round at one end, you might increase in the 1st, 3rd, and 5th of those stitches in this round. This will distribute the increases and keep the oval shape smooth. Join with a slip stitch.
Rounds 5-8 (or until your base is the desired size): Continue to build the base by repeating Round 4, increasing in every other stitch of the increase sections from the previous round, or simply single crocheting around without increases if you want to slow down the growth of the base. Refer to the image to get an idea of the size of the base relative to the bag. You want a nice, sturdy oval base for your tote.
Crafting the Textured Body of the Bag
Now for the fun part – fashioning the main body of the bag with that lovely textured stitch you see in the image! The stitch used looks like a type of bobble or puff stitch, which gives it that wonderful bumpy texture. We’ll use a simple variation to produce a similar effect.
Round 1: Chain 1. Single crochet in each stitch around the base. Join with a slip stitch. This round sets up the base for our textured stitch.
Round 2: Chain 2 (this counts as your first double crochet). Now, we’ll assemble our textured stitch. Skip the next stitch. In the stitch after that, develop a group of stitches like this: (yarn over, insert hook, pull up a loop) three times in the same stitch (you will have 7 loops on your hook). Yarn over and pull through all 7 loops. Chain 1 to close the stitch. This is our textured stitch cluster! Skip the next stitch again. Repeat this textured stitch cluster in the stitch after that. Continue this pattern – textured stitch cluster, skip a stitch – all the way around. When you reach the end, you might need to adjust slightly to make sure you end with a textured stitch cluster and a skipped stitch before joining. Join with a slip stitch to the top of the chain-2 at the beginning of the round.
Round 3: Chain 1. Single crochet in each stitch around. Make sure to single crochet into the top of each textured stitch cluster and into each skipped stitch from the previous round. This round builds a row of single crochet stitches on top of the textured row. Join with a slip stitch.
Rounds 4 – 30 (or until your bag is the desired height): Repeat Rounds 2 and 3. Round 2 will be a round of textured stitch clusters, and Round 3 will be a round of single crochet. Alternating these rounds will form the textured pattern of the bag body. Keep crocheting these rounds until your bag is as tall as you’d like it to be. Refer to the image to see the height of the bag and the number of textured rows.
Fashioning Sturdy Handles for Easy Carrying
Now we need to craft some strong handles so you can carry your beautiful bag! The handles in the image are thick and sturdy, made with a simple stitch.
Round 1 (Handle Round): Chain 1. Single crochet around for about half of the bag opening. Then, chain 20 (or desired handle length – experiment to see what looks and feels right for you). Skip the next section of stitches on the bag opening (this skipped section will be the space for the handle). Single crochet in the remaining stitches around the bag opening until you are about halfway across the opening again. Chain 20 again for the second handle. Skip the next section of stitches. Single crochet in the remaining stitches to complete the round. Join with a slip stitch.
Round 2 (Handle Reinforcement): Chain 1. Single crochet in each single crochet stitch from the previous round, and then single crochet in each chain stitch of the handle chain (make sure to work around the chain to develop a thick handle). Continue single crocheting around the entire opening, including both handles. Join with a slip stitch.
Rounds 3-4 (Handle Thickness): Repeat Round 2. Crochet a few more rounds of single crochet around the bag opening and handles to build up the thickness and strength of the handles. Refer to the image to see how thick the handles look. You can adjust the number of rounds to get the thickness you want.
Final Touches to Complete Your Bag
We’re almost there! Just a few finishing touches to assemble our gorgeous tote.
Fasten Off: After your last round, cut the yarn, leaving a tail of about 6 inches. Yarn over and pull the yarn tail completely through the last loop on your hook. Pull tightly to secure the end.
Weave in Ends: Use your tapestry needle to weave in all loose yarn ends neatly into the back of your work. This makes your bag look professional and prevents ends from unraveling. Hide the yarn tails by threading them through the stitches on the inside of the bag, going back and forth a few times, then snip off the excess yarn.
Tips for Success and Happy Crocheting!
- Keep your tension consistent: Try to make your stitches the same tightness throughout the project for a neat and even fabric. If your tension is too tight, your bag will be stiff; if it’s too loose, it might be floppy.
- Count your stitches, especially in the base rounds: This helps ensure your oval base grows evenly and doesn’t become too pointy or too wide.
- Don’t be afraid to unravel! If you form a mistake, or if something doesn’t look right, it’s okay to gently pull out your stitches and try again. Every crocheter does this, especially when learning something new!
- Take breaks: Crocheting should be fun and relaxing! If your hands get tired, or you feel frustrated, put your project down for a while and come back to it later.
- Refer to the image often: Look closely at the image of the bag to guide you on size, shape, and stitch texture. It’s a great visual aid!
Share Your Handmade Tote Bag!
Congratulations! You’ve just fashioned your very own chic crocheted tote bag! Isn’t it satisfying to produce something beautiful and useful with your own hands? We hope you absolutely love your new bag and enjoy using it every day.