Whip Up a Sweet Lavender Sachet
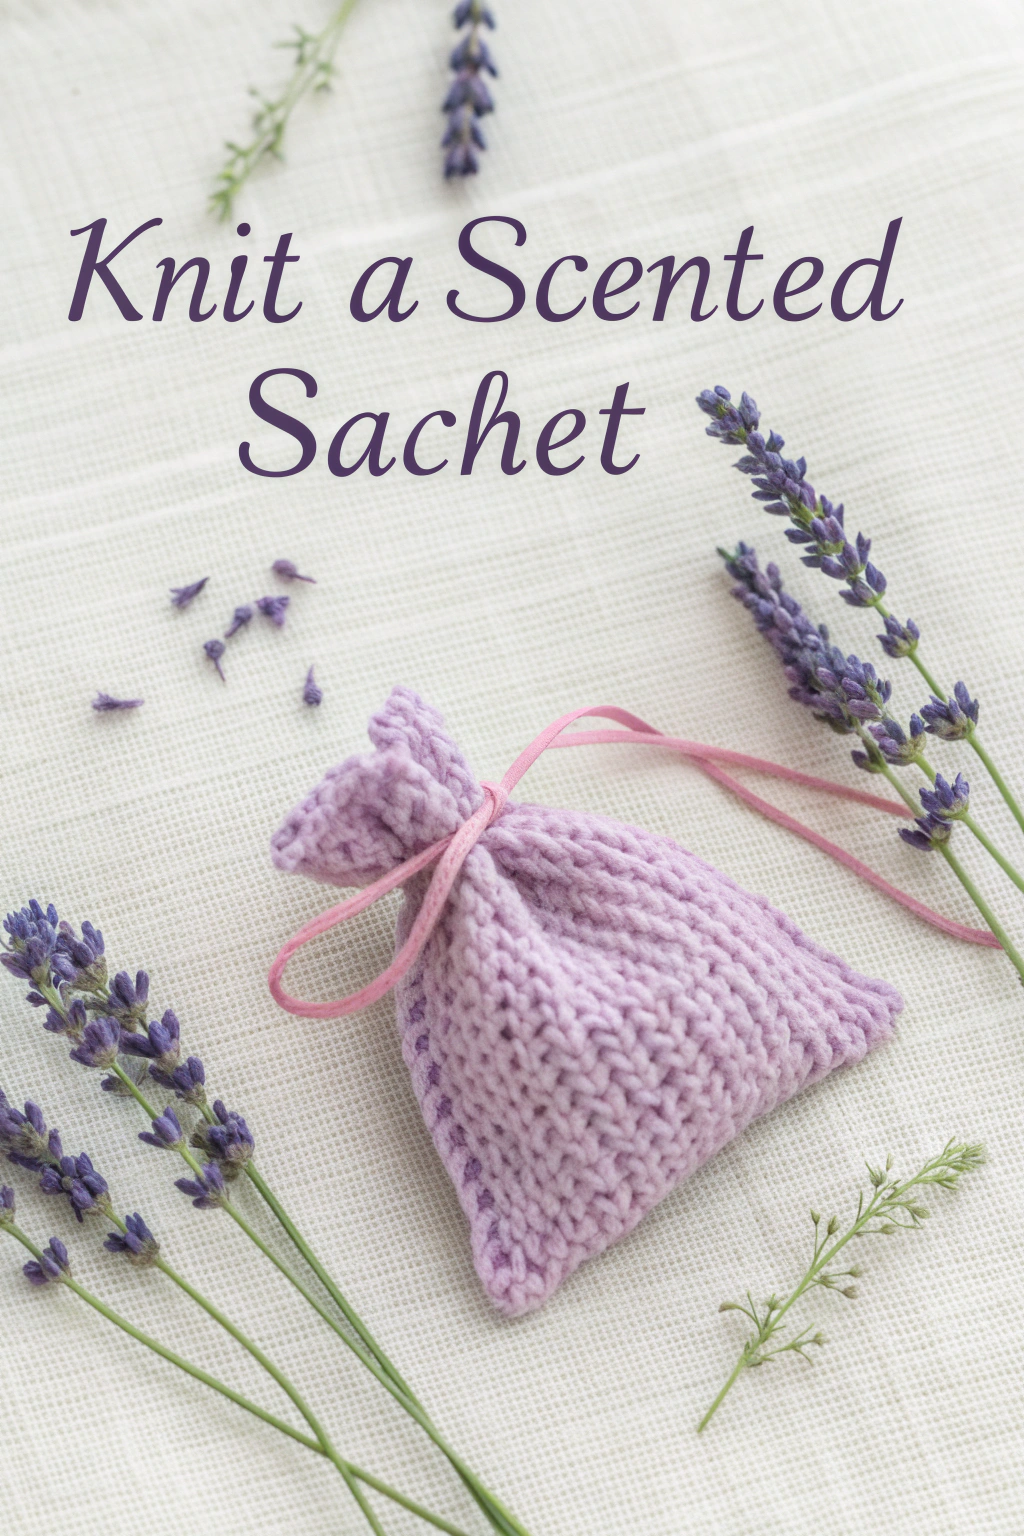
Feast your eyes on this incredibly sweet Knitted Scented Sachet in the picture – isn’t it darling? It’s a simple yet beautiful pouch, perfect for holding your favourite scents, and the best part is, you can fashion it with your own hands! This project is absolutely ideal for beginners wanting a rewarding first go with needles. Imagine the satisfaction of tucking this into your dresser, gifting it with love, or just having that calming lavender scent nearby. Let’s gather our needles, and we’ll guide you through putting this little treasure together.
Gathering Your Supplies
Before we begin, let’s gather everything you’ll need. Having it all ready makes the process smooth and enjoyable!
- 🧶 Yarn: One ball of DK (Double Knitting) or worsted weight yarn in a soft lavender color, just like the sachet shown. Cotton or a soft acrylic blend works beautifully.
- 🥢 Knitting Needles: A pair of straight knitting needles appropriate for your yarn weight (check the yarn label, but size US 6 / 4.0mm or US 7 / 4.5mm is often a good starting point for DK/worsted).
- 🎀 Ribbon or Cord: About 15-18 inches (38-46 cm) of thin pink ribbon or cord for the drawstring tie.
- ✂️ Scissors: For snipping yarn.
- 🧵 Yarn Needle (Tapestry Needle): A blunt needle with a large eye for weaving in ends and seaming.
- 🌿 Filling: Dried lavender buds (or your favorite potpourri).
Let’s Begin Knitting!
We’re going to fashion a simple rectangle first, which we’ll then fold and seam. This sachet is made using the Garter Stitch technique, which is fantastic for beginners because it only uses one type of stitch!
Step 1: Casting On Your Stitches
This is how you get the first loops of yarn onto your needle to start knitting.
- Make a slip knot: Loop the yarn around your fingers, twist it, and pull a loop through. Place this loop onto one knitting needle and gently tighten it. This counts as your first stitch.
- Cast On 20 stitches. A simple way for beginners is the “thumb method” or “long-tail cast-on” (look up a quick video if you’re unsure!). Don’t make them too tight or too loose – aim for even loops that can slide comfortably on the needle. You should have 20 loops (stitches) on your right-hand needle when finished.
Step 2: Knitting the Main Body (Garter Stitch)
Now for the fun part – building the fabric! The beautiful texture you see on the lavender sachet is pure Garter Stitch.
- What is Garter Stitch? It simply means you Knit every single stitch, in every single row. No complicated changes!
- How to do the Knit Stitch:
- Hold the needle with the 20 cast-on stitches in your left hand. Hold the empty needle in your right hand.
- Insert the tip of the right needle into the front of the first stitch on the left needle, going from left to right.
- Wrap the working yarn (coming from the ball) counter-clockwise around the tip of the right needle.
- Use the tip of the right needle to pull that loop of yarn through the stitch on the left needle.
- Slide the original stitch off the left needle. You’ve just completed one Knit Stitch! The new stitch is now on your right needle.
- Repeat this Knit Stitch for all 20 stitches on your left needle. Once you’ve worked all the stitches, you’ve finished your first row! All 20 stitches will now be on your right needle.
- Swap the needles: Move the needle with the stitches back into your left hand, and the empty needle into your right.
- Continue knitting every stitch of every row. Just keep repeating the process: knit all 20 stitches, swap needles, knit all 20 stitches back. You’ll see horizontal ridges forming – that’s the Garter Stitch pattern!
- Keep knitting rows until your rectangle measures approximately 8 inches (20 cm) long. You can measure from the cast-on edge. This length will allow for folding it in half to form the pouch shape seen in the image.
Step 3: Binding Off
Once your rectangle is the right length, it’s time to secure the stitches so they don’t unravel. This is called Binding Off.
- Knit the first two stitches of the row as normal. You now have two stitches on your right needle.
- Insert the tip of your left needle into the first stitch you knitted (the one furthest to the right on the right needle).
- Lift this first stitch over the second stitch and completely off the tip of the right needle. You’ve bound off one stitch! You have one stitch remaining on the right needle.
- Knit the next stitch from the left needle. You now have two stitches on the right needle again.
- Repeat steps 2 and 3 (lift the first stitch over the second and off the needle).
- Continue this process – knit one stitch, lift the previous stitch over – until only one stitch remains on your right needle.
- Cut the yarn, leaving about a 6-inch tail. Pull this tail through the final loop on your needle and tighten gently to secure it. Well done! You have a finished knitted rectangle.
Step 4: Assembling the Sachet
Now let’s turn that rectangle into the pretty pouch from the picture.
- Weave in the starting tail: Thread the yarn tail from your cast-on edge onto your yarn needle. Weave it neatly into the stitches on the wrong side (choose whichever side you prefer to be the inside) for about an inch or two, then snip the excess yarn.
- Fold: Lay your rectangle flat. Fold it in half widthwise, so the cast-on edge meets the bound-off edge. The ridges of the garter stitch should run horizontally across the folded piece.
- Seaming the Sides: We need to join the side edges to form the bag. The image shows neat side seams. A Mattress Stitch gives a nearly invisible join, but a simple Whip Stitch is also fine for beginners. Let’s describe Whip Stitch:
- Cut a length of yarn (about 12-15 inches). Thread it onto your yarn needle.
- Starting at the bottom folded corner, push your needle through both layers of fabric near the edge. Leave a small tail to weave in later.
- Bring the needle over the edge and push it through both layers again, very close to the first stitch. Continue making small, evenly spaced stitches over the raw edges, working your way up the side. Don’t pull too tight, or the seam will pucker.
- When you reach the top corner, make a small knot to secure the yarn, then weave the end into the inside of the sachet before snipping.
- Repeat this process to seam the other open side of the sachet.
- Weave in any remaining yarn tails neatly on the inside. Turn the sachet right-side out. It should now resemble the pouch in the image, open at the top.
Step 5: Adding the Drawstring
The pink cord is threaded through the stitches near the top to allow the sachet to be pulled closed.
- Thread your chosen ribbon or cord onto the yarn needle.
- About 1 inch (2.5 cm) down from the top edge, begin weaving the needle in and out through the knitted fabric. Go under two stitches, then over two stitches, all the way around the top opening of the sachet. Try to keep it level.
- Bring both ends of the ribbon out at the front center of the sachet. Remove the yarn needle.
- Adjust the ribbon so the ends are even.
Step 6: Filling and Finishing
The final touch!
- Carefully fill your knitted pouch with dried lavender buds or your chosen potpourri. Don’t overfill it – leave enough room for the top to gather nicely.
- Pull the ends of the ribbon or cord gently to cinch the top of the sachet closed.
- Tie the ribbon ends into a neat bow, just like the one securing the sachet in the photograph. Trim the ribbon ends if necessary.
Your Fragrant Handiwork!
Take a moment to admire the sweet little lavender sachet you’ve just brought together! Feel the texture of the garter stitch, enjoy the soft color, and breathe in that lovely scent. You’ve patiently worked through each step, turning simple yarn into something useful and beautiful. What a wonderful feeling!
Why not make a few more? They’re perfect little gifts or additions to your own home. We’d love to see the sachets you fashion – feel free to share pictures of your finished pieces! Happy knitting!